Table of Contents
Advertisement
Quick Links
Advertisement
Table of Contents

Summary of Contents for LumiRing AUTOMATION
- Page 1 AUTOMATION Industrial MQTT Gateway Manual...
- Page 2 2022 Automation Manual_En_V3.0...
-
Page 3: Table Of Contents
Relay Wet mode INSTALLATION RECOMMENDATIONS Wiegand device connection Heave loads switching Inductive loads connection EXT1 and EXT2 example of connection LUMIRING RFID reader Specification MQTT CONNECTION SETTING DHCP Settings (Zero touch provision) Web-based interface Network settings Local Wi-Fi Access point settings... -
Page 4: Purpose And General Information
PURPOSE AND GENERAL INFORMATION The MQTT Gateway controller provides a simple way to collect information from various sensors and automation systems while, at the same time, giving control to actuators and other devices. The universal Wiegand port allows connectivity of cost-effective solutions that work with RFID tags, QR, and barcodes. -
Page 5: Usage Diagram
Cloud or on-premise MQTT servers supported. You can run such a server on any Linux machine, even Raspberry PI. For device management, customers can use any SCADA or automation system which can work with MQTT server data. Usage diagram Specification... - Page 6 -Wiegand 100 m /328 ft -Dallas 1-WIRE 100 m /328 ft -Ethernet 100 m /328 ft Operational (L)110x(W)75х(H)35 mm Dimensions (L)4.3x(W)2.9x(H)1.37 inch -30 ~ + 70 С Working temperature range -22 ~ 158 F Housing material ABS plastic Automation Manual_En_V3.0...
-
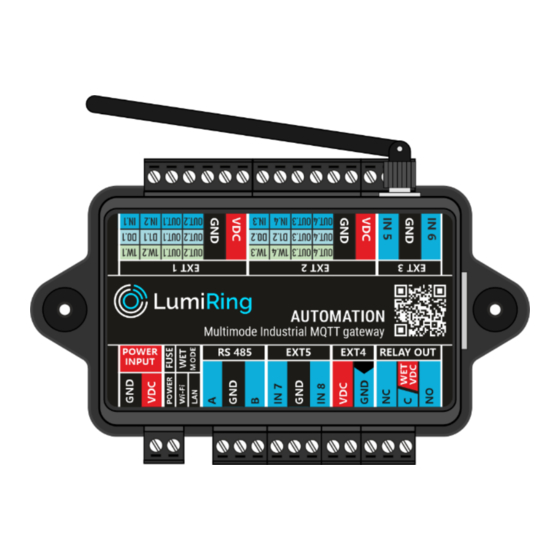
Page 7: Connection And Sockets Description
40 such sensors. The delay period for querying each sensor must be taken into consideration - it will take up to 43 seconds to poll all sensors. In this mode, device still has 2 Outputs that can be used to control any actuators. Indication description BLINK Automation Manual_En_V3.0... -
Page 8: Relay Work Mode
DRY MODE and use NO or NC and C, and wire to the external supply. That allows the ability to control the actuators (lock, etc.), which use different power supplies. ● If your actuator needs to shortcut, two contacts to be activated Example: Different power source for actuators Example: 2 contact shortcuts Automation Manual_En_V3.0... -
Page 9: Relay Wet Mode
- we recommend using a UTP 5E cable. If you need to supply power from the Device to any third-party reader, you must be sure the third-party reader supports 24VDC. You must use a separate power supply if the third-party reader does not support 24VDC. Automation Manual_En_V3.0... -
Page 10: Heave Loads Switching
Suitable diodes 1N5400, 1N5408, 1N5821, HER301, and similar. Instead of diodes, with varistors no need to check polarity. Varistors VCR-07D101K S07K60, TVR07101, GNR-07D101K, or similar are suitable. Automation Manual_En_V3.0... -
Page 11: Ext1 And Ext2 Example Of Connection
2022 EXT1 and EXT2 example of connection LUMIRING RFID READER The Smart reader is designed to work with any controller of the access control system. The reader supports work with RFID identifiers at 125Khz frequencies. The initial setup of the reader must be made via a Web-based interface, which allows for changing settings and updating device firmware. -
Page 12: Mqtt Connection Setting
In the case of working through a DHCP server, the connection parameters must first be set in the additional fields of the DHCP server. The connection parameters are specified as a JSON string. The DHCP server option code must be 226! Figure 1. Example of an additional parameter on a DHCP server Automation Manual_En_V3.0... -
Page 13: Web-Based Interface
An alternative option for specifying connection parameters is the Device's Web interface. The default IP address of the Device is 192.168.1.120. For first-time entry, leave the “Login” and “Password” fields empty – just press «Submit» We strongly recommend you set your own Login and Password for web-interface access. Automation Manual_En_V3.0... -
Page 14: Network Settings
>Network (2)->Cloud (3)-Server (4) tab. To manually specify the parameters for connecting to MQTT, switch the "Cloud requirements source" (5) to the "Manual" position. In «DHCP mode,» the Device tries to receive all information from your DHCP server through the Zero touch provision Automation Manual_En_V3.0... - Page 15 Required parameters are «MQTT Address» (6) and «MQTT port» (7). To set MQTT server credentials, you must On the Configuration (1) ->Network (2) ->Cloud (3) ->User Credentials tab (4) - specify the Login (5) and password (6) for the MQTT server. Automation Manual_En_V3.0...
-
Page 16: Mqtt Topic Settings
Device will work will be built, taking into account the prefix from the "location"(6) parameter! For example, if "location" = "lumiring," then the Device will subscribe to the following topics: "lumiring/operate/”(7) - To receive control commands. -
Page 17: Device Inputs
For the convenience of presenting data about the state of the input, when configuring, you can override its name, for example: In such a case, the Device will publish the name "switch1" instead of "inputSensorName_0" and so on. ……. "inputSensorName_0":"switch1", "inputSensorName_1":"switch2" Automation Manual_En_V3.0... -
Page 18: Multifunctional Device Ports Ext 1 & Ext 2
The 1W.x inputs are configured in pairs. In other words, both 1W.x inputs of the same port can only have one mode of operation at the same time. Port operating modes are set by the “ext1_mode” and “ext2_mode” parameters, respectively. The operating modes are shown in the tables below: Automation Manual_En_V3.0... - Page 19 Correction factor tempSensor_id_14 String(16:32) Sensor ID (HEX) tempSensorCalibrate_14 float Correction factor tempSensor_id_15 String(16:32) Sensor ID (HEX) tempSensorCalibrate_15 float Correction factor tempSensor_id_16 String(16:32) Sensor ID (HEX) tempSensorCalibrate_16 float Correction factor tempSensor_id_17 String(16:32) Sensor ID (HEX) tempSensorCalibrate_17 float Correction factor Automation Manual_En_V3.0...
-
Page 20: Sensor Tool
String(16:32) Sensor ID (HEX) tempSensorCalibrate_36 float Correction factor tempSensor_id_37 String(16:32) Sensor ID (HEX) tempSensorCalibrate_37 float Correction factor tempSensor_id_38 String(16:32) Sensor ID (HEX) tempSensorCalibrate_38 float Correction factor tempSensor_id_39 String(16:32) Sensor ID (HEX) tempSensorCalibrate_39 float Correction factor Sensor Tool Automation Manual_En_V3.0... - Page 21 Data ports 1W.1, 1W.2 of EXT 1 port and pins 1W.3 and 1W.3 of EXT 2 port can be used to connect any RFID readers via the Wiegand interface. Wiegand Pin Matching 1W.1 Wiegand D0 EXT 1 1W.2 Wiegand D1 Automation Manual_En_V3.0...
-
Page 22: Device Outputs
Device Outputs TTL Output settings Port Parameter Type otputName_0 string OUT.1 otputInitState_0 EXT 1 otputName_1 string OUT.2 otputInitState_1 otputName_2 string OUT.3 otputInitState_2 EXT 2 otputName_3 string OUT.3 otputInitState_3 otputName_4 string EXT 5 otputInitState_4 otputName_5 string Relay OUT C/NO/NC otputInitState_5 Automation Manual_En_V3.0... -
Page 23: Example Of Device Configuration
2022 Example of device configuration {"device":"61FF3C","configVersion": "1.0","systemDescription":"systemDescription","location":"lumiring","operateTopic":" lumiring/operate/","ackTopic":" lumiring/ack/","eventsTopic":" lumiring/events/","configTopic":" lumiring/config/","presenceTopic":" lumiring/presence/","ipv4Address":"192.168.3.3","ipv4Mask":"255.255.255.0","ipv4Gw":"192.168.3.1" ,"ipv4Dns":"192.168.3.1""ipv4NTP": "192.168.3.10","PresenceHeartBitInteval":15,"ipv4Mqtt": "192.168.1.36","ipv4MqttPort":1883,"mqttClientId":"","mqttUser":"admin","mqttPassword":"admin"," mqttMethod":"std","mqttTimeOut": 200,"mqttKeepAlive":3,"messageDelay":0,"enableReboot":1,"rebootTime":"23:59","ext2_mode" : "RFID","ext2_RFID_mode" : 34, "ext2_RFIDbigEndian":0"timeOffset":3600,"sensorUnit":"C","inputSensorReverse_0":1,"inputSens orReverse_1":1,"inputSensorReverse_2":1,"inputSensorReverse_3":1,"inputSensorName_0":"swit ch1","inputSensorName_1":"switch2","inputSensorName_2":"LightBarrier1","inputSensorName_3" :"PressureSwitch1","tempSensor_id_0":"28E5ACF1FFAAE101:namenamename1","tempSensor_i d_1":"28E5ACF1FFAAE102:namenamename2","tempSensor_id_2":"28E5ACF10FAAE103:namen amename3","tempSensor_id_3":"28E5ACF1EFAAE104:namenamename4","tempSensor_id_4":"2 8E5ACF1FBAAE105:namenamename5","tempSensor_id_5":"28E5ACF1FFFAE106:namenamen ame6","tempSensor_id_6":"28E5ACF1FFABE1A1:namenamename7","tempSensor_id_7":"28E5A CF1FFAEE1A2:namenamename8","tempSensor_id_8":"28E5ACF1FFAAE1E1:namenamename9 ","tempSensor_id_9":"28E5ACF1FFAFE1EF:namenamename10","tempSensorCalibrate_0":- 0.4,"tempSensorCalibrate_1":-0.4,"tempSensorCalibrate_2":-0.4,"tempSensorCalibrate_3":- 0.4,"tempSensorCalibrate_4":-0.4,"tempSensorCalibrate_5":-0.1,"tempSensorCalibrate_6":- 0.4,"tempSensorCalibrate_7":-0.4,"tempSensorCalibrate_8":-0.4,"tempSensorCalibrate_9":- 0.6,"outputName_0":"Pump_0X21","outputName_1":"Fan_022","outputName_2":"Fan_023","outp utName_3":"Lamp","outputInitState_0":1,"outputInitState_1":0,"outputInitState_2":1,"outputInitStat e_3":1} Automation Manual_En_V3.0... - Page 24 2022 "tempSensor_id_0":"28E5ACF1FFAAE101:namenamename1","tempSensor_id_1":"28E5ACF1FFA AE102:namenamename2","tempSensor_id_2":"28E5ACF10FAAE103:namenamename3","tempS ensor_id_3":"28E5ACF1EFAAE104:namenamename4","tempSensor_id_4":"28E5ACF1FBAAE105 :namenamename5","tempSensor_id_5":"28E5ACF1FFFAE106:namenamename6","tempSensor _id_6":"28E5ACF1FFABE1A1:namenamename7","tempSensor_id_7":"28E5ACF1FFAEE1A2:name namename8","tempSensor_id_8":"28E5ACF1FFAAE1E1:namenamename9","tempSensor_id_9": "28E5ACF1FFAFE1EF:namenamename10","tempSensorCalibrate_0":- 0.4,"tempSensorCalibrate_1":-0.4,"tempSensorCalibrate_2":-0.4,"tempSensorCalibrate_3":- 0.4,"tempSensorCalibrate_4":-0.4,"tempSensorCalibrate_5":-0.1,"tempSensorCalibrate_6":- 0.4,"tempSensorCalibrate_7":-0.4,"tempSensorCalibrate_8":-0.4,"tempSensorCalibrate_9":- 0.6,"outputName_0":"Pump_0X21","outputName_1":"Fan_022","outputName_2":"Fan_023","outp utName_3":"Lamp","outputInitState_0":1,"outputInitState_1":0,"outputInitState_2":1,"outputInitStat e_3":1} Automation Manual_En_V3.0...
-
Page 25: Control Commands
Only one of them can be used to set the time. An unused parameter cannot be set. "device":"EC24dfefe", "setTimeUnix": 1649078254, “useNtp”: 1 Device restart The reboot command is necessary for reinitialization, for example, after changing configuration parameters "device":"EC24dfefe", "sys": reboot Control device outputs Settings: Parameter Type Description device string Device serial number (HEX) Automation Manual_En_V3.0... -
Page 26: Device Data Publication
When the state of any of the inputs, outputs, and sensor readings changes – the Device, makes the full publication of the input/output ports states and statuses of all connected peripherals. Example: "device":"EC24dfefe", "incomingKey_hex:"00 02 AC FF"; "switch1":1, "switch2":1, "LightBarrier1":0, Automation Manual_En_V3.0 "PressureSwitch1":0,... -
Page 27: Faq
Are there local events logs? Yes. The Device has local events log with the date-time timestamp. If the connection to the MQTT server falls down – the Device starts storing all events in its own memory. When the connection Automation Manual_En_V3.0... - Page 28 – for example: 1 message/second to avoid excessive load on the server or customer application. Can I use my own naming for the device inputs/outputs ports and variables? Yes. You can do this with a special configuration JSON file. Automation Manual_En_V3.0...
Need help?
Do you have a question about the AUTOMATION and is the answer not in the manual?
Questions and answers