
Related Manuals for Cruz Stema


Summary of Contents for Cruz Stema
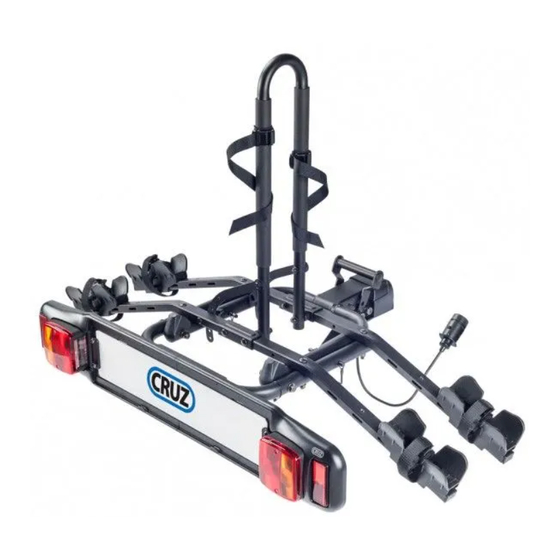
- Page 1 Cruz Stema 940-500 Instrucción de montaje Información al usuario ¡Leer primero! Assembly instructions User information Read fi rst! Montageanleitung Benutzer-information Zuerst lesen! 940-500 2013r1...
- Page 2 Cruz Stema 940-500 Contenido embalaje: ¡Verifi car! Package content: Check! Packungsinhalt: Überprüfen! main frame U-arm ×1 ×1 supporting arm connection plate base ×4 ×4 ×2 M6x50 M8x45 M8x65 M8x80 1/4”x5/8” multiuse 3/8”×110 M6*45 ×1 ×1 ×2 ×1 wrench ×1 ×1 ×4...
- Page 3 Conecte ambos lados de los brazos de soporte con la placa de conexión rectangular y fíjelos con tornillos. Connect both side of supporting arms using the rectangular connection plate and secure them with screws. Montieren und verschrauben sie die Trägerarme in den Vierkant-verbindungsprofilen. ×2 ×2 Instale los brazos de soporte en el bastidor principal y fíjelos con tornillos.
- Page 4 Cruz Stema 940-500 Instale el brazo en U en el marco principal con los tornillos. Install the U-arm in the main frame using the bolts. Montieren sie den klappbaren Fahrradhalterrahmen auf das Kupplungsträgergestell. ×2 ×2 Fije la posición del brazo en U de acuerdo a sus bicicletas y asegúrela.
- Page 5 Deslice las bases de los brazos de soporte y asegúrelos. Slide the bases on the supporting arms and secure them. Schieben sie die Radhalterungen auf die Trägerarme und verschrauben sie diese. ×4 Una las dos mitades de la placa portamatrículas y fije el soporte de acero con los tornillos suministrados.
- Page 6 Cruz Stema 940-500 Coloque una matrícula homologada y asegúrela a la placa portamatrículas con los tornillos, tapas de plástico y herramientas suministradas. Remove your license from the car and transfer it to the license board then secure it with pro- vided plastics stoppers and hardware.
- Page 7 Inserte la bola de remolque en la abrazadera de la base asegurándola con la palanca de bloqueo. Clamp the bike carrier to the tow ball. Secure it with the locking pin and use the wrench to tight the safety screw firmly. Setzen sie den Fahrradträger auf die Anhängerkupplung.
- Page 8 Cruz Stema 940-500 Asegure el cable a la plataforma mediante bridas y luego conéctelo a su vehículo. Use the cable ties to arrange the cables and plug the light board to your car. Befestigen sie das Kabel mit den Kabelschellen entlang de Trägerrahmens. Verbinden sie das Kabel mit der Kupplungssteckdose ihres Fahrzeugs.
- Page 9 Rodee con la correa de seguridad el marco superior y llévela hacia atrás para asegurar los cuadros de las bicicletas. Divide the safety strap to half and loop it over then frame. Bring it forward to secure the bike frames. Befestigen sie die Räder mit den Spannbändern.
-
Page 10: Información Al Usuario
Información al usuario Especificaciones generales para los portabicicletas ■ Cada mes, nuevos modelos de coches llegan al mercado con diferentes diseños. Aunque el equipo de diseñado- res trabaja para hacer todos los productos lo más universales posibles para los coches a la venta, es imposible que un único portabicicletas pueda instalarse en todos los modelos de coches disponibles. - Page 11 12. Vehicles equipped with bike carrier/bikes have extra width and length. In addition, please make sure the bikes are mounted in the center to avoid excessive protrusion. 13. Some bikes like lady bikes require bike beam to mount. 14. When vehicle is equipped with bike carrier, please check the installation of bike carrier and mounting of bikes for every 100km during the journey.
- Page 12 CRUZBER S.A. Pol. ind. Las Salinas II, parc. 12 E-14960 Rute (Córdoba) Spain T: +34 957 538 354 F: +34 957 539 069 www.cruzber.com info@cruzber.com 940-500 2013r1...
Need help?
Do you have a question about the Stema and is the answer not in the manual?
Questions and answers