
Related Manuals for juicedLink DT414

Summary of Contents for juicedLink DT414
- Page 1 User’s Manual DT414 (No Phantom Power, No AGC Disable) / DT454 XLR Adapter / Preamplifier © 2011 juicedLink, LLC. ENGLISH All Rights Reserved. DT414/DT454 User Manual: Rev1.12...
-
Page 2: Table Of Contents
General ..................... 12 Features / Specifications .............. 12 Switch / Panel Descriptions and Photos ........13 Photos..................13 DT414 Bottom ................14 DT454 Bottom ................15 Front Panel Switches ..............16 Side / Back Inputs ............... 17 Bottom Switches ................ 18 Included Items................ - Page 3 Playback Headphone Monitoring..........41 Advanced Topics................43 Post Production – Removing Right Track (DT454 only) ....43 Appendix................... 45 Subscribe to the juicedLink Blog ..........45 Care and Maintenance ..............45 Warranty, Service, and Returns............ 45 Compliance ..................45 DT414/DT454 – XLR Adapter / Preamplifier...
-
Page 4: Read This First
Get notified on new revisions of this User Manual, product updates, new product releases, and tutorial videos. Subscribe to the blog: www.juicedlink.com/blog/index.html Notes regarding documentation in this manual are as follows: - References to markings/labels on the unit are denoted in underline/bold. -
Page 5: Notes Regarding Specific Cameras
For lowest noise performance while recording fine audio detail, you will want to manually throttle back the camera gain, and replace that noisy gain with clean gain from the juicedLink low-noise preamplifier. Follow the directions from Canon for how to navigate the firmware menus. -
Page 6: Magiclantern 3
5D running MagicLantern being fed by juicedLink low- noise preamplifiers. Since the DT has even more available gain than the juicedLink CX family of preamps, the 5D analog gain can be set to 0dB gain, for even lower noise performance than was even achievable before. - Page 7 There’s no need to follow any of the post-production steps presented in this Manual, since there was no need to use any of the AGC disable features of the DT454. Return to Contents Get notified on User Manual and product updates: Page 7 - Subscribe at http://www.juicedlink.com/blog/index.html...
-
Page 8: Canon T2I, 7D, 1D Mark Iv (Dt454 Only)
Set the GAIN for the RING/TIP INPUT to the LO setting on the bottom of the DT454. f. On the front panel, turn the RING-R potentiometer (volume control) to the eleven o’clock position. Page 8 Omissions / Suggestions? Contact Us www.juicedLink.com... - Page 9 3. After the camera power gets cycled, you will need to hit RECORD again to eliminate the noise in the headphones. Return to Contents Get notified on User Manual and product updates: Page 9 - Subscribe at http://www.juicedlink.com/blog/index.html...
-
Page 10: Nikon D300S, D3S
Manual gain (like the Canon 5D), or even the signal to noise performance of a camera which does not have Manual gain (but not the fixed hi analog noisy gain in the front end) while using the DT454 AGC disable technique (such as the Canon T2i, etc). - Page 11 There’s no need to follow any of the post-production steps presented in this Manual, since there was no need to use any of the AGC disable features of the DT454. Return to Contents Get notified on User Manual and product updates: Page 11 - Subscribe at http://www.juicedlink.com/blog/index.html...
-
Page 12: General
Case Dimensions: 4.5” x 3.2” x 1.5” Weight: 10 ounces (no battery) o Includes: Stereo 3.5mm miniplug cable, 1/8” Allen wrench key Features and Specifications are subject to change without notice. Return to Contents Page 12 Omissions / Suggestions? Contact Us www.juicedLink.com... -
Page 13: Switch / Panel Descriptions And Photos
Switch / Panel Descriptions and Photos Photos Get notified on User Manual and product updates: Page 13 - Subscribe at http://www.juicedlink.com/blog/index.html... -
Page 14: Dt414 Bottom
DT414 Bottom Page 14 Omissions / Suggestions? Contact Us www.juicedLink.com... -
Page 15: Dt454 Bottom
DT454 Bottom Return to Contents Get notified on User Manual and product updates: Page 15 - Subscribe at http://www.juicedlink.com/blog/index.html... -
Page 16: Front Panel Switches
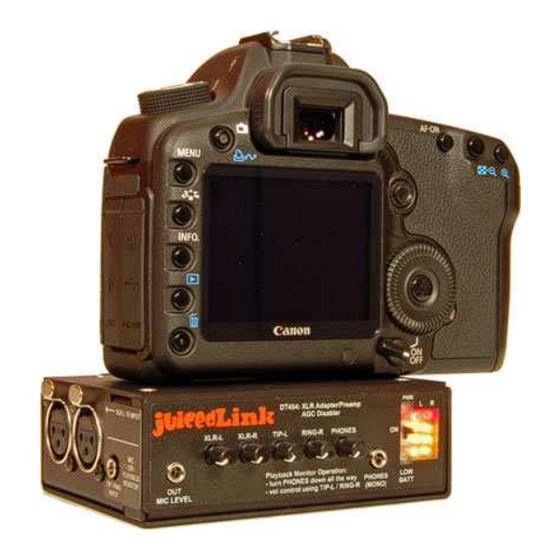
5. Output (OUT) at an amplified mic level, which connects to the microphone input of your camera through a stereo minijack cable (included) 6. Headphone (PHONES) minijack output and volume control Return to Contents Page 16 Omissions / Suggestions? Contact Us www.juicedLink.com... -
Page 17: Side / Back Inputs
3. Audio Inputs: XLR-L (left) and XLR-R (right) balanced mic or line inputs (unbalanced capable) 4. Audio Inputs: TIP-L (left) and RING-R (right) unbalanced mic inputs (or playback monitor inputs) Return to Contents Get notified on User Manual and product updates: Page 17 - Subscribe at http://www.juicedlink.com/blog/index.html... -
Page 18: Bottom Switches
Bottom Switches Page 18 Omissions / Suggestions? Contact Us www.juicedLink.com... - Page 19 10. ¼-20 thread for mounting DT454 on top of a tripod (etc). 11. Hex key receptacle. USE HEX KEY (included) HERE TO TURN ¼-20 SCREW INTO CAMERA FOR MOUNTING TO BOTTOM OF CAMERA. Return to Contents Get notified on User Manual and product updates: Page 19 - Subscribe at http://www.juicedlink.com/blog/index.html...
-
Page 20: Included Items
1. Stereo minijack cable. Use to connect mic output of DT454 to the mic input on the camera. 2. Hex key. USE HEX KEY TO TURN ¼-20 SCREW INTO CAMERA FOR MOUNTING TO BOTTOM OF CAMERA. Return to Contents Accessories Return to Contents Page 20 Omissions / Suggestions? Contact Us www.juicedLink.com...
Need help?
Do you have a question about the DT414 and is the answer not in the manual?
Questions and answers