Table of Contents
Advertisement
Quick Links
Advertisement
Table of Contents

Summary of Contents for multicomp pro MP780620
- Page 1 SOUND, TEMPERATURE AND HUMIDITY DATALOGGER MP780620 & MP780621...
-
Page 2: Table Of Contents
Contents Product Introduction ..................1 Product Safety Instructions ............... 1 Model Selection Sheet ................1 Product Image and Button Description ............2 Product Appearance ................2 Introduction of Button Functions ............... 2 LCD ......................3 Technical Parameter ..................4 Operating Instructions ..................5 Install the Battery .................. -
Page 3: Product Introduction
Dispose of waste batteries according to local WEEE regulations, do not incinerate; Please avoid contact with corrosive chemicals; Avoid use in areas of high static electricity or magnetic fields. 1.2 Model Selection Sheet Model MP780620 MP780621 Function Temperature /Built-in ○ ○... -
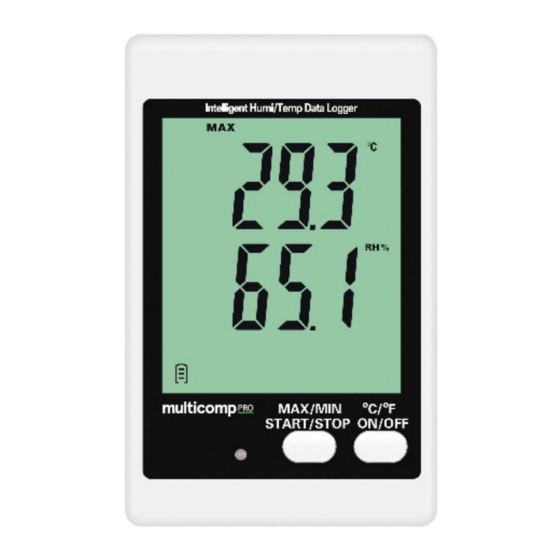
Page 4: Product Image And Button Description
2. Product Image and Button Description 2.1 Product Appearance 2.2 Introduction of Button Functions Right button Button Left button Button (℃/℉ (MAX/MIN combination Operation START/STOP) ON/OFF) Switch between Switch Turn off Short press maximum and temperature buzzer alarm minimum values display units Start / stop Power on / Power off... -
Page 5: Lcd
2.3 LCD Temperature Temperature and Humidity ① Minimum values ⑦ Humidity units ② Maximum values ⑧ Humidity value display area ③ Record prompt symbol ⑨ Date and time ④ Storage capacity Icon ⑩ Battery level ⑤ Temperature units ⑪ Humidity over-limit alarm prompt ⑥... -
Page 6: Technical Parameter
3. Technical Parameters Model MP780620 MP780621 Measurement parameters Temperature and Humidity Built-in: -30~70℃; Measuring range 0~100%RH (non-condensing) External: -40~125℃; 0~100%RH (non-condensing) Built-in: ±0.5℃(0~60℃); ±0.8℃(others); ±3.5%RH (20~80%RH,25℃); ±6%RH (others) Accuracy External: ±0.3℃(0~60℃); ±0.9℃(others); ±3%RH (20~80%RH, 25℃); ±5%RH (others) Resolution 0.1℃ 0.1℃; 1%RH... -
Page 7: Operating Instructions
4. Operating Instructions 4.1 Install the Battery Remove the battery cover, insert the battery noting the polarity indications inside the battery compartment, and close the battery cover. 4.2 Power on After changing the battery, the red indicator light is on and the LCD is fully displayed for 3s is turned off 1s after the LCD is displayed. -
Page 8: Display Description
Note: If the PC software does not check "Stop by button", long press the left button, the instrument will not stop recording. Other conditions of stopping recording: When the number of recording points reaches the maximum limit, the instrument automatically stops recording. At this time, the screen displays the capacity icon and does not display "LOG". -
Page 9: Convert File
4.6 Convert File Connect the USB in the power-on state, and the temperature value display area will display the file type being converted. During file conversion, the red indicator light flashes once every 1s. After the conversion is completed, the green indicator light stays on, and the screen prompts "uSb". -
Page 10: Pc Software Description
4.8 PC Software Description Connect the instrument to the computer via a USB cable, open the software, and configure the instrument functions and parameters. 4.8.1 Recording Interval After connecting, open the software and set the recording interval in the "Configure" column. 4.8.2 Start Delay Open the software after connecting, and set the start delay time in the "Configure"... -
Page 11: Screen Display Description
5. Screen Display Description Number Display interface Instruction Figure 1 Instrument not configured via PC software The instrument enters the recording state Figure 2 Figure 3 Data exceeded prompt in power-on state The instrument is converting the pdf file (The actual display, please refer to the Figure 4 configured file format) File conversion complete... - Page 12 Number Display interface Instruction Figure 6 File conversion not complete Probe not connected or poor contact Figure 7 Sensor fault INFORMATION ON WASTE DISPOSAL FOR CONSUMERS OF ELECTRICAL & ELECTRONIC EQUIPMENT. When this product has reached the end of its life it must be treated as Waste Electrical &...
Need help?
Do you have a question about the MP780620 and is the answer not in the manual?
Questions and answers