Baratza Sette 30 - Coffee Grinder Manual
- Quick start manual (25 pages) ,
- Replacement manual (13 pages) ,
- Manual (12 pages)
Advertisement
INTRODUCTION
With the Sette, it's now easier than ever to make a delicious cup of coffee.
Below are detailed descriptions of the features that make the Sette 30 stand out from other grinders in its class.
Conical Burrs
Manufactured in Liechtenstein, the 40mm conical burrs grind coffee at 3.5g to 5.5g/sec. depending on the setting. These conical burrs are durable and will remain sharp for many years. The adjustment mechanism provides precise burr alignment ensuring accurate grinding.
Grind Adjustment
The Sette 30 grinds from espresso to manual brew. The adjustment mechanism is directly connected to the cone burr resulting in immediate and true grind adjustment.
Digital Control Panel
The front mounted control panel with backlit LED display is user friendly and has grind time settings within 0.01 second. Simply press the START button and the Sette automatically delivers precise dosing.
Device Holder
The Sette 30 has a stationary device holder that allows you to remove and re-orient the arms to grind directly into the supplied grounds bin or a portafilter - a unique feature amongst all other home grinders.
SAFETY INFORMATION
Please read the information below very carefully. It contains important safety information for this appliance. Please keep these instructions for future reference.
 Use only with AC current and the correct voltage. See the label on the base of the grinder to determine the correct voltage.
 Only clean the grinder housing with a dry or slightly damp cloth. Do not immerse the grinder, plug or cord in water or any other liquid.
Baratza will not accept any liability for damage, injury, or warranty if the grinder is used other than for its intended purpose (i.e. grinding roasted whole coffee beans) or is improperly operated or repaired.
This appliance can be used by children aged from 8 years and above and persons with reduced physical, sensory or mental capabilities or lack of experience and knowledge if they have been given supervision or instruction concerning use of the appliance in a safe way and understand the hazards involved.
If the supply cord is damaged, it must be replaced by the manufacturer, its service agent or similarly qualified persons in order to avoid a hazard.
Always unplug the electrical supply cord before assembling, disassembling or cleaning the grinder.
To unplug, grasp plug and remove from the outlet. Never pull on the cord.
Keep the appliance and its cord out of reach of children aged less than 8 years. ! Do not leave your grinder unattended while turned ON. ! Cleaning and user maintenance shall not be done by children without supervision.
Do not operate the grinder with a damaged cord or plug.

ALWAYS unplug the electrical supply cord prior to cleaning the grinder.
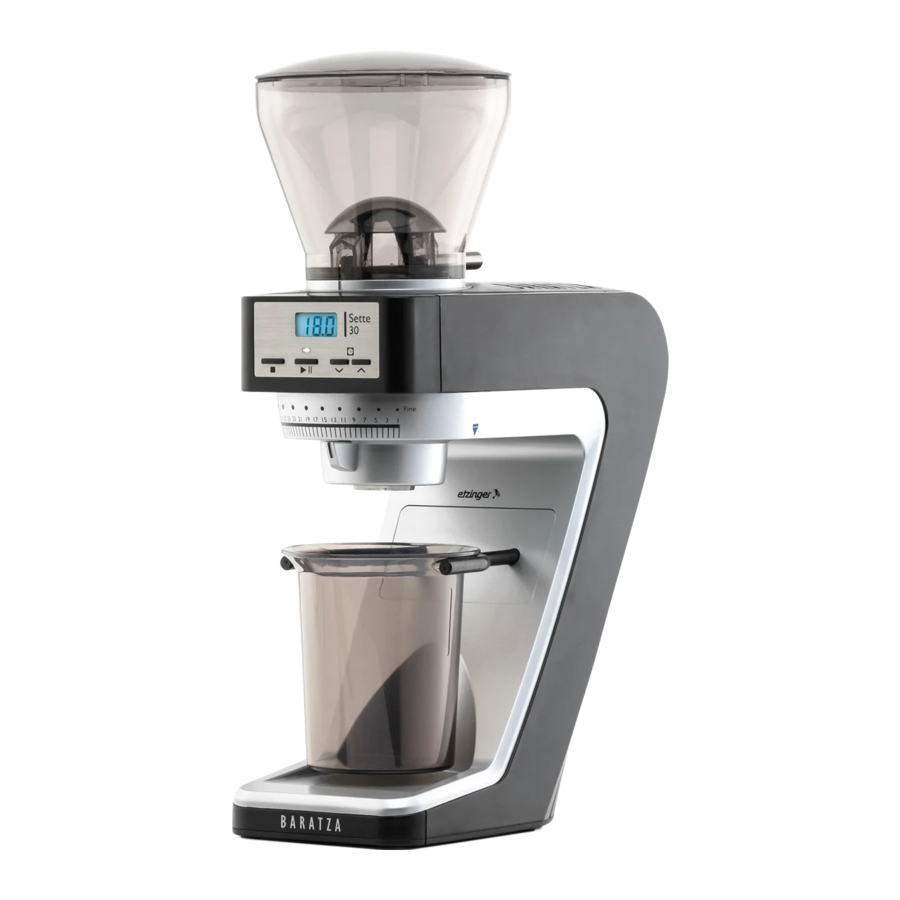
PARTS IDENTIFICATION

- Hopper Lid
- Bean Hopper
- Bean Shutoff Knob
- Hopper Alignment Indicator
- Control Panel
- Grind Adjustment Assembly
- Convertible Device Arms
- Grounds Bin
- Removable Grounds Tray
- Power Cord
- Installation/Removal Indicator
- Macro Adjust
- Installation/Removal Tab
- LCD Display
- Grinding Indicator
- Stop
- Start/Pause
- Grind Time Adjustment Buttons
OPERATION
BEFORE USING YOUR GRINDER
Prior to using your Sette grinder for the first time, you should wash the bean hopper and grounds bin in warm soapy water. Do not wash the grind adjustment assembly or burr. See the section on Care and Cleaning for instruction on how to remove and reinstall these parts. Place the Sette on a level surface and plug the power cord into the back port on the machine. Plug the cord into a correct voltage AC outlet only. There may be some rust on the burrs when you receive your grinder. This is normal and will disappear after a small amount of coffee has been ground. To remove the rust and season the burrs, grind a handful of beans (~40g) on setting 15 and discard. This begins the burr seasoning process and primes the grinder for normal operation.
DUTY CYCLE
The Sette was designed for a maximum of 2 lbs (1 kg) per day, with an espresso duty cycle of 10%. We want to remind everyone buying the Sette grinder that it was designed for home use (short duration grinding).
Here is a general overview of the duty cycle of the Sette Series:
Espresso (Setting ~10) it will take about 6 seconds to grind a dose of espresso, then the grinder should rest for 60 seconds. This is about what you could do if making back-to-back shots on a one-group machine.
Brew (Setting ~25) it will take 5 to 30 seconds to grind up to 150 grams of coffee, then the grinder should rest for 60 seconds. Remember, a maximum of 150 grams at one time, with a 1 minute off before grinding again.
The duty cycles described above will work great for home brewing. If you choose to use it in a commercial situation, please think about the Sette's duty cycle function and decide if this will be a successful choice for your bar setup.
HOPPER INSTALLATION
With the hopper lid in place, mount the hopper by lining up the hopper's bean shutoff knob at the 11:00 position (back left). Press the hopper down, and rotate clockwise until the alignment tabs on the front are aligned. Flip the bean shutoff knob to the "open" position and pour in desired quantity of roasted, whole coffee beans.

The Sette grinds at a very high speed, be careful not to overfill your portafilter or bin! If a mound of coffee backs up into the chute it will clog the grinder. Unclogging requires thorough manual cleaning, and possibly a new internal fuse.
SETTING THE GRIND CONTROL
The adjustment ring moves from coarse (31) to fine (1). With the grinder running, turn the knob to the right to move from coarse to fine. We always recommend the motor be on when making grind adjustments.
Below are the best practices for making accurate and repeatable grind adjustments:
- Press start/pause button
- While grinder is running, rotate the grind adjustment assembly until close to desired grinder size
- Pull bin out and check the particle size.
- Allow 1-2 seconds more run time, and discard the ground coffee. This small amount of waste is called a purge, and is crucial in making sure all the ground coffee used is from the same setting.
- Grind full dose
- Brew and repeat above steps as needed
STARTING SETTINGS
The settings shown in the table below can be used as a general guideline for starting points*. The actual particle size for a particular setting will vary depending on many factors including: degree of roast (light vs. dark), freshness, humidity, type of bean, oil content, etc. With use, you will determine the setting that is right for your taste, brewing style, and your favorite beans.
| Espresso | Manual Brew |
| 10 | 25 |
*If you find that your preferred setting is outside of this range, there is no need to be concerned, grind to your personal taste.

TIME BASED GRINDING OPERATION
Place the grounds bin on the arms. Use the up and down arrows to change your desired grind time. Press the START button (>ll) to begin grinding. While grinding, the screen will count UP the seconds and stop when the preset time is reached. When the screen reaches the preset time, the motor will stop and the display will reset again to the programmed time. For manual operation, press and hold the START button until you obtain the desired amount of coffee, then release the START button, the grinder will then stop with the screen showing the total amount of seconds run. To get out of manual mode, press STOP.

PULSE FUNCTION & MANUAL MODE
The Sette 30 also has a pulse function/manual time grinding mode. To turn the grinder on in this mode, simply hold the START button for more than 2 seconds, the display will flash "- - -" and grinding will commence. You are now in pulse mode. The motor will continue to run as long as your finger is on the START button and will turn off when you remove your finger. To Exit this mode press STOP.
ADJUSTING THE DEVICE HOLDERS FROM BIN TO PORTAFILTER MODE
The arms that hold your grounds bin, can also be converted to portafilter mode, and used as a rest while you dose directly into a portafilter. To convert the arms, pull them straight out, rotate 90° and reinsert.
HOW MUCH COFFEE SHOULD I GRIND?
At an espresso fine setting, the Sette 30 grinds coffee at around 3.6g per second (this will vary based on coffee and grind size), which means you get a full double-shot worth of coffee in about 5 seconds give or take.
At a grind size for an automatic brewer (like a drip coffee maker), the Sette 30 grinds coffee at around 5g per second (again, this will vary based on your coffee and specific grind size). For a 6 cup batch of drip coffee, you'll want around 10 seconds.
If you find that either time produces too much or too little coffee, you can easily add or remove time from the grind cycle with the up and down arrows.
Note: this does not allow hands-free grinding into the portafilter, it helps to position the portafilter for improved grounds transfer from the grinder.
CARE AND CLEANING
REMOVING THE BEAN HOPPER
Rotate the bean shutoff knob to the CLOSED position, then press the START button to purge any remaining beans. Remove the power plug from the power outlet. Remove the hopper by rotating it counterclockwise until it stops, and then lift the bean hopper off of the grinder housing.

REMOVING THE CONE BURR/GRIND ADJUSTMENT ASSEMBLY
- Rotate the bean shutoff knob so it is in the CLOSED position, then press the START button to run any remaining beans through the grinder (fig. C).

- Once the grinder has been fully purged, rotate the grind adjustment assembly beyond the coarsest setting to the install/remove indicator (blue triangle). The assembly will release downward for removal (fig. D).


REINSTALLING THE CONE BURR/GRIND ADJUSTMENT ASSEMBLY
- Align the blue installation/removal indicator on the grind adjustment assembly with the blue installation/ removal indicator on the right side of the machine (fig E).
![]()
- Keeping the two blue indicators aligned, gently press up on the grind adjustment assembly and rotate the black cone burr holder (fig F) until the tabs and notches line up and the cone burr holder slides up into the machine. At this point the cone burr and holder will be inserted into the machine and no longer visible (fig G). For a video tutorial, watch our video on youtube.
![]()
- While applying upward pressure, rotate the grind adjustment assembly as shown (fig G) rotating the blue tab towards the rear of the grinder. The adjustment assembly will click as it properly engages and the black macro adjustment will be aligned with the 1-31 scale on the machine.
![]()


RECALIBRATING/SHIMMING THE CONE BURR
After the first few pounds of coffee, the grind produced at the lowest setting may not be fine enough for espresso. To shift the grind range finer, a small washer (included) can be installed below the cone burr. First follow the steps in "Removing the Bean Hopper" and "Removing the Cone Burr/Grind Adjustment Assembly" then proceed to the steps below.
- Take the grind adjustment assembly in your hand, grab the cone burr and holder with your other hand and pull/pry them apart. (fig. H)

- Once the cone burr and holder are separated, remove the exit chute by pulling away from the cone burr holder.
- With the included 5mm hex wrench, fully loosen the bolt in the bottom of the cone burr holder
- Remove the cone burr from the holder. The cone burr is generally tightly affixed. To easily remove, put the 5mm hex bolt back in position but do not thread it in. Insert your 5mm hex key into the head of the bolt, and then tap the hex key against your work surface. This tactic enables the user to punch the cone burr off of the holder. (fig. I)
![]()
- Place one washer over the cone burr holder. You may already find a washer below your burr, it is ok to add another if needed.
- Reinstall the cone burr so that the tabs on the cone burr holder seat fully into the slots on the bottom of the burr.
- Reinstall the bolt and tighten down as much as possible. (fig. J)
![]()
- Reinstall the chute.
- Set the cone burr and holder onto the counter with the burr resting on the work surface. Set the adjustment ring over the top and firmly press the adjustment assembly down onto the cone burr and holder (fig. K).
![]()


CLEANING THE GROUNDS BIN, HOPPER & BURRS
Wash the grounds bin, hopper, and the hopper lid in warm soapy water, then rinse and dry. Never wash the burrs or they will rust. If the grinder is used daily, the burrs should be cleaned every few months with a stiff brush (included) or by using tablets (see below for Automatic Cleaning). Note that tablets will not clear a clogged grinder. If your grinder is clogged, refer to the section below.
Do not put the bean hopper, hopper lid, or grounds bin in the dishwasher. Hand wash only. Again, Do NOT wash the grind adjustment assembly OR BURRS in water.
CLEARING A CLOGGED GRINDER
If your grinder is not dispensing coffee normally, it could be clogged with coffee powder. This can happen if the grounds bin is allowed to overfill and ground coffee gets backed up into the grounds chute and grinding chamber. It can also happen with the buildup of coffee powder.
Unclogging the grinder:
- Remove the cone burr/adjustment collar assembly (see figures C and D).
- Take the adjustment collar assembly in one hand and grab the cone burr and holder with your other hand. Pull or pry them apart. (fig. H)
- The cone burr will have compacted coffee around and below it. Using a fine tool like a toothpick or chopstick, break up the compacted coffee.
- Continued picking and scraping will eventually clear out the ports in the cone burr holder.
- Once all openings are clear in the cone burr holder, set it onto a flat, sturdy surface with the burr facing down. Set the adjustment collar assembly over the top and firmly press it onto the cone burr and holder.
AUTOMATIC CLEANING
A thorough, fast, and easy cleaning can be accomplished using Full Circle™ biodegradable grinder cleaning tablets. Full Circle tablets are designed to dislodge coffee particles and absorb and remove odors and coffee oil residue. Remove all beans from the hopper and run the grinder to remove any beans inside. Place the recommended amount of Full Circle into the empty hopper. Set the macro adjust to 20, insert the grounds bin and run the grinder until empty. Grind all of the tablets into the bin. Once complete, we recommend grinding approximately 30g coffee to remove any tablet residue. Discard the ground tablets/coffee. For information on Full Circle cleaning tablets, go to www.urnex.com.
WARRANTY & SERVICE
U.S. & CANADIAN WARRANTY INFORMATION
Limited Warranty for Baratza Grinders is 1 year from the original date of purchase or 25 hours of cumulative run time, whichever occurs first. This warranty covers all defects in materials and workmanship (parts and labor) including free ground transportation to and from our repair facility within the US and Canada. This warranty does not apply to: improper use, lack of cleaning, abuse, normal wear and tear, lack of proper adjustment, foreign objects (stones, screws, etc.) in the beans, or uses outside the intended use of grinding whole roasted coffee beans. If your grinder fails within one year, email support@baratza. com or call 425-641-1245. For additional warranty, support, or troubleshooting information, go to www.baratza.com.
INTERNATIONAL WARRANTY INFORMATION
For all countries outside the US and Canada, the warranty, support and service is provided by the International Retailer you purchased from. If you purchased this grinder from a reseller outside of the country you live in, you may be responsible for any shipping costs to service the grinder, and you may need to pay for service.
PROOF OF PURCHASE & PRODUCT REGISTRATION
You can register your grinder at www.baratza.com/register-your-grinder. Registration will enable us to contact you in the unlikely event of a product safety notification and assist us in complying with the provisions of the Consumer Product Safety Act. The serial number is located on the bottom of the grinders. Please keep your sales receipt that shows the date of purchase.
FOR REPAIRS OR QUESTIONS
Email: support@baratza.com
For Parts and Information go to: www.baratza.com
For Troubleshooting Help: www.baratza.com/troubleshooting

Documents / Resources
References
![www.urnex.com]() Urnex | Coffee & Espresso Equipment Cleaning Products
Urnex | Coffee & Espresso Equipment Cleaning ProductsBaratza Home - Baratza
http://www.baratza.com/register-your-grinder
Breville Customer Community
![www.youtube.com]() Baratza - YouTube
Baratza - YouTubehttp://www.baratza.com/register-your-grinder/
Breville Customer Community
Download manual
Here you can download full pdf version of manual, it may contain additional safety instructions, warranty information, FCC rules, etc.
Advertisement


Need help?
Do you have a question about the Sette 30 and is the answer not in the manual?
Questions and answers