
Summary of Contents for AutoCrib IntelliPort
- Page 1 IntelliPort & IntelliPort Lite Platinum Operations Manual (Last Revision September 2019) Phone: 1-800-671-6501 AutoCribSupport.com 2882 Dow Avenue Tustin, CA 92780 P a g e 1 | 84...
-
Page 2: Table Of Contents
Installation – IntelliPort Lite ........................19 Equipment supplied ..........................19 Tools Needed for Installation ........................19 Initial Placement and Installation ......................20 Setting up the IntelliPort Lite for use ......................33 Management Station Installation ....................... 33 Restore the Database ..........................33 IntelliPort Configuration ..........................40 Commonly Performed Procedures –... - Page 3 Reprinting a bad tag ..........................79 Deleting an RFID Tag ..........................80 Recycling RFID Tags ..........................81 Intelliport Unique Behaviors ........................84 P a g e 3 | 84...
-
Page 4: Limited Express Warranty
AutoCrib or from an authorized AutoCrib Distributor (“Original Purchaser”), and is limited to the repair or replacement, at AutoCrib’s sole option, of any part or parts of the Unit that are returned to AutoCrib with all transportation charges prepaid by Original Purchaser, and which, on AutoCrib's examination, such returned part or parts shall conclusively appear to have been defective. - Page 5 Phone: Tool Free 1-(800) 671-6501, Local/International 1-(714) 274-0400 Email: sales@autocrib.com Website: http://www.autocrib.com | http://www.autocribsupport.com AutoCrib Authorized Representative: AutoCrib EMEA: Address: Am Südbahnhof 7 a, 21035 Hamburg Germany Phone: +49 40 716 655 900 Email: info@autocrib-emea.com | support@autocrib-emea.com Website: www.autocrib- emea.com | www.support.autocrib-emea.com P a g e...
-
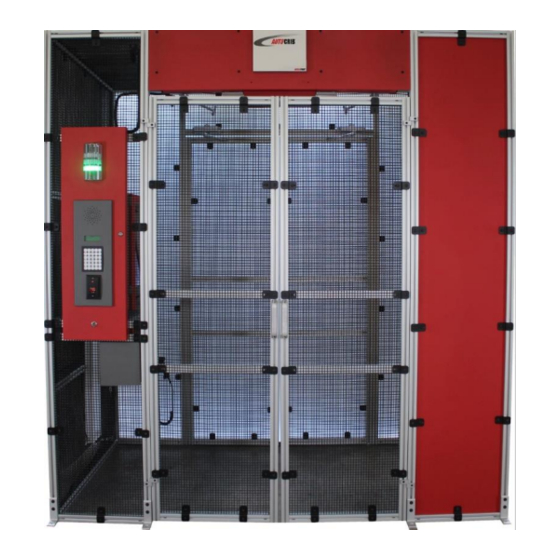
Page 6: Machine General Description & Features
RFID tags in and out of a controlled area. Use the IntelliPort® to secure a tool crib on an entire warehouse! The IntelliPort® Lite has been designed in both single and double door configurations making it a great choice for smaller store rooms and cribs. - Page 7 ▪ 85” W (215cm) x 95”H (241cm) x 51” D (129cm) (closed) / 68” D (172cm) (open) ▪ Walkway-space is 44” (111cm) between the doorway o IntelliPort Lite: ▪ Single Door • 46” W (116cm) x 93”H (236cm) x 20” D (50cm) •...
-
Page 8: Cautions
Cautions The following cautionary information should be reviewed before the machine is installed. Following these requirements and warnings are required. CAUTION: This machine is designed for indoor usage only. Any other usage will void the Manufacturer’s Warranty. Voltage and Polarity Check It is important that this machine be hooked up to the proper voltage and polarity for your country. - Page 9 P a g e 9 | 84...
-
Page 10: Before Installing The Intelliport
Before Installing the IntelliPort RFID Tags The IntelliPort is optimized to function with Class 1 Gen 2 tags. These tags use the UHF 860-928 MHz frequency band, which are acceptable in the US, Europe, Asia & Japan. The tags can come in the form of labels such as the labels encoded and printed out of a Zebra RFID printer. - Page 11 ✓ Identify the items which are not suitable for printed RFID labels. These items will require specialized tags due to their metallic material, water content, or heavy-duty purpose. ✓ Identify the items which are too large to pass through the IntelliPort gates and have them moved outside the portal.
-
Page 12: Installation - Standard Intelliport
• Door keys, 4 pcs • Network hub • CAT5 cables Tools Needed for Installation • Outlet tester – it is built into the UPS provided with the Intelliport – except export models. • Rubber Mallet • Tape Measure • Level •... -
Page 13: Initial Placement & Installation
Initial Placement & Installation TWO PEOPLE ARE REQUIRED FOR INSTALLATION DO NOT ATTACH POWER CABLE INTO OUTLET UNTIL LAST STEP. 1. Uppon arrival Inspect for shipping damage - Thoroughly inspect the exterior of the box and/or wrapping for damage, which may have occurred during shipment. a. - Page 14 5. Adjust the feet on the bottom until each frame is level. There must be 50 inches between the frames. 6. Insert the top bridge between the left and right frames. The wires need to face the direction of the left frame. DO NOT INSERT SCREWS OR ATTACH ANTENNA WIRES. THIS ALLOWS YOU TO MOVE THE BRIDGE WHILE INSTALLING OTHER COMPONENTS.
- Page 15 a. Using the 4” screws (2 used on each side), attach the rear sign panel assembly. The screws should be inserted through the side frame and into the sign panel. b. Each screw is secured using a 1/4” nyloc bolt. Using a 7/16 socket driver to hold the screw in place on the side frames, tighten the bolts using the socket wrench.
- Page 16 9. Front Sign Panel Assembly Installation – This panel contains the magnets. a. Using the 4” screws (2 used on each side), attach the front sign panel. The screws should be inserted from the outside of the frame. DO NOT SECURE SCREWS.
- Page 17 c. Insert the front fascia and use 4 self-tapping screws with nuts to secure. d. Locate the camera through the hole in the middle of the fascia. Attach camera using the clip. 12. Attach Hydraulic Door Closers a. Cut zip ties on hydraulic door closers. b.
- Page 18 c. Attach 8 self-tapping screws and nuts to the bridge panel. d. Place the last two roof panels and secure each with 10 self-tapping screws and nuts each. 14. Remove the outside, bottom, left frame panel and locate power cable. Plug the power cable into the outlet provided.
-
Page 19: Installation - Intelliport Lite
• Network hub • CAT5 cables Tools Needed for Installation • Outlet tester – it is built into the UPS provided with the IntelliPort, except export models • Cordless drill with a #2 Phillips head bit • 1 ladder • #2 Philips screwdriver •... -
Page 20: Initial Placement And Installation
DO NOT ATTACH POWER CABLE INTO OUTLET UNTIL LAST STEP. The IntelliPort Lite is assembled and packed so that a minimum amount of time is necessary for preparation to install it on location. The following steps are recommended to ensure correct unpacking. - Page 21 3. Placing the IntelliPort Lite Left and Right Enclosures - Place the Left and Right enclosures 48” apart measuring from the Insides of the frames 4. Front Header Assembly Installation Front Header Assembly Left bottom angle brackets Right bottom angle brackets a.
- Page 22 c. Turn the Front Header Assembly right-side up and slide the right and left angle brackets into the right and left frame channels keeping the assembly leveled until the top of the header is flush with the enclosure. P a g e 22 | 84...
- Page 23 d. Tighten all four set screws on Right and Left angle brackets using an 1/8” Hex Ball End Driver. Tighten Set Screws e. Install 1 Anchor Fastener on the top of each side of the Front Header Assembly and tighten using a 1/4” Hex Ball End Driver Anchor Fastener Install Anchor Faster Tighten using a ¼”...
- Page 24 5. Roof Panel A Installation a. From the backside of the Frame enclosure slide Roof Panel A (mesh side in first) into the top right and left horizontal channels of the enclosure Roof Panel A Mesh side in first b. Push the Roof Panel all the way to the front and feed into the front channel Push and feed into the front channel c.
- Page 25 d. Install 5 mesh retainer plates using a 3/16” Hex Ball End Driver, 3 retainer plates in the front and 1 retainer plate on right and left sides. The mesh retainer plate contains a square metal plate and hex head screw P a g e 25 | 84...
- Page 26 To install the Mesh Retainer Plate, insert the screw through the top of the mesh retainer bracket, then screw on the mesh retainer plate from the bottom side of the mesh and tighten using a 3/16” Hex Ball End Driver. 6.
- Page 27 Roof Panel B P a g e 27 | 84...
- Page 28 Slide Roof Panel B all the way in so that it slides into all channels, then install 5 Mesh Panel Retainer Plates, 3 in the front and 1 on each side. d. Tighten middle right and left brackets screws (from step a.) using a 3/16” Hex Ball End Driver.
- Page 29 b. Slide the back-header assembly down the right and left enclosure until the top of the assembly is flush with the Right and Left Enclosure frames, then tighten the 4 Anchor Fasteners using a 1/4” Hex Ball End Driver. c. Install 3 mesh retainer plates on the top of roof B using a 3/16 Hex Ball End Driver 8.
- Page 30 b. Loosen top hinge using a 3/16 Hex Ball End Driver then slide onto top pin and tighten 9. Right and left door closer installation a. Use two Philips screws to tighten the door closer to the door frame P a g e 30 | 84...
- Page 31 10. Plug in the mag lock and door sensor wires a. Route and zip tie the mag lock and door sensor wires halfway along the frame inside the Front Header Assembly b. Pull them out through the cut out in the frame and plug them in. 11.
- Page 32 12. Run the antenna cable to the antenna, use zip ties to attach the cable alongside the mesh, then connect the cable to the antenna. 13. Repeat steps from step #8 to install Right and Left Back Door Panels P a g e 32 | 84...
-
Page 33: Setting Up The Intelliport Lite For Use
Restore the Database AutoCrib Software Must be Turned Off 1. Unzip the file database received from the AutoCrib Professional Services department into C:\Program Files\Microsoft SQL Server\MSSQL13.SQLEXPRESS\MSSQL\Backup on the management station. 2. Start the Microsoft SQL Server Management Studio software and connect to the server. - Page 34 3. Right Click on the Databases folder and click on Restore Database… 4. From the Source section select the Device radio button, then click the Browse button P a g e 34 | 84...
- Page 35 5. Select the Add button within the Select backup devices screen 6. Navigate to the destination location of the .bak file and select the correct .bak file name, example: C:\ProgramFiles\MicrosoftSQLServer\MSSQL13.SQLEXPRESS\MSSQL\Backup\AutoCrib61.bak 7. Click the OK button P a g e 35 | 84...
- Page 36 8. Select OK in the Select backup devices screen 9. From the Destination section of the screen select the name of the database to restore to from the Database dropdown field or if restoring to a new database, type in the new database name.
- Page 37 10. Within the ‘Backup sets to restore’ menu, verify that the “Restore” checkbox is selected 11. Within the ‘Select a page’ box click on Files, then within the ‘Restore database files as’ box check the Relocate all files to folder checkbox P a g e 37 | 84...
- Page 38 Overwrite the existing database checkbox and click OK 13. Click OK on message “Database “xxxxxx” restored successfully. Congratulations! The database has now been restored and you are ready to begin using the AutoCrib software P a g e 38 | 84...
- Page 39 NOTE: If the AutoCrib software prompts for the server, database name, username, and password, insert the following: Server: (LOCAL) Database Name: autocrib61 Username: sa Password: **See AutoCrib Support Portal article “AutoCrib Default Passwords” P a g e 39 | 84...
-
Page 40: Intelliport Configuration
CAT5 cable through this hole. The CAT5 cable can now be routed underneath the frame of the IntelliPort. DO NOT CONNECT THE CAT5 CABLE TO THE CUSTOMER’S LAN. 5. Connect the IntelliPort Software to the Database Located on the Management Station. If the Intelliport software prompts for the server, database name, username, and password Insert the following. - Page 41 Note: If the Intelliport software starts with the portal’s Login screen complete the following steps: 1. Exit the Intelliport software by double clicking on the AutoCrib icon in the upper left- hand corner of the Intelliport software and type the exit username and password.
-
Page 42: Commonly Performed Procedures - Hardware And Software
Exiting the Intelliport Software Complete the following steps to exit the Intelliport software and access the Microsoft Windows desktop: 1. From the Intelliport software Login screen, double click on the AutoCrib icon in the upper left-hand corner P a g e... - Page 43 2. Insert the Exit Username created through the AutoCrib Security module and select Enter 3. Insert the Exit Password created through the AutoCrib Security module and select Enter, the Windows Desktop will appear P a g e 43 | 84...
-
Page 44: Assigning Items To Rfid Tags And Bins In The Toolroom
Assigning Items to RFID Tags and Bins in the toolroom Complete the following steps to assign Items to RFID Tags and Bins in the ToolRoom: 1. In the AutoCrib software navigate to Inventory > RF Items 2. Select the Item and click on the Assign RFID button... - Page 45 3. You will see the prompt “Assign RFID to the Item or to a Container?” Select Item if you wish to assign the RFID number to the Item, select Container if you wish to assign the RFID number to a container 4.
- Page 46 6. If you select Yes, you will be directed to the Assign Bin screen 7. Assign an existing bin, or click New to create a new bin 8. Select OnHand or Burn, then click on OK 9. You will see the message “Are you in the ToolRoom where RFIDs will be Assigned?” a.
- Page 47 b. Select No if the RFID printer resides outside the ToolRoom. In this case the item(s) will be added to the inventory later. The RFID tag will print, attach the tag to the item. P a g e 47 | 84...
-
Page 48: Restocking Using The Automatic Tag Method
Restocking Using the Automatic Tag Method 1. Create a purchase order in the AutoCrib software a. Navigate to Purchasing > Purchase Orders > New PO b. Select the Toolroom, Supplier, and Method (All, Below Min, or Below Max) P a g e... - Page 49 If all inventory can be stocked, select the Purchase All button, otherwise, insert the purchase quantity for each line that can be stocked and select Apply 2. Create a Tag in the AutoCrib software a. Navigate to Purchasing > Purchase Orders > Crate Tags...
- Page 50 b. Select the Purchase Order just created by double clicking on the aqua colored box. c. If all inventory is consigned, select Receive All. If all inventory is customer owned, select Receive All Burn. If there is a mix of consignment and customer owned inventory, insert the appropriate quantities into the On Hand and Burn Qty fields.
- Page 51 Select Apply, The Tags will now print, affix all tags to the items 3. Check In the items through the Intelliport a. Enter you employee ID (and pin number if required) b. Log into the Intelliport and press the Check In button P a g e 51 | 84...
- Page 52 Place the items with the RFID tags attached inside the IntelliPort portal d. The IntelliPort software will automatically recognize the items ready for stocking e. Verify the RFID reader has calculated the total items needing to be stocked correctly f.
-
Page 53: Issuing An Item From The Intelliport
To Issue an Item out from the Intelliport complete the following steps: 1. Enter the IntelliPort by entering your employee number at the keypad (which is mounted to the outside of the portal), the door will then unlock to allow you to enter the portal 2. - Page 54 5. The screen will show what items have been scanned 6. Verify all items being checked out of the Intelliport appear in the checkout screen (If not all items have been scanned press the Rescan button, you may also try moving the items around for a better read) 7.
-
Page 55: Returning An Item To The Intelliport
To return an item to the Intelliport complete the following steps: Enter the IntelliPort by entering your employee number at the keypad, the doors will unlock, open the door and enter the portal (you may set the item(s) you wish to return on... - Page 56 Note: If returning a gage insert the number of cycles. If the gage or serialized item needs to be repaired, indicate so on the Intelliport check in screen. 6. After returning the item to the bin, return to the portal and enter your employee badge number...
- Page 57 Zero items will be scanned, Select the Check Out button and the doors will unlock allowing you to exit the portal P a g e 57 | 84...
-
Page 58: Locate Function
Locate function The Locate function allows you to find the desired item anywhere it exists in you facility. To Locate and Item complete the following steps: Enter your employee badge number (and pin if required), then select the Login button Select the Locate button P a g e 58 | 84... - Page 59 Use the Item search field to search for the items and view results (Crib, Bin, On Hand and Burn qty fields will display) To view open issues for a specific item, select the item, then select the Open Issues button The Open Issues screen will pop up where you can view the employee number, Last Name, Burn Qty, Oh Hand Qty, Dept, Job, Machine, and Oper (select the Close button to go back to your search results screen)
-
Page 60: Wrong Employee Function
Wrong Employee Function If you entered the wrong employee number complete the following steps: From the Welcome screen select the Wrong Emp button You will then be directed to the Login screen where you may re-enter the badge number P a g e 60 | 84... -
Page 61: Maintain (Update Rfid Reader And Antenna Settings)
The Maintain button gives you access to update your RFID reader and each individual antenna’s settings. There are a total of 3 read points in the IntelliPort which are referred to as antennas. The settings for each antenna depend on how close RFID tags are to the IntelliPort system. As the TX (Transmit Power) and RX (Receive power) settings increase, the signal intensifies making the RFID reader more accurate. - Page 62 ➢ Preset dropdown – The Preset dropdown field allows you to quickly set the Transmit and Receive Power of all Antennas to one of the flowing preset values: • Low Power (25%) – This will set all antennas to a low Transmit Power of 15.0 and Receive Power of -40 •...
- Page 63 ➢ Scan Duration (ms) – In the Scan Duration field you can set the reader’s scanning duration in Milliseconds, the default value is 250 Milliseconds (example; to set a scan duration of 1 seconds enter 1000 milliseconds) ➢ Antenna Port tabs - Each Antenna Port tab represents one antenna and can be configured manually: •...
-
Page 64: Rfid Printer Settings For Zebra Rz400
Note: Do not install any Zebra drivers on the PC where the printer will be connected. The drivers do not work with the AutoCrib software. a. Simply connect the Zebra printer to the PC using the provided null modem cable. Make sure that the cable has the words NULL MODEM on the connector closest to the PC b. -
Page 65: Illustrated Parts List
Illustrated Parts List Standard Intelliport P a g e 65 | 84... - Page 66 P a g e 66 | 84...
- Page 67 P a g e 67 | 84...
- Page 68 P a g e 68 | 84...
- Page 69 P a g e 69 | 84...
- Page 70 P a g e 70 | 84...
- Page 71 P a g e 71 | 84...
-
Page 72: Intelliport Lite
Intelliport Lite INTELLIPORT LITE P a g e 72 | 84... - Page 73 MAIN TOWER P a g e 73 | 84...
- Page 74 USER INPUT MODULE P a g e 74 | 84...
- Page 75 FRONT HEADER ASSEMBLY P a g e 75 | 84...
- Page 76 OUTSIDE USER INPUT MODULE P a g e 76 | 84...
- Page 77 INTELLIPORT LITE P a g e 77 | 84...
- Page 78 INTELLIPORT LITE P a g e 78 | 84...
-
Page 79: Appendix
Appendix Reprinting a bad tag 1. Delete the RFID tag number from Cribs > Bins using the AutoCrib software 2. In the AutoCrib software navigate to Inventory > RF Items 3. Locate your item, click on it and locate the RFID tag number from the previous step 4. -
Page 80: Deleting An Rfid Tag
1. RFID tag must be On Hand or Burn in the bin 2. In the AutoCrib software navigate to Cribs > Bins, locate the bin and click Edit 3. Locate the RFID number you wish to delete from the RFID box 4. -
Page 81: Recycling Rfid Tags
Prerequisites: • The RFID Tags to be recycled must already exist in the AutoCrib system • The RFID Tags to be recycled must be in your possession To begin the process: Pull the tags you’d like to recycle and make sure the items they are associated with are issued out 1. - Page 82 3. Select Item or Container 4. Select how many tags you will assign 5. Click Assign to bin now 6. Select the bin which the tag will be assigned to 7. Select whether you are in the toolroom or not 8.
- Page 83 2. In the AutoCrib software navigate to Purchasing > Receiving 3. Make sure to uncheck “Assign & Print RFID” check box 4. In the AutoCrib software navigate to Inventory > RF Items and follow process described above P a g e...
-
Page 84: Intelliport Unique Behaviors
An “R” transaction to put the tag back in (return) • A “B” transaction to issue it back out ➢ If an expendable tag is checked in through the Intelliport, but the system thinks it is already in you will see two simultaneous transactions: •...
Need help?
Do you have a question about the IntelliPort and is the answer not in the manual?
Questions and answers