Advertisement
Quick Links
Intelligent
Astronomical Telescope TW1
DDL-TW1/Pro/Max Instruction Manual
Please read this manual carefully before using the product!
Please keep the instruction manual properly!
Special Reminder:
Do not observe the sun directly when not wearing "Bud film sunglasses".
Otherwise, the image sensor will burn out.
Image Collector: WIFI Password: 12345678
Advertisement

Summary of Contents for BeaverLAB TW1
- Page 1 Intelligent Astronomical Telescope TW1 DDL-TW1/Pro/Max Instruction Manual Please read this manual carefully before using the product! Please keep the instruction manual properly! Special Reminder: Do not observe the sun directly when not wearing "Bud film sunglasses". Otherwise, the image sensor will burn out.
-
Page 3: Table Of Contents
Directory 1. Product Overview 2. Instructions For Use 3. Installation Instructions 4. Usage Procedure 5. Accessories And Tools 6. The Fault Is Rectified 7. Trademarks And Legal Statements 8. Overall Parameters... -
Page 4: Product Overview
01 Product Overview Thank you for purchasing Intelligent Astronomical Telescope. Please read this manual carefully before use and keep it properly. Do not use the telescope without knowing how to use it In order to avoid unnecessary loss caused by wrong use. Description of telescope composition Find the star mirror Dust cover... - Page 5 Description of telescope knobs Starfinder red dot left and Starfinder red dot switch right fine-tuning knob Brightness trim knob Fine tune the red dot Fine tune the red dot to lighten clockwise to the left reverse time clockwise Needle Fine tune the red dot fine tuning red dots to darken counterclockwise to the right close...
-
Page 6: Instructions For Use
Focal length adjustment knob The rack at the bottom of the focusing seat is coated with grease. Do not touch it. Lock knob in horizontal direction of gimbal Clockwise lock for horizontal turn counterclockwise release. 02 Usage Instructions Protect the lens of the objective lens and close the dust cover after use to avoid dust or foreign objects. -
Page 7: Installation Instructions
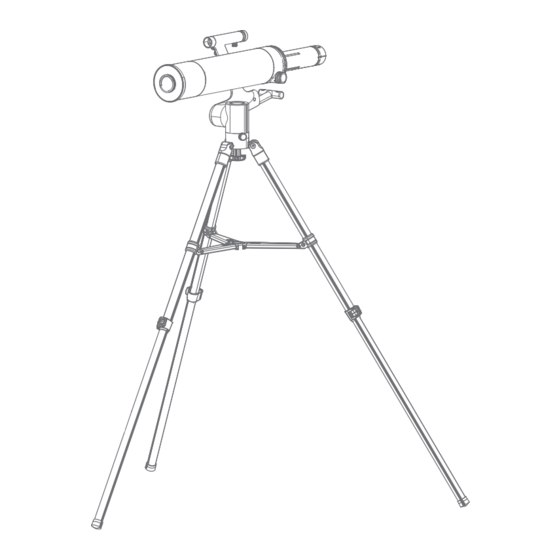
This product is a precision instrument, please avoid collision and violent vibration. In the case of low temperature, the available capacity of the battery will have different degrees of decay, this is the characteristics of lithium batteries, is a normal phenomenon. In case of any abnormal phenomenon, please refer to the troubleshooting manual in time. - Page 8 Install primary mirror barrel with tripod 1. Prepare the main mirror, the whole head, the tripod, and the quick detachable rod, as shown below. 2. Take out the main mirror and the cradle head, and align the three positioning pins of the cradle head base with the corresponding three holes on the tripod.
- Page 9 Installation of image collector 1. Get the image collector ready. 2. Align the locking clip on the side of the image collector with the notch of the telescopic cylinder and insert it, and then rotate the image collector to align the mark point to fix and jam. Pay attention to the bayonet position ①...
- Page 10 Replace the battery 1. Take out the star finder, place the battery in the interface where the star finder is inserted into the support, and remove the battery holder with your fingers or tweezers. 2. The star finder uses CR-2032 battery. When replacing the button battery, pay attention to the positive and negative terminals of the battery.
-
Page 11: Usage Procedure
04 User Procedure The tripod is placed smoothly Remove the dust cover The middle triangle is stretched flat and tight The tripod extension leg is opened and locked... - Page 12 Pitch steering adjustment Horizontal steering regulation Loosen the gimbal locking knob Pitch lock the handrail Release the gimbal locking knob and pitch locking armrest to confirm the observation target. Through the focal length adjustment knob can focus the image, so that the image is more clear Through the focusing knob, the image is focused...
- Page 13 Use of image collector: This product is equipped with an image collector Support wireless observation, and wired observation (users need to be equipped with OTG adapter, Apple system can not be wired connection. Image collector interface and switch instructions: Image collector indicator light Reset button When there is a crash, you can press the Blue light breathing: wifi...
- Page 14 Charging instructions When charging, it is a red breathing light, and when fully charged, it turns into a long red light. type-C Charging port The image collector can be Do not charge the battery for more than charged using a 5V1A charger. 12 hours to avoid affecting the battery life.
- Page 15 (the blue light is breathing at this time). Open the APP of the mobile phone, select Add Device → select the wifi name corresponding to the astronomical telescope (such as DL-TW1-XXXX), and connect→ Click Enter after it shows that it has been connected.
- Page 16 5. In the process of observation, images can be obtained by taking photos and videotaping. Click below the pictures to download and save them in the system album. 6. The exposure, sharpening, contrast, saturation and other parameters of the image can also be adjusted in real time through the App to achieve the optimal overall effect.
- Page 17 ③ Open the APP and click "Start Observation". In the pop-up "Allow the app Beaver Point to access the USBdevice Dialog box, click OK. Wired computer connection ①Double-click the switch of the image collector to switch the default wifi mode to wired connection mode.
- Page 18 ③ Open the Windows software and select the device to observe. Computer users can download the Windows version of the software to's official website (www.beaverlabtech.com or www.dangdangli.com) Pay attention to the cable connection 1. IPhone and pad do not support wired connection. 2.
-
Page 19: Accessories And Tools
find specific stars or nebulae for observation. See the Astrolabe manual for specific usage 05 Accessories And Tools BEAVERLAB It's been 13.8 billion years since the Big Bang. In the long river of time, countless stars were born. -
Page 20: The Fault Is Rectified
06 Telescope Faults And Troubleshooting Methods Phenomenon of the problem Reason Processing method The starfinder's red The battery is dead. Replace the battery dot is not bright The charging port is Remove and reinsert the interface not securely inserted The device cannot be charged Put through power supply No power access Send to repair... -
Page 21: Trademarks And Legal Statements
” 、 “ ” 、 “ 当当狸” 是海狸文创科技 (深圳) 有限公司在中国大陆申请或注册的商标, 并在本商品上 "BeaverLAB" is Beaver Technology (Shenzhen) Co., Ltd.A trademark applied or registered in mainland China and used on the goods. Without the permission of the trademark owner, no person or organization may use the above-mentioned trademark marks on the commodities that have not been approved. -
Page 22: Overall Parameters
08 Overall Telescope Parameters Brand 品牌 BeaverLAB 当当狸 Product Name 产品名称 Intelligent Astronomical Telescope TW1 当当狸智能天文望远镜 Product Model 产品型号 DDL-TW1(PRO) DDL-TW1 产品颜色 黑色、 蓝色 Version TW1/TW1 Pro/TW1 Max 口径 80mm Product Color Black 、Blue 焦距 500mm Aperture F/6.1 构型 折射式望远镜... - Page 23 友情提示: 因运输过程中需要使用包装箱保证产品运输安全, 建议您自签收之日起至少保留包装箱 30 天。 2. 保修内容 主机保修 6 个月。 3. 非保修条例 ①未经授权的维修、 误用、 碰撞、 疏忽、 滥用、 进液、 事故、 改动等不正确的使用方式, 或撕毁、 涂改标贴、 防伪标 记; ②已超过保修期; ③因不可抗力造成的损坏; ④不符合 《当当狸智能天文望远镜产品性能故障表》 所列性能故障的情况; ⑤因人为原因导致本产品及其配件产生 《当当狸智能天文望远镜产品性能故障表》 所列性能故障。...
- Page 24 Intelligent Astronomical Telescope TW1 Product Name: Intelligent Astronomical Telescope TW1 Product Size: 1300x1140x1030mm Product Model: DDL-TW1 Input Voltage: DC5V Product Net Weight: About 3.5kg Operating Temperature: -10℃ ~45℃ FCC ID: 2A6VMDDL-TW1 Brand Company: Beaver Technology (Shenzhen) Co., Ltd. Address: Room101.102, Building 6, F518 Idea Land, No.1065, Baoyuan Road, Laodong,...
Need help?
Do you have a question about the TW1 and is the answer not in the manual?
Questions and answers