Table of Contents
Advertisement
Quick Links
Advertisement
Table of Contents

Subscribe to Our Youtube Channel
Related Manuals for Garmin Alpha 300i


Summary of Contents for Garmin Alpha 300i
- Page 1 Alpha 300i ® Owner’s Manual...
- Page 2 © 2023 Garmin Ltd. or its subsidiaries All rights reserved. Under the copyright laws, this manual may not be copied, in whole or in part, without the written consent of Garmin. Garmin reserves the right to change or improve its products and to make changes in the content of this manual without obligation to notify any person or organization of such changes or improvements. Go to www.garmin.com...
-
Page 3: Table Of Contents
Table of Contents Tracking Your Dog on the Map.... 12 Dog Status Icons........13 Dog Tracking Compass......13 Getting Started......... 1 Navigating to Your Dog......13 Setting Up the Alpha System....1 Changing the Length of the Dog's Device Overviews........1 Track............ - Page 4 Editing a Route........28 Connecting to a Wireless Network..21 Reversing a Route......28 Garmin Explore........21 Viewing the Active Route....28 Garmin Messenger App......22 Deleting a Route........ 28 Tracks............ 28 Syncing inReach Data..... 22 Recording Track Logs....... 28 Viewing Details about the Track..29 Contact Tracking......
- Page 5 Downloading Maps......33 Transferring Dog Tracks to BaseCamp™........42 Enabling Maps........33 Deleting Files........43 Deleting a Map........33 Disconnecting the USB Cable... 43 Customizing Your Device....34 Resetting Data and Settings..... 43 Customizing the Main Menu....34 Appendix........43 Customizing the Favorite Bar....34 Accessories and Replacement Parts...
-
Page 7: Getting Started
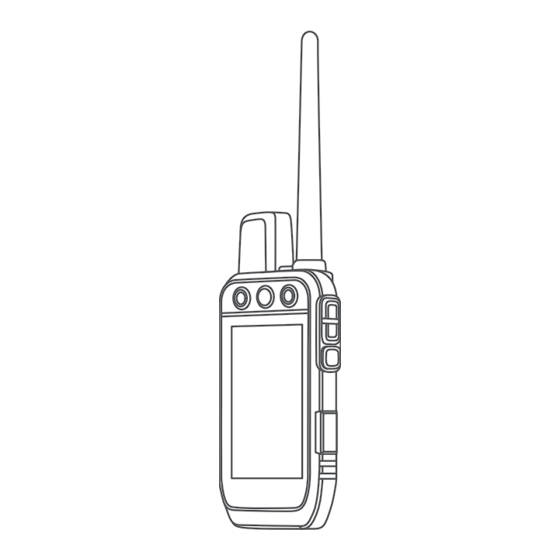
Getting Started WARNING See the Important Safety and Product Information guide in the product box for product warnings and other important information. Setting Up the Alpha System Before you can use the Alpha system, you must set up the devices. 1 Charge the handheld device (Charging the Handheld Device, page 4). - Page 8 Satellite antenna VHF radio antenna Mounting spine microSD ® memory card slot (under battery) Battery cover D-ring USB port (under weather cap) Alpha Device Keys Power key Customizable training keys Training up Training down Training enter SOS key (under protective cap) Getting Started...
-
Page 9: Dog Collar Device
Dog Collar Device NOTE: Your dog collar device may look different than the device pictured. VHF antenna GPS antenna Power button Status LED Flashing beacon LEDs Installing the Battery Pack 1 Turn the D-ring counter-clockwise, and pull up to remove the cover. 2 Locate the metal contacts on the end of the lithium-ion battery. -
Page 10: Charging The Handheld Device
Charging the Handheld Device NOTICE To prevent corrosion, thoroughly dry the USB port, the weather cap, and the surrounding area before charging or connecting to a computer. NOTE: The device does not charge when it is outside the approved temperature range (Alpha Handheld Device Specifications, page 39). -
Page 11: Charging The Dog Collar Device
Charging the Dog Collar Device NOTICE To prevent corrosion, thoroughly dry the contacts on the dog collar device and the surrounding area before connecting the charging clip. NOTE: Your dog collar device may look different than the device pictured. You should fully charge the battery before you use the dog collar device for the first time. Charging a fully depleted battery takes about five hours. -
Page 12: Using The Status Page
TIP: For the best connection with satellites, place the device with the antenna pointed toward the sky. Activating the Device WARNING Before you can use the inReach features of your Alpha 300i device, including messaging, SOS, tracking, and inReach Weather, you must activate it. 1 From your computer or smartphone, go to explore.garmin.com... -
Page 13: Dog Collar Device Setup
Dog Collar Device Setup Methods to Add a Dog Collar Device to a Handheld Device If you purchased the dog collar device and the handheld device separately, you must add the dog collar device to the handheld device. You can add up to 250 devices to one handheld device by using MURS/VHF, entering the track and control codes, or by sharing wirelessly using ANT+ technology. -
Page 14: Sharing A Dog Wirelessly
The navigator and dog collar device allow the user to install a different antenna. Changing the antenna can result in improved radio performance and higher radiated power. You must not use the device with a third party antenna or an antenna not approved by Garmin ®... -
Page 15: Managing A Group
Managing a Group Before you can create a group, you must pair one or more dog devices to your handheld. 1 Select Dog List. 2 Select 3 If necessary, select Create Group, enter a group name, and add devices to the group. 4 Select a group from the list. -
Page 16: Changing The Dog Id
Changing the Dog ID Before you can change the dog ID, the collar must be turned on and within range of the handheld device. If you are experiencing interference from other collars or handheld devices in the area, you might need to change the ID for the dog. -
Page 17: Communication With The Dog Collar Device
Communication with the Dog Collar Device You should keep an unobstructed line of sight between your navigator and dog collar device to produce the best communication signal. To achieve the best line-of-sight conditions, you should move to the highest elevation point in your area (for example, on the top of a hill). -
Page 18: Using The Channel View
Using the Channel View Both your Alpha handheld navigator and dog collar device broadcast data over individual channels. Channels are identified using unique IDs. You can update your ID to maintain a clear signal and avoid interference from other dog devices. 1 Select >... -
Page 19: Dog Status Icons
Dog Status Icons Sitting Running On point Treed Unknown Dog Tracking Compass To open the dog tracking compass, select You can use the dog tracking compass to view the direction and distance to your dog, your vehicle, and any paired devices. The dog tracking compass also shows the dog's status, such as running or on point (Dog Status Icons, page 13). -
Page 20: Location Alerts
Location Alerts Location alerts notify you when your dogs enter or exit a particular location. You can create a custom geofence or use a radius around your current location. A geofence is an invisible boundary around an area and is created using points on the map. The virtual boundaries of a geofence are accurate up to approximately 3 m (10 ft.). -
Page 21: Customizing The Training Keys
Right Button: Sets the default training mode for the right training button. inReach Features WARNING Before you can use the inReach features of your Alpha 300i device, including messaging, SOS, tracking, and inReach Weather, you must have an active satellite subscription. Always test your device before you use it outdoors. -
Page 22: Messages
Messages Your Alpha 300i device sends and receives text messages using the Iridium satellite network. You can send messages to an SMS phone number, an email address, or another device that uses inReach technology. Each message you send includes your location details where allowed. -
Page 23: Navigating To A Message Location
Show On Map: Displays inReach messages on the map. inReach Tracking You can use the tracking feature on your Alpha 300i device to record track points and transmit them over the Iridium satellite network at the specified send interval. Track points appear on the Garmin Explore website and the MapShare tracking page. -
Page 24: Sharing Your Mapshare Web Page
During an emergency, you can use your Alpha 300i device to contact the Garmin Response center to request help. Pressing the SOS button sends a message to the Garmin Response team, and they notify the appropriate emergency responders of your situation. You can communicate with the Garmin Response team during your emergency while you wait for help to arrive. -
Page 25: Initiating An Sos Rescue
For the first 10 minutes of your rescue, an updated location is sent to the emergency response service every minute. To conserve battery power after the first 10 minutes, an updated location is sent every 10 minutes. TIP: You can also initiate an SOS rescue and interact with the Garmin Response team using the Garmin Messenger app. -
Page 26: Weather
Weather inReach Weather: You can receive weather information through your inReach subscription. Your device can send an inReach message to request basic, extended, or marine weather forecasts. You can receive weather forecasts for your current location or a new location, such as a saved waypoint. Weather forecasts incur data charges or additional charges on your inReach subscription. -
Page 27: Connected Features
Garmin device. You can use the app to download maps for offline access, and then navigate anywhere without using your cellular service. You can download the Garmin Explore app from the app store on your phone, or you can go to explore.garmin .com. -
Page 28: Garmin Messenger App
Garmin Messenger App WARNING Before you can use certain inReach features of the Garmin Messenger app, including SOS, tracking, and inReach Weather, you must have an active satellite subscription and a connected inReach device. Always test the app before you use it outdoors. -
Page 29: Methods To Add A Contact To A Handheld Device
Methods to Add a Contact to a Handheld Device Using MURS/VHF: Allows you to add a handheld device contact after you have placed your handheld device into pairing mode. This method is helpful when you are adding a new device to the system prior to leaving for the hunt (Adding a Contact Using Wireless Pairing, page 23). -
Page 30: Sending A Message To Your Contacts
Sending a Message to Your Contacts Before you can send a message to your contacts, you must turn on the transmitter (Turning On and Off the Transmitter, page 22). You can send and receive automated messages. There are 18 messages you can choose from, such as "Help" and "I'm Coming."... -
Page 31: Marking Your Truck Location
Marking Your Truck Location You can mark the location of the truck, so you can navigate back to your truck after the hunt. 1 Select Mark Waypoint > Truck. 2 Select Save. Marking a Covey You can mark a covey location and enter the estimated number of birds flushed and the number of birds taken. 1 Select Mark Waypoint >... -
Page 32: Waypoints, Routes, And Tracks
Waypoints, Routes, and Tracks Waypoints Waypoints are locations you record and store in the device. Waypoints can mark where you are, where you are going, or where you have been. You can add details about the location, such as name, elevation, and depth. You can add a .gpx file that contains waypoints by transferring the file to the GPX folder (Connecting the Handheld Device to a Computer,... -
Page 33: Increasing The Accuracy Of A Waypoint Location
Increasing the Accuracy of a Waypoint Location You can refine a waypoint location for more accuracy. When averaging, the device takes several readings at the same location and uses the average value to provide more accuracy. 1 Select Waypoint Manager. 2 Select a waypoint. -
Page 34: Navigating A Saved Route
Navigating a Saved Route 1 Select Navigation > Route Planner. 2 Select a route. 3 Select View Map > Go. Editing a Route 1 Select Navigation > Route Planner. 2 Select a route. 3 Select Edit Route. 4 Select a point. 5 Select an option: •... -
Page 35: Viewing Details About The Track
Viewing Details about the Track 1 Select Track Manager. 2 Select a track. 3 Select The beginning and the end of the track are marked by flags. 4 Select the information bar along the top of the screen. Information about the track is listed. Viewing the Elevation Plot of a Track 1 Select Track Manager. -
Page 36: Map
represents your location on the map. As you travel, the icon moves and leaves a track log. Waypoint names and symbols appear on the map. When you are navigating to a destination, your route is marked with a line on the map. -
Page 37: Elevation Plot
Elevation Plot By default, the elevation plot displays the elevation for an elapsed time. To open the elevation plot, select Track Manager > My Track > Calibrating the Barometric Altimeter You can calibrate the barometric altimeter manually if you know the correct elevation or the correct barometric pressure. -
Page 38: Setting A Proximity Alarm
Setting a Proximity Alarm Proximity alarms alert you when you or your dogs are within a specified range of a particular location. A tone sounds when you enter the designated radius. 1 Select Proximity Alarms. 2 Select Create Alarm. 3 Select a category. 4 Select a location. -
Page 39: Managing Maps
• To download premium maps and activate your Outdoor Maps+ subscription for this device, select Check Subscription. NOTE: Go to garmin.com/outdoormaps for information about purchasing a subscription. 3 Select > Layer Information to view details about the map layers (optional). -
Page 40: Customizing Your Device
Customizing Your Device Customizing the Main Menu 1 From the main menu, select > Main Menu > Main Menu. 2 Select an option: • To move a menu item, select a menu item, and select Move Up or Move Down. •... -
Page 41: Display Settings
Display Settings Select > Display. Backlight Timeout: Adjusts the length of time before the backlight turns off. Battery Save: Saves the battery power and prolongs the battery life by turning off the screen when the backlight times out (Turning On the Handheld Battery Save Mode, page 40). -
Page 42: Advanced Map Settings
Advanced Map Settings Select > Map > Advanced. Orientation: Adjusts how the map is shown on the page. North Up shows North at the top of the page. Track Up shows your current direction of travel toward the top of the page. Automotive Mode shows an automotive perspective with the direction of travel at the top. -
Page 43: Routing Settings
Remote: Allows you to enable or disable the inReach remote function and device verification. NOTE: You can pair a compatible Garmin device and use it to remotely send messages from your Alpha device. Changing the Units of Measure You can customize units of measure for distance and speed, elevation, and temperature. -
Page 44: Support And Updates
Support and Updates • You can update software and maps for your handheld device and compatible dog collar device using Garmin Express ™ • Go to support.garmin.com for FAQs, videos, and more information. Product Updates On your computer, install Garmin Express (www.garmin.com/express). -
Page 45: Specifications
Contact your local waste disposal department to properly recycle the batteries. Only for use with Garmin part number 361-00053-04. The device withstands incidental exposure to water of up to 1 m for up to 30 min. For more information, go to www.garmin.com/waterrating. Only for use with Garmin part number 361-00035-16. -
Page 46: Long-Term Storage
Long-Term Storage NOTICE The normal long-term decrease in the charging capacity of lithium-ion batteries can be accelerated by exposure to elevated temperatures. Storing a fully charged device in a location with a temperature outside the long-term storage temperature range can significantly reduce its recharging capacity. When you do not plan to use the handheld device for several months, the battery should be removed. -
Page 47: Saving Energy While Charging The Device
Saving Energy While Charging the Device You can turn off the device display and all other features while charging. 1 Connect your device to an external power source. The remaining battery capacity appears. 2 Hold the power key for 4 to 5 seconds. The display turns off, and the device goes into a low power, battery charging mode. -
Page 48: Connecting The Handheld Device To A Computer
Connecting the Handheld Device to a Computer NOTICE To prevent corrosion, thoroughly dry the USB port, the weather cap, and the surrounding area before charging or connecting to a computer. 1 Lift the weather cap 2 Plug the small end of the USB cable into the USB connector on the device. -
Page 49: Deleting Files
If you do not know the purpose of a file, do not delete it. Your device memory contains important system files that should not be deleted. 1 Open the Garmin drive or volume. 2 If necessary, open a folder or volume. -
Page 50: Tips For Pairing Wireless Sensors
Tips for Pairing Wireless Sensors • Verify that the sensor is compatible with your Garmin device. • Before you pair the sensor with your Garmin device, move 10 m (33 ft.) away from other sensors with ANT+ technology. • Bring the Garmin device within range 3 m (10 ft.) of the sensor. -
Page 51: Data Field Options
Data Field Options 24 hr. Max. Temperature: The maximum temperature recorded in the last 24 hours. 24 hr. Min. Temperature: The minimum temperature recorded in the last 24 hours. Accuracy of GPS: The margin of error for your exact location. For example, your GPS location is accurate to within +/- 12 ft. - Page 52 Grade: The calculation of rise (elevation) over run (distance). For example, if for every 10 ft. (3 m) you climb you travel 200 ft. (60 m), the grade is 5%. Heading: The direction you are moving. Lap Ascent: The vertical distance of ascent for the current lap. Lap Descent: The vertical distance of descent for the current lap.
- Page 53 Velocity Made Good: The speed at which you are closing on a destination along a route. You must be navigating for this data to appear. Vertical Dist. to Dest.: The elevation distance between your current position and the final destination. You must be navigating for this data to appear.
- Page 54 May 2023 GUID-6D545062-562E-441A-969F-C22D9A5E20F3 v1...
Need help?
Do you have a question about the Alpha 300i and is the answer not in the manual?
Questions and answers