Advertisement
Introduction
Your RIFF is a handy recording interface designed specifically for the guitarist and bassist. It connects directly to your PC, Mac, or Apple iOS device via USB. The design is intuitive and uncluttered, providing quick access to all features. Extras include direct signal monitoring that allows latency-free recording. Plus, you'll even find a variety of preset guitar tones. So let's get started.
Getting Connected

-
OUTPUT JACK
This stereo jack provides a mix of the audio being played back along with the input signal – depending on the input volume set by the RIFF DIRECT parameter. Use the appropriate cabling to connect this output to your monitoring system, if desired. This signal is identical to the![]() jack signal.
jack signal. -
USB
The USB connection establishes a two-way audio connection between RIFF and your computer, and also provides RIFF with the power it needs. The display will indicate RIFF is connected and ready to use. -
![]() HEADPHONE OUTPUT
HEADPHONE OUTPUT
The audio signal present at this jack is identical to the OUTPUT jack signal. This 3.5mm (1/8") stereo jack can accommodate headphones rated from 16 Ohms to 64 Ohms. -
INPUT
Plug your guitar or bass directly into this jack.


Selecting RIFF as the Input on your Computer
In general, if you connect RIFF to your computer before launching your recording software, it will automatically recognize RIFF and select it as the audio input source. If not, you will have to choose it manually. For Mac, open System Settings and select Sound. Click on the Input tab and choose RIFF (Positive Grid). PC users will need to open the Control Panels and select Sound. Click on the Recording (input) tab and select RIFF (Positive Grid).

Selecting RIFF as the Output
Depending on your setup, you may or may not want to use RIFF as the output device. If you have an existing computer music rig that is already connected to your studio monitoring system, you may want to continue to use that system. Using RIFF is ideal if you are working with headphones or a personal monitoring system.
Using the Controls
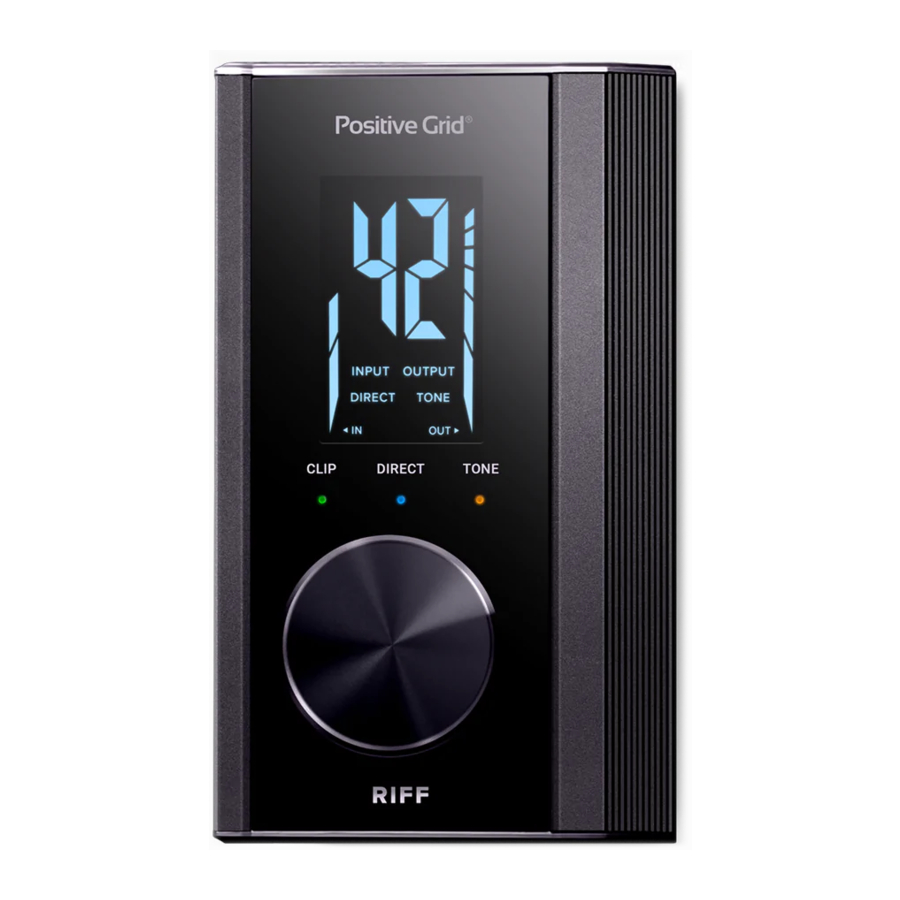
DISPLAY
The display shows the current parameter (indicated by a box around the parameter name) and its value (shown by the two digit display in the center of the screen). The left side of the screen shows a vertical Input Level meter; the right side of the screen shows a vertical Output Level meter.
INDICATOR LIGHTS
Just below the display are three indicator lights.
- CLIP:
When an input signal is present, this LED will be green. Red indicates that the maximum level has been exceeded and clipping has occurred. Lower the input level if this indicator is frequently red. - DIRECT:
This blue LED is a visual reminder that the value of the DIRECT parameter is set to a value other than 0 (Off). - TONE:
This amber LED is a visual reminder that one of the preset TONEs is selected.
CONTROL KNOB
RIFF is operated completely via the Control Knob. Pushing down on the Control Knob will advance the selected parameter from INPUT to OUTPUT to DIRECT to TONE and back to INPUT in a continuous loop. Rotating the Control Knob changes the value of the selected parameter, as indicated in the display.

Parameters
INPUT (0 to 50)
This parameter sets the volume of the input signal. There is a vertical Input Volume meter along the left edge of the display. Remember that the CLIP warning LED can be affected by the value of this parameter.

OUTPUT (0 to 50)
This parameter sets the volume of the output signal. There is a vertical Output Volume meter along the right edge of the display. Keep this level somewhat high to minimize noise. Use the volume controls on your external monitoring system to set a safe listening level.

DIRECT (0 to 10)
This parameter mixes the Direct, or dry, input signal with the wet output of your recording software. By mixing in the direct signal, you can record with zero latency when recording or overdubbing new parts. While some software packages may do this on their own, this is very convenient when using RIFF alone with a laptop and headphones, for example. If the DIRECT parameter is set to a value other than 0 (Off), the DIRECT indicator will light.

TONE (0, 1, 2, 3)
RIFF relies on DSP technology to create a number of preset TONEs. These built-in TONEs were created to replicate some of the most popular guitar effect pedals, making it simple to get a great sound as you record (TONEs are only applied to the input / Direct signal). Select the TONE parameter and rotate the wheel to choose a TONE. When a TONE other than 0 (Off) is selected, the TONE indicator will light.

- TONE 1: MODERN
This option adds a mild amount of compression to the Direct signal for a more consistent sound. - TONE 2: TRANSPARENT
Selecting this option will enhance the low and high frequencies to create an authentic full-range sound. - TONE 3: OLD SCHOOL FAT
This option adds a boost to the midrange frequencies, creating a chunkier, fatter sound. - 0: OFF
No TONE is applied.
CONTACT US
Visit our online Help Center for user manuals,
FAQs, or to contact our support team.
Help Center: https://help.positivegrid.com/
In The Box
- Positive Grid Riff
- Lightning Cable
- Quick Start Guide
- USB Cable (Type A)


VideosRIFF Guitar Audio Interface – Demo & Overview Video
Documents / ResourcesDownload manual
Here you can download full pdf version of manual, it may contain additional safety instructions, warranty information, FCC rules, etc.
Advertisement


Need help?
Do you have a question about the RIFF and is the answer not in the manual?
Questions and answers