Advertisement
Quick Links
Advertisement

Related Manuals for ADIRmed Viva ADIME902-BASE-48-LS-GRY


Summary of Contents for ADIRmed Viva ADIME902-BASE-48-LS-GRY
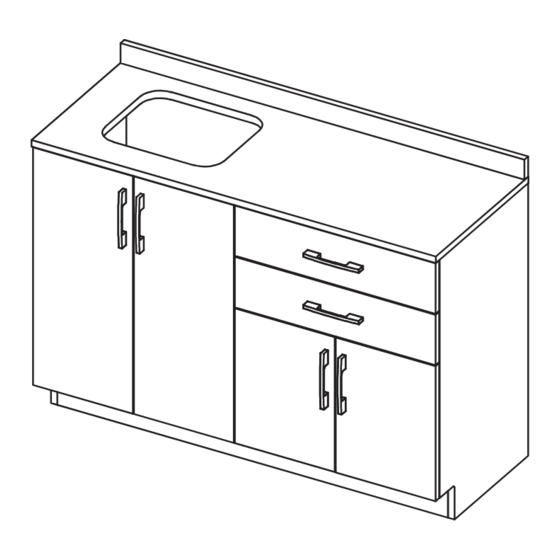
- Page 1 48 INCH COUNTERTOP WITH LEFT SINK CUTOUT ADIME902-BASE-48-LS-GRY USER GUIDE...
- Page 2 Thank you for your purchase. Viva by AdirMed maintains a strong practice of ongoing development of products and commercial research. We recognize that starting and maintaining a medical practice is Additionally, our team of specialists will ensure everything you your clients.
-
Page 3: Table Of Contents
Table of Contents Parts Hardware Assembly Instructions Medical Sink with Faucet and Handles Installation Notes Warranty... -
Page 4: Parts
Parts Left Side Panel Right Side Panel Middle Panel Bottom Panel Removable Shelf 1 Removable Shelf 2 Top Back Rail Top Front Rail Top Back Rail 1 Back Panel Center Back Rail Bottom Back Rail Left Door 1 Left Door 2 Right Door 1 Right Door 2 Toe Kick... - Page 5 Drawer Back 1 Drawer Front 1 Dr awer Front 2 Drawer Right Side 2 Drawer Back 2 Drawer Bottom Drawer Bottom 2 Drawer Face 1 Drawer Face 2 Top Filler Left Cutout Top 1 Tools Needed (But Not Included): Phillips Head Flat Head Electric Screwdriver...
-
Page 6: Hardware
Hardware Handle (x6) Ø4x25mm Screw (x12) -
Page 7: Assembly Instructions
Assembly Instructions Before starting, ensure you have an open, clean area to assemble your cabinet. Ensure you have all the necessary parts and hardware listed above. We highly recommend hiring a professional contractor to assemble and install your cabinet(s). - Page 13 Slide the Back Pan...
- Page 15 two Handles (M); lay it on a flat, clean surface. Affix the four Hinges (K) in place with eight Ø4x15 mm Wooden Screw (D) and a Philips head screwdriver.
- Page 17 Insert four Ø4x40 mm Wooden Screws (H) from underneath the Top 1 ( ) through the Top Filler (...
- Page 18 1 Set...
- Page 21 Attach the mounting plates to the Hinges (J/K) with two Ø4x15mm Wooden Screws (D) per Hinge (J/K).
-
Page 22: Medical Sink With Faucet And Handles Installation
Medical Sink with Faucet and Handles Installation Medical Sink Faucet and Handles Rubber Washer (x2) Metal Washer (x2) Hex Nut (x2) Sink Clips (x8) Rubber Washer Plastic Drainer (Drainer) M6 x 20mm Screw Metal Drainer Tools Needed (But Not Included): Latex or 100% Phillips Head Silicone Caulk... - Page 23 We highly recommend using two people to install your Medical Sink. Before installing your Medical Sink (A), apply a bead of caulk around the edge of the cutout. Line up and insert the Medical Sink (A) into the cutout and apply even pressure from both sides. Grab your Sink Clips (4) and partially thread the included screws into each clip.
- Page 24 A. Locate your Faucet and Handles (B) and remove the following hardware on the bottom of the handles. a. Two Rubber Washers (1). b. Two Metal Washers (2). c. Two Hex Nuts (3). B. Place the Faucet and Handles (B) into the holes on top of the sink.
- Page 25 A. Open your cabinet door on your base cabinet and go under the countertop. B. Secure a Rubber Washer (1) to one of the metal threads that connect to the handles. C. Then secure a Metal Washer (2) and the Hex Nut (3). a.
-
Page 26: Notes
Notes... -
Page 27: Warranty
Warranty Adir Corp (the “Company” or “Tiger Companies”) warrants to the purchaser that the product will be free from defects in workmanship and materials for a period of 3 years from the date of purchase. The warranty period is not extended if we repair, replace, exchange, or provide a refund for the product (as determined in our sole discretion). - Page 28 ADIME902-BASE-48-LS-GRY © 2023 AdirCorp adircorp.com...
Need help?
Do you have a question about the Viva ADIME902-BASE-48-LS-GRY and is the answer not in the manual?
Questions and answers