Advertisement
Quick Links
NOTE: Partitions slide in from the bottom of the units, so it is easiest to assemble the shelving upside down
1
Tools needed: 1/2" box
wrench and 1/2" socket wrench,
and phillips Head Screwdriver.
(Power drill recommended)
2
Prepare all STARTER panel
bolts with washers AND lock
washers.
3
Line up the top frame block holes with the barrel inserts found in the top of the Upright/End Panel. Pass bolts
with washers through the top frame blocks and HAND TIGHTEN the bolts.
4
Align the top frame edges with the edge
band lines on the Upright/End Panel. Use
the 1/2" wrench to tighten each bolt slowly.
Top frame can be lightly tapped with your
hand to maintain alignment during tight-
ening. DO NOT over tighten panel bolts.
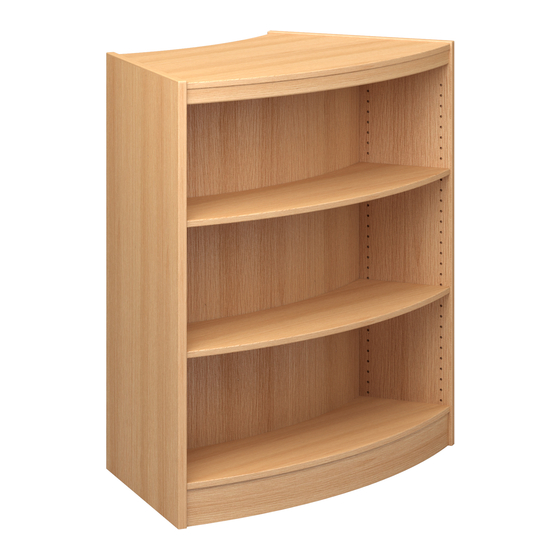
STARTER & ADDER ASSEMBLY
RADIUS SHELVING UNITS - STATELY SERIES
ASSEMBLY INSTRUCTIONS FOR 36",42",48",60"
TOP OF UPRIGHT /
END PANEL - Indicated with
single barrel inserts.
NOTE: Intermediate Panels will not have threaded barrel inserts, but will have
holes that go all the way through the panel to allow adder bolts to
TOP FRAME
BOLTS &
WASHERS
UPRIGHT /
END PANEL
UPRIGHT /
END PANEL
GROOVE
FOR
PARTITION
BOTTOM
FRAME(S)
The bottom frames also have blocks with holes that will be lined
5
up with the threaded barrel inserts found in the Upright/End
Panel. Pass bolts with washers (as pictured in step 2)
through the bottom frame blocks and HAND TIGHTEN. Once
all bolts are hand tightened, wrench tighten all bottom frame bolts.
BOTTOM OF UPRIGHT / END
PANEL - Indicated with double
holes
pass through.
Advertisement

Summary of Contents for Russwood STATELY RADIUS SHELVING UNIT
- Page 1 STARTER & ADDER ASSEMBLY RADIUS SHELVING UNITS - STATELY SERIES ASSEMBLY INSTRUCTIONS FOR 36”,42”,48”,60” NOTE: Partitions slide in from the bottom of the units, so it is easiest to assemble the shelving upside down Tools needed: 1/2” box TOP OF UPRIGHT / BOTTOM OF UPRIGHT / END wrench and 1/2”...
- Page 2 Starter and Adder Units are con- nected with Intermediate Panels. Intermediate Panels have holes on both sides. Pass bolts with washers (as pictured) through the bottom frame blocks and intermediate panel. Repeat the process with the top frames ADDER HARDWARE bottom view (units shown upside down) Position the plywood partition so that the wood grain will be running vertically when...
Need help?
Do you have a question about the STATELY RADIUS SHELVING UNIT and is the answer not in the manual?
Questions and answers