
Summary of Contents for DINAZA DINNING TABLE WITH STORAGE
- Page 3 ASSEMBLY INSTRUCTIONS 1 OF 25...
-
Page 4: Board Identification
BOARD IDENTIFICATION 2 OF 25... -
Page 5: Parts List
PARTS LIST MAIN PANEL MAIN PANEL SIDE PANEL QTY:2 QTY:2 BOTTOM SEAL PANEL LAYER BOARD QTY:2 LEFT RISER RIGHT RISER DOOR QTY:4 QTY:4 QTY:2 PULL PLATE PULL PLATE QTY:4 QTY:4 3 OF 25... - Page 6 CAM BOLT CAM LOCK WOOD DOWEL SCREW F7*30 F15*11 F8*30 F3.5*14 SCREW PULLEY PULLEY CORNER CODE F4*35 SCREW HANDLE MAGNETIC PUSH SPIKES F4*18 LATCH HINGE 4 OF 25...
- Page 7 STEP 1 -Screw the cam bolt (A) into the panel (1). -Install hinge (Q) to panel (1) with screws (D). (Attention:Cam bolt & Insert nut need to be put together) 5 OF 25...
- Page 8 STEP 2 -Screw the cam bolt (A) into the panel (4). -Insert wood dowels (C) into panel (4). (Attention:Cam bolt & Insert nut need to be put together) 6 OF 25...
- Page 9 STEP 3 -Screw the cam bolt (A) into the panel (3) & (8) & (9). -Insert wood dowels (C) into panel (11). (Attention:Cam bolt & Insert nut need to be put together) 7 OF 25...
- Page 10 STEP 4 -Attach panel (5) & (6) to (4) and lock with cam (B). 8 OF 25...
- Page 11 STEP 5 -Insert wood dowels (C) into panel (5) & (6) . 9 OF 25...
- Page 12 STEP 6 -Attach panel (4) to (5) & (6) and lock with cam (B). 10 OF 25...
- Page 13 STEP 7 -Insert wood dowels (C) into panel (4) & (5) & (6) . 11 OF 25...
- Page 14 STEP 8 -Attach panel (3) to (4) & (5) & (6) and lock with cam (B). 12 OF 25...
- Page 15 STEP 9 -Insert wood dowels (C) into panel (3) & (4) . 13 OF 25...
- Page 16 STEP 10 -Attach panel (1) to (3) & (4) and lock with cam (B). 14 OF 25...
- Page 17 STEP 11 -Install hinge (Q) to panel (2) with screws (D). 15 OF 25...
- Page 18 STEP 12 -Attach corner code (H) to plane (3) & (6) with screw (D) 16 OF 25...
- Page 19 STEP 13 - Install pulley (G) to panel (6) with screws (D). 17 OF 25...
- Page 20 STEP 14 -Attach panel (8) & (9) to (11) and lock with cam (B). -Attach panel (8) & (9) to (10) with screw (E). 18 OF 25...
- Page 21 STEP 15 -Screw the cam bolt (A) into the panel (7). (Attention:Cam bolt & Insert nut need to be put together) 19 OF 25...
- Page 22 STEP 16 -Install handle (I) to panel (7) with bolts (J). -Knock spikess (K) into panel (7) as below shown. -Install pulley (F) to panel (7) with screws (D). 20 OF 25...
- Page 23 STEP 17 -Attach panel (8) & (9) & (10) to (7) and lock with cam (B). 21 OF 25...
- Page 24 STEP 18 -Install magnetic push latch (L) to panel (7) with screws (D). 22 OF 25...
- Page 25 STEP 19 -Install hinge (Q) to panel (7) with screws (D). 23 OF 25...
- Page 26 STEP 20 - Install hinge (Q) to panel (4) with screws (D). 24 OF 25...
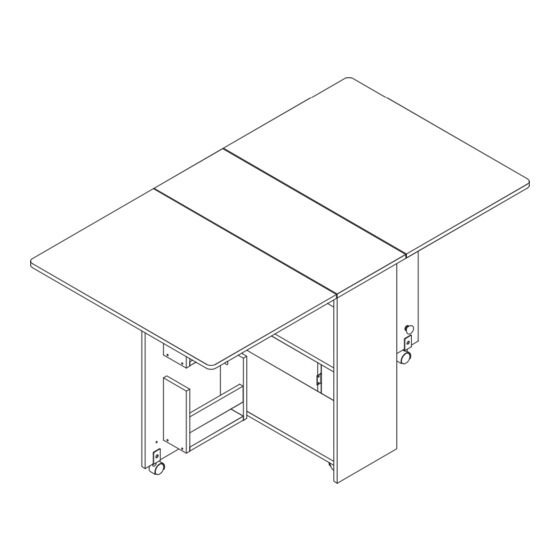
- Page 27 STEP 21 -Installation complete. 25 OF 25...
Need help?
Do you have a question about the DINNING TABLE WITH STORAGE and is the answer not in the manual?
Questions and answers