Advertisement
Quick Links
11 Callywhite Business Park, Callywhite Lane, Dronfield S18 2XP
+44(0)1246 417113
Features:
• Connects to home WiFi
• Turn devices on and off remotely through the App
• Manage numerous smart switches and other Tuya compatible smart devices from
one App
• Compatible with Amazon Alexa, Google Assistant & Siri (via Shortcuts)
• Set schedules and timers
• Switch device on automatically when you get home (Beta)
• Share access with other users permanently or for a set time period
• Remove access to other users instantly
• Latching or timed mode
• Group device management
• Built in 433.92MHz receiver for remote controls
Specification:
• Input voltage: 7-32Vac/dc
• Max current load: 10A
• WiFi standard: 2.4GHz, 802.11 b/g/n
• Standby/max current draw: 80mA/115mA
•
Dimensions: 73 x 46 x 30mm
sales@cproxltd.com
CPWIFISW2
2 Channel WiFi Smart Switch Manual
www.quantek.co.uk
Advertisement

Related Manuals for C Prox CPWIFISW2

Summary of Contents for C Prox CPWIFISW2
- Page 1 11 Callywhite Business Park, Callywhite Lane, Dronfield S18 2XP +44(0)1246 417113 sales@cproxltd.com www.quantek.co.uk CPWIFISW2 2 Channel WiFi Smart Switch Manual Features: • Connects to home WiFi • Turn devices on and off remotely through the App • Manage numerous smart switches and other Tuya compatible smart devices from one App •...
-
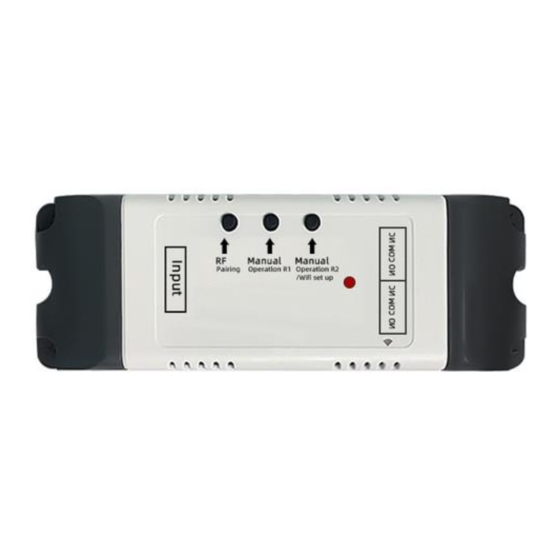
Page 2: Device Setup
Device setup Download the ‘Smart Life’ App by searching in the mobile App stores or scanning the following QR codes. 2. Create an account in the App, or if you already have an account just login. 3. Use a flat screwdriver to prise off the dark grey end covers. 4. - Page 3 Wiring examples Light Set mode to latching DC Motor Set interlocking mode Gate Set both outputs to inching mode - 2 secs Refer to gate panel manual for Start and Pedestrian Start terminals RC2000 Set both outputs to inching mode - 2 secs...
- Page 4 5. Reset the smart switch by pressing the reset button for 5 seconds until the red network LED indicator is flashing quickly every 0.5 seconds (if the network indicator is already flashing quickly, skip this step). 6. Add & connect the device in the App Select a 2.4GHz WiFi network, After a few seconds the device enter your password and click...
-
Page 5: App Functions
App functions 3. Rename Offline notification Third-party control Share Device Create group Remove device Tap here to enter function operation interface. 4. Smart scenes 2. Relay status 1. Countdown Siri Interlock setting Schedule RF remote control setup Circulate Random Inching 1. - Page 6 2. Set the following: Relay status (when the device is switched back on after losing power) Interlock mode Tap Add, select both switches and click Save Then only one switch can be on at a time RF remote control setup Tap Add When prompted, press the remote control button you want to add within 10 seconds The message ‘The remote has been added’...
- Page 7 Share device with other users Other users must have a Smart Life account Tap ‘Share with the Account Tap ‘Share Device’ Tap ‘Add Sharing’ Smart Life’. Enter the email or phone number Then you can set a validity of the account you want to share Tap on the name of the account period (if required) or unshare with and click ‘Done’...
- Page 8 Create smart scenes and setup Siri Tap ‘Scene’ then ‘+’ or ‘Create Scene’ Tap ‘Launch Tap-to-Run’ Tap ‘+’ Tap ‘Run the Device’ Select the name of switch again, select ‘ON’ and then tap ‘Save’ Tap the 3 dots to rename the Select the appropriate switch followed by ‘Next’...
- Page 9 Tap ‘Change Voice Phrase’ and Select the scene enter the desired phrase Tap ‘Done’ Please note, to use with Siri on other phones, you must share the ‘Home’ with other accounts, rather than just the device. Tap ‘Me’ > ‘Home Management’ > Select the name of the Home > ‘Add Member’ Please also make sure that the ‘Shortcuts’...
- Page 10 Setup Alexa Link Alexa and Smart Life Apps. You may need to login to Amazon/Alexa. In the Alexa App, tap ‘Devices’ then scroll across to ‘All Devices’ Tap the name of the switch Tap ‘Create a Routine’ Tap the ‘+’...
- Page 11 Tap ‘Voice’ and enter the Name the routine. Then tap desired voice command. Then ‘When this Happens’ tap ‘Next’ Tap ‘Add Action’ Tap ‘Smart Home’ Tap ‘All devices’ Tap the name of the switch Tap ‘Power – ON’ then ‘Next’ Save your routine...
- Page 12 Switch device automatically when you get home Please note this feature is a Beta service and requires location services to be on all the time. Tap ‘Scene’ then ‘+’ or ‘Create Select location. Zoom in or out to Scene’ Tap ‘When location changes’. Tap ‘Arrive’.
- Page 13 Rename the scene and choose Tap the 3 dots the effective period (if required) Choose and tap ‘Next’ Tap ‘Save’...
Need help?
Do you have a question about the CPWIFISW2 and is the answer not in the manual?
Questions and answers