Table of Contents
Advertisement
Quick Links
Advertisement
Table of Contents

Subscribe to Our Youtube Channel
Related Manuals for Broadcast Electronics Marti Electronics SR-30

Summary of Contents for Broadcast Electronics Marti Electronics SR-30
- Page 1 Broadcast Electronics 4100 North 24 Street, Quincy, Illinois 62305 USA • Phone (217) 224-9600 • Fax (217) 224-9607 • www.bdcast.com • bdcast@bdcast.com SR–30 RPU RECEIVER SR–40A RPU RECEIVER Marti Electronics SR-30 SR-40A RPU Receiver 597-8104 rev B March 24, 2011...
- Page 2 The information in this publication is subject to improvement and change without notice. Although every effort is made to ensure the accuracy of the information in this manual, Broadcast Electronics accepts no responsibility for any errors or omissions. Broadcast Electronics reserves the right to modify and improve the design and specifications of the equipment in this manual without notice.
- Page 3 Marti Electronics Product Warranty (One-Year Limited) Broadcast Electronics (BE) hereby warrants all new Marti Electronics branded products, including STL systems, manufactured by BE, against any defects in material or workmanship at the time of delivery thereof, or that develop under normal use within a period of one (1) year, from the date of shipment.
- Page 4 NO OTHER WARRANTIES, OR ANY AFFIRMATIONS OF FACT OR PROMISES BY BE, WITH REFERENCE TO THE EQUIPMENT, OR TO MERCHANTABILITY, FITNESS FOR A PARTICULAR APPLICATION, SIGNAL COVERAGE, INFRINGEMENT, OR OTHERWISE, WHICH EXTEND BEYOND THE DESCRIPTION OF THE EQUIPMENT ON THE FACE HEREOF. ©2011 Broadcast Electronics...
- Page 5 Emergency and warranty replacement parts may be ordered from the following address. Be sure to include the equipment model number, serial number, part description, and part number. Non- emergency replacement parts may be ordered directly from the Broadcast Electronics stock room at the number shown below.
- Page 6 All returned merchandise must be sent freight prepaid and properly insured by the customer. MODIFICATIONS - Broadcast Electronics, reserves the right to modify the design and specifications of the equipment in this manual without notice. Any modifications shall not adversely affect performance of the equipment so modified.
- Page 7 Additional information follows. D. RF BURNS - Circuit boards with RF power transistors contain high RF potentials. Do not operate an RF power module with the cover removed. ©2011 Broadcast Electronics...
- Page 8 The power components in the transmitter are cooled by forced-air and natural convection. When handling any components of the transmitter after it has been in operation, caution must always be taken to ensure that the component is cool enough to handle without injury. ©2011 Broadcast Electronics...
-
Page 9: Table Of Contents
IF Amplifier/Detector Circuit Board Adjustments ........21 Decode Board Circuit Board Adjustments ..........21 POWER SUPPLY/METER CALIBRATION ............ 22 SR 30 BILL OF MATERIAL ............... 23 SR 40A BILL OF MATERIAL ..............33 ©2011 Broadcast Electronics... - Page 10 Wideband Converters and Filters ............43 SCHEMATICS ..................68 ©2011 Broadcast Electronics...
-
Page 11: Introduction
SR-30 / SR-40A RPU Receivers 1 Introduction The Marti SRPT-30 and SRPT-40A Transmitters with companion SR-30/SR-40A Receivers, form a high quality FM, synthesized, point-to-point, line of sight, radio communications link for remote broadcast applications. The SR-30 receiver is a dual channel unit that can be programmed on any 2 frequencies within a 50 MHz band. - Page 12 Accessory Connector: 15-pin D connector Weight: Net 67 pounds. (3.0 kilograms). Dimensions: 3.5 in. high x 12 in. wide x 15 in. deep. (8.9 cm. high x 30.5 cm. wide x 38.1 cm. deep.) Regulatory: FCC, DOC ©2011 Broadcast Electronics...
-
Page 13: Available Options For The Sr-30/Sr-40A Receivers
1.1.1 ORDERING INFORMATION MARTI PART # Description SR30–150–025 SR–30 RPU Receiver, 135 to 182 MHz, 2 Channel, 25 KHz Receive Bandwidth, 110/220VAC 50/60 Hz Operation. SR30–150–036 SR–30 RPU Receiver, 135 to 182 MHz, 2 Channel, 36 KHz Receive Bandwidth, 110/220VAC 50/60 Hz Operation. -
Page 14: Installation
J4–4 (signal) and J4–1 (ground). Once the audio cable is installed, connect the mating connector to the J4 receptacle on the rear–panel. CAUTION IF DC OPERATION IS REQUIRED, DO NOT APPLY MORE THAN +14V TO THE UNIT. ©2011 Broadcast Electronics... - Page 15 3. Ensure the receiver rear–panel ON/OFF switch is OFF. Connect the rear–panel AC line receptacle to an 85 to 264V, 47 to 63 Hz AC power source. USE ONLY A 3–PRONG GROUNDED OUTLET RECEPTACLE FOR SAFETY. The unit can also be operated from a +10V to +14V external dc supply. If DC operation is required, refer to Figure 1 and connect: 1) the positive wire to J4–7 and 2) ground to J4–8.
- Page 16 ©2011 Broadcast Electronics...
-
Page 17: Mobile Repeater Connections
Mobile Repeater Connections A mobile repeater installation requires one of the following Receiver to Transmitter cables: For an RPT–15 Transmitter, use Cable No. 585–037–2 with 4 Amp fuse. For an SRPT–30/40A Transmitter, 12–15 VDC operation, use Cable No. 585–139. For SRPT–30/40A Transmitter, 15–30 VDC operation, use Cable No. 585–140. A mobile repeater installation also requires one of the following mobile mounting brackets: - For an SR–30/SR–40A receiver, use Mobile Mounting Bracket 700–252. -
Page 18: Antennas
Personnel must not be near the antenna when radiating. Locate antenna as far as possible from people and equipment susceptible to RF radiation. Do not mount antenna directly on transmitter. Refer to ANSI C95.1 “Limits on Non–Ionizing Radiation.” ©2011 Broadcast Electronics... -
Page 19: Base Station Antenna Installation Checklist
BASE STATION ANTENNA INSTALLATION CHECKLIST The following suggestions are offered to help those responsible for antenna installations avoid costly errors in assembly and adjustment. Marti Electronics, Inc. assumes no responsibility for the installation and performance of antenna systems associated with its equipment. The following suggestions are not intended to be a complete step–by–step procedure, simply a listing of some of the most frequently reported errors in antenna system installation. - Page 20 Check VSWR of both transmit and receive antennas. VSWR should be less than 1.5:1. Check for obstructions in the path such as trees and man–made structures. The base antenna must be high enough to provide a line–of–sight path to the remote transmitting antenna. ©2011 Broadcast Electronics...
-
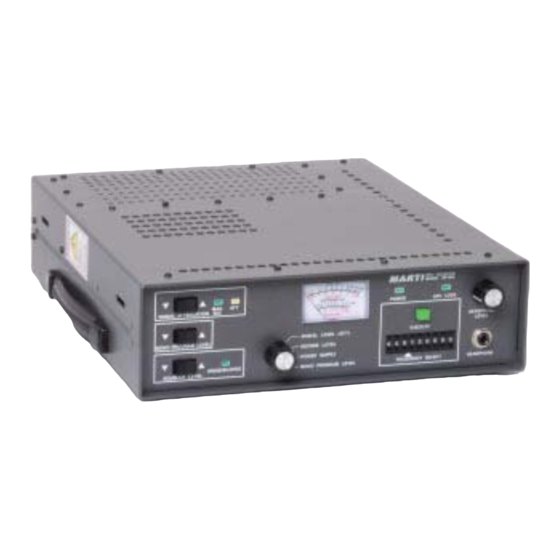
Page 21: Operation
4 OPERATION CONTROLS AND INDICATORS 4.1.1 SIGNAL ATTENUATION CONTROL The SIGNAL ATTENUATION control adjusts a variable attenuator at the input of the converter. This control is designed to minimize the reception of unwanted signals during interference conditions. These conditions are due to extremely high intermodulation from a combination of neighboring signal frequencies. - Page 22 Lower the input signal level to the desired squelch point as viewed on the multimeter. Depress the SQUELCH LEVEL , section of the control until the UNSQUELCHED indicator extinguishes. Return the signal level to the normal level. ©2011 Broadcast Electronics...
- Page 23 4.1.4 MULTIMETER The SR–30/SR–40A is equipped with a multimeter. The multimeter is controlled by the meter select switch. The following text presents a description of the multimeter switch positions. To use the multimeter, operate the switch to the desired position and view the indication on the meter. The green values on each meter scale present nominal values.
- Page 24 The receiver audio can be monitored using the front–panel headphone receptacle and level control. A 1/4” inch stereo headphone receptacle is provided for headphone monitoring. A 40 Ohm or greater headphone impedance is required. Adjust the headphone level using the HEADPHONE LEVEL control. ©2011 Broadcast Electronics...
-
Page 25: Initial Start-Up And Operation
INITIAL START–UP AND OPERATION The following text presents initial start–up and operating procedures. Apply power to the unit. The POWER indicator will illuminate. The AFC LOCK indicator will illuminate when the unit locks to a frequency. The UNSQUELCHED indicator will illuminate if the unit signal level is above the squelch point. The MAX SIG level indicator will illuminate if no attenuation is applied. - Page 26 To monitor the program audio, insert a stereo headphone jack into the HEADPHONE receptacle. Adjust the headphone level using the HEADPHONE LEVEL control. ©2011 Broadcast Electronics...
-
Page 27: Theory Of Operation
5 THEORY OF OPERATION Refer to block diagram 597–8104–2 in the SCHEMATIC AND ASSEMBLY DRAWINGS section as required for the following discussion. Converter, 913–2132–150/–240/–330/–450/–950 The received RF signal is applied to the converter circuit board. This circuit board is: 1) assembled for specific bands of operation and 2) can accept a 50 MHz (30 MHz for 950 MHz units) wide group of frequencies within the specific band. - Page 28 IC2. When this voltage exceeds the reference voltage setting of R16 the comparator output goes high, turning on transistor Q1 and pulling in relay K1. Relay contacts are available at accessory connector J4 for low current switching and signaling. ©2011 Broadcast Electronics...
-
Page 29: Input/Output Filter, 800-193Ad
Input/Output Filter, 800–193AD All input/output circuits connected to the accessory connector as well as the AC line input have radio– frequency filters. The filter circuitry is located on I/O Filter Schematic 800–193AD. Front Panel Circuit Board Assembly, 953–2130–001/–002 The front panel circuit board contains three switching power supply circuits, decode circuitry for the SR–40A frequency programming switches, the metering circuitry, and a digital–to–analog converter (DAC) circuit. -
Page 30: Test Equipment
0–110 dB RF Signal Generator Marconi Model 2022C Spectrum Analyzer Hewlett–Packard Model 8558B Oscilloscope Tektronix Model 2215 7 TOOLS FOR ALIGNMENT Tuning Tool GC 9300, GC 9440, Spectrol 8T000, Sprague– Goodman Screwdriver Xcelite R184, 1/8” x 4” ©2011 Broadcast Electronics... -
Page 31: Tune-Up And Adjustments
8 TUNE–UP AND ADJUSTMENTS NOTICE This equipment was thoroughly tested and inspected at the factory prior to shipment. Adjustments should rarely be necessary in the field and should only be attempted by highly trained technicians familiar with this type of equipment. Laboratory grade test equipment is required and is listed under TEST EQUIPMENT AND TOOLS. -
Page 32: Power Supply/Meter Calibration
1. Connect an RF signal from an encoded Marti transmitter adjusted for proper encode frequency and modulation level as an encode signal source to the receiver. 2. Operate the multimeter to DECODE LEVEL. 3. Adjust SENSITIVITY control R1 for approximately 2 volts p–p on the front panel meter. 4. -
Page 33: Sr 30 Bill Of Material
LEVEL PART NO. DESCRIPTION REF. DES. 9 SR 30 BILL OF MATERIAL This bill of material uses an indented structure to show relationships of parts into sub assemblies. Example; all BOM LEVEL 2 parts are contained in the BOM LEVEL 1 part immediately above it. PART NO. - Page 34 FILTER, CERAMIC, 10.7MHZ CF1,CF2 ..2 800-208A IF AMPLIFIER, AR/CR, GENERIC ..3 100-1041 RES,1K OHM,1/4W,1% ..3 100-1051 RES,10K OHM,1/4W,1% R19,R20 ..3 100-1531 RES,150 OHM,1/4W,1% R1,R2 ..3 103-2241 RES,2.21K OHM,1/4W,1%,METAL R6,R8,R15 ..3 103-3324 RES,3.32K OHM,1/4W,1%,METAL R3,R9 ..3 103-4741 RES,4.75K OHM,1/4W,1%,METAL ©2011 Broadcast Electronics...
- Page 35 LEVEL PART NO. DESCRIPTION REF. DES..3 103-4753 RES,475 OHM,1/4W,1%,METAL R7,R12 ..3 145-431 Resistor, 432 ohm 1/4 watt 1% metal film R4,R10,R14 Mepco SFR25 ..3 145-470 Resistor, 47.5 ohm 1/4 watt 1% metal film R11,R13,R17 Mepco SFR25 ..3 177-5050 RES,TRMR,50K,10%,TOP ADJ 3299Y ..3 217-103 CAP,0.1UF 250VDC 5%,POLY FILM...
- Page 36 CAP CERAMIC, 0.068uF, 50v, SMD, 0805 ..2 007-1003- CAP,1000PF,0805,5%,50V C8,C30,C42 ..2 007-1034 CAP,CER,0.01uF,50V,10%,SMD C7,C15,C16 ..2 007-1034- CAP,CER,10000 PF,1%,25V,1206,SMD ..2 007-1203- CAP, CER, 1200 PF, 50V, 5%, SMD C10,C29,C41 ..2 007-1204- CAP,.012UF,0805,5%,50V ..2 007-1503- CAP,1500PF,0805,5%,50V C11,C28,C40 ..2 007-1504- CAP,.015UF,0805,5%,50V ..2 007-1803- CAP,1800PF,0805,5%,50V C27,C39 ©2011 Broadcast Electronics...
- Page 37 LEVEL PART NO. DESCRIPTION REF. DES..2 007-1804- CAP,.018UF,0805,5%,50V ..2 007-2203- CAP,2200PF,0805,5%,50V C9,C24 ..2 007-2204- CAP,.022UF,0805,5%,50V C34,C48 ..2 007-2703- CAP,2700PF,0805,5%,50V ..2 007-2704- CAP,.027UF,0805,5%,50V ..2 007-3314 CAP, CER, 3300PF, 50V, 5%, SMD C22,C26,C38 ..2 007-3904- CAP,.039UF,0805,5%,50V ..2 007-3923- CAP,CER,3900 PF,1%,50V,1206,SMD ..2 007-4704- CAP,4700PF,0805,5%,50V ..2...
- Page 38 Cond. 22/19x34 pvc ..2 600-0016 CBL,FLAT,16-COND,28GA 1.33 ..2 600-0026 CBL,FLAT,26-COND,28GA 2.33 ..2 601-1800 WIRE,AWG18 19/30 BLK 1.75 ..2 601-2209 WIRE,AWG22,19/34 WHT 45.13 953-2130- ASSY,SR-30 FRONT PANEL (SBCM) ..2 193-0500 POT,500 OHMS,PCB MOUNT,LINEAR,HD AUDIO ..2 310-0080 METER,MULTI,2 IN,SR-30/SR-40A ©2011 Broadcast Electronics...
- Page 39 LEVEL PART NO. DESCRIPTION REF. DES..2 323-2124 LED INDICATOR,GRN,RECTANGULAR D1,D2,D3,D4,D5,D7 ..2 323-3124 IND,LED,YEL ..2 417-0311 JACK,SWCRFT #N-112B 3COND..2 471-5351 PANEL,FRONT,SR30 ..2 500-210 Screw,SEMS 4-40x1/4 Phil Pan Head MS Blk Zinc(external lock) ..2 510-005 Polytube, Manhatten#AF155A-20-yel ..2 510-212 CONTROL KNOBS, #45KNO23 ..2 913-2130- ASSY,PCB,SR-30/40A FRONT PANEL...
- Page 40 SWITCH,ROCKER,PCB S11,S12,S13 MOUNTING,SMALL BLACK RECTANGULAR CAP ..3 350-197 INDUCTOR, SMT, POWER, 1uH L2,L4 ..3 350-201 INDUCTOR, SMT, 1812, 82NH ..3 360-0125 IND, 68 UH, 1.5A, SMD L1,L3 ..3 366-0010- IND,10UH,1.5A ..3 400-106 IC, Inverter, Open-drain Gate U8,U9,U10,U11 ©2011 Broadcast Electronics...
- Page 41 LEVEL PART NO. DESCRIPTION REF. DES..3 400-196 IC, SMT, 1.5A STEP-UP REGULATOR ..3 401-164 IC, SMT, 8-Bit Ser In, Par Out SR Phillips U5,U6 74HC164D ..3 401-165 IC, 8-Bit Ser/Par In, Ser Out SR Phillips U1,U2,U3,U4,U20 74HC165D ..3 401-275 IC,SMT,OP-AMP,LOW NOISE,HIGH U15,U16,U17,U18, AUDIO BW...
- Page 42 LEVEL PART NO. DESCRIPTION REF. DES..3 598-0013 BINDER,MARTI,1 IN,BLUE,W CD POCKET ©2011 Broadcast Electronics...
-
Page 43: Sr 40A Bill Of Material
LEVEL PART NO. DESCRIPTION REF. DES. 10 SR 40A BILL OF MATERIAL This bill of material uses an indented structure to show relationships of parts into sub assemblies. Example; all BOM LEVEL 2 parts are contained in the BOM LEVEL 1 part immediately above it. PART NO. - Page 44 ..3 100-1531 RES,150 OHM,1/4W,1% R1,R2 ..3 103-2241 RES,2.21K OHM,1/4W,1%,METAL R6,R8,R15 ..3 103-3324 RES,3.32K OHM,1/4W,1%,METAL R3,R9 ..3 103-4741 RES,4.75K OHM,1/4W,1%,METAL ..3 103-4753 RES,475 OHM,1/4W,1%,METAL R7,R12 ..3 145-431 Resistor, 432 ohm 1/4 watt 1% metal film R4,R10,R14 Mepco SFR25 ©2011 Broadcast Electronics...
- Page 45 LEVEL PART NO. DESCRIPTION REF. DES..3 145-470 Resistor, 47.5 ohm 1/4 watt 1% metal R11,R13,R17 film Mepco SFR25 ..3 177-5050 RES,TRMR,50K,10%,TOP ADJ 3299Y ..3 217-103 CAP,0.1UF 250VDC 5%,POLY FILM C9,C12,C14 ..3 217-104 CAPACITOR, .01 UF 50V GMV DISC C1,C2,C3,C4,C5, C6,C7,C8,C10,C16 ..3 219-220...
- Page 46 ..2 007-1503-050 CAP,1500PF,0805,5%,50V C11,C28,C40 ..2 007-1504-050 CAP,.015UF,0805,5%,50V ..2 007-1803-050 CAP,1800PF,0805,5%,50V C27,C39 ..2 007-1804-050 CAP,.018UF,0805,5%,50V ..2 007-2203-050 CAP,2200PF,0805,5%,50V C9,C24 ..2 007-2204-050 CAP,.022UF,0805,5%,50V C34,C48 ..2 007-2703-050 CAP,2700PF,0805,5%,50V ..2 007-2704-050 CAP,.027UF,0805,5%,50V ..2 007-3314 CAP, CER, 3300PF, 50V, 5%, SMD C22,C26,C38 ©2011 Broadcast Electronics...
- Page 47 LEVEL PART NO. DESCRIPTION REF. DES..2 007-3904-050 CAP,.039UF,0805,5%,50V ..2 007-3923-050 CAP,CER,3900 PF,1%,50V,1206,SMD ..2 007-4704-050 CAP,4700PF,0805,5%,50V ..2 007-4724-051 CAP,CER,4700 PF,1%,50V,1206,SMD C4,C5 ..2 007-5603-050 CAP,5600PF,0805,5%,50V C25,C37 ..2 007-6213-500 CAP,CER,620pF,50V,5%,SMD C50,C51 ..2 007-6803-050 CAP,6800PF,0805,5%,50V ..2 102-0100 RES,CHIP,10.0 OHMS,1/10W,1%,SMD ..2 102-1001 RES,CHIP,1.00K OHMS,1/10W,1%,SMD ..2 102-1002 RES,CHIP,10.0K...
- Page 48 ..2 323-2124 LED INDICATOR,GRN,RECTANGULAR D1,D4,D5,D7 ..2 323-3124 IND,LED,YEL ..2 340-0168 SWITCH,PUSHWHEEL,SUBMINIATUR S4,S5,S6,S7,S8,S9 E,PANELMOUNT ,S10,S11,S12 ..2 417-0311 JACK,SWCRFT #N-112B 3COND..2 471-5352 PANEL,FRONT,SR40A ..2 500-210 Screw,SEMS 4-40x1/4 Phil Pan Head MS Blk Zinc(external lock) ..2 510-005 Polytube, Manhatten#AF155A-20-yel ©2011 Broadcast Electronics...
- Page 49 LEVEL PART NO. DESCRIPTION REF. DES..2 510-212 CONTROL KNOBS, #45KNO23 ..2 530-086 Switch, Dip, 4 Position, Right Angle, Apem DA04T ..2 913-2130-003 ASSY,PCB,SR-30/40A FRONT PANEL (SBCM) ..3 006-1085 CAP,ELECTRO,100 UF,10%,35V,SMD C59,C62,C66,C69 ..3 007-1022 CAP,CER,100pF,50V,2%,SMD ..3 007-1024 CAP,CER,.001uF,50V,10%,SMD C64,C71 ..3 007-1044 CAP,CER,0.1uF,50V,10%,SMD note...
- Page 50 350-197 INDUCTOR, SMT, POWER, 1uH L2,L4 ..3 350-201 INDUCTOR, SMT, 1812, 82NH ..3 360-0125 IND, 68 UH, 1.5A, SMD L1,L3 ..3 366-0010-001 IND,10UH,1.5A ..3 400-106 IC, Inverter, Open-drain Gate U8,U9,U10,U11 ..3 400-196 IC, SMT, 1.5A STEP-UP REGULATOR ©2011 Broadcast Electronics...
- Page 51 LEVEL PART NO. DESCRIPTION REF. DES..3 401-164 IC, SMT, 8-Bit Ser In, Par Out SR U5,U6 Phillips 74HC164D ..3 401-165 IC, 8-Bit Ser/Par In, Ser Out SR Phillips U1,U2,U3,U4,U20 74HC165D ..3 401-275 IC,SMT,OP-AMP,LOW NOISE,HIGH U15,U16,U17,U18, AUDIO BW ..3 401-374 IC, OCTAL D FLIP-FLOP W 3-ST OUT U7,U12 ..3...
- Page 52 LEVEL PART NO. DESCRIPTION REF. DES..2 973-9999 KIT,BIND+MAN,SR30/SR40A ..3 597-8104 INSTRUCTION MANUAL, SR 30/SR 40A RPU RECEIVER ..3 597-9996 MAN,COVER,MARTI REAR ..3 597-9997 MAN,COVER,MARTI FRONT, W/WINDOW ..3 598-0013 BINDER,MARTI,1 IN,BLUE,W CD POCKET ©2011 Broadcast Electronics...
- Page 53 LEVEL PART NO. DESCRIPTION REF. DES. 11 Wideband Converters and Filters PART NO. DESCRIPTION REF. DES. LEVEL 800-207-20 Filter, assembly 20 KHz ..2 255-161 CAPACITOR, 160 PF 300V 5% SIVLER MICA ..2 255-241 Capacitor, 240 pf 500v 5% silver mica CD10FD241J03 ..2 255-271C CAPACITOR, 270pF 5% 200V...
- Page 54 FILTER, 25 KHZ 10.7 MHZ ..2 500-199 Keps nut 4 x 40 zinc 4CNKEOZ ..2 550-084 CONNECTOR,PHONO JACK,PCB J1,J2 MOUNT ..2 580-005 Buss Wire, #22AWG Solid Tinned 0.04 Copper ..2 800-207B PC Board, IF Filter R Receiver ©2011 Broadcast Electronics...
- Page 55 LEVEL PART NO. DESCRIPTION REF. DES. 800-207-30 Filter, assembly 30/36 KHz ..2 255-161 CAPACITOR, 160 PF 300V 5% SIVLER MICA ..2 255-241 Capacitor, 240 pf 500v 5% silver mica CD10FD241J03 ..2 255-271C CAPACITOR, 270pF 5% 200V CERAMIC DIPPED ..2 255-361 Capacitor, 360pF 300v 5% silver mica CD10FA361J03 ..2...
- Page 56 360-027 FILTER, 50KHZ 10.7 MHZ ..2 500-199 Keps nut 4 x 40 zinc 4CNKEOZ ..2 550-084 CONNECTOR,PHONO JACK,PCB J1,J2 MOUNT ..2 580-005 Buss Wire, #22AWG Solid Tinned 0.04 Copper ..2 800-207B PC Board, IF Filter R Receiver ©2011 Broadcast Electronics...
- Page 57 LEVEL PART NO. DESCRIPTION REF. DES. 913-2132- ASSY,DUAL WIDE-BAND CONVERTER,150 MHZ (NOTE) ..2 270-120 CAP, SMT, 12PF, 100V C61,C62,C63 ..2 350-200 INDUCTOR, SMT, 1812, 56NH L11,L12 ..2 350-202 IND, SMT, 1812, 39 NH L10,L13 ..2 360-0140 FILTER, HELICAL BANDPASS, FL2,FL3 F=140M ..2 360-0175...
- Page 58 Res Chip 110K 1/10W 1%,SMD R198 ..3 102-1400 RES,CHIP,1.4K OHMS,1/10W,1%,SMD ..3 102-1500 RES,CHIP,150 R32,R33,R34,R35 OHMS,1/10W,1%,SMD ,R44,R45,R46, R47,R75,R76,R77 ,R78,R85,R86, R87,R88,R95,R96 ,R97,R98,R116, R117,R118,R119, R108,R109,R110, R111,R137,R138, R139,R140,R123, R124,R125,R126, R175 ..3 102-1582 RES,CHIP,15.8 K, 1/10 W, 1% ..3 102-1623 Res,Chip 162K 1/10W 1% SMD R196 ©2011 Broadcast Electronics...
- Page 59 LEVEL PART NO. DESCRIPTION REF. DES..3 102-1744 RES,1.74K OHM,1/10W,1% R190 ..3 102-1802 Res Chip 18.2 ohm 1/10W 1% SMD R99,R100,R101, R127,R128,R129 ..3 102-2000 RES,CHIP,200 OHM,1/10 W,1% R184 ..3 102-2001 RES,CHIP,2.00K OHMS,1/10W,1%,SMD ..3 102-2201 RES,CHIP,22.1 OHM,1/10W,1% R79,R80,R71 ..3 102-2214 RES,CHIP,2.21K OHM,1/10W,1% ..3 102-2490 RES,CHIP,24.9 OHM,1/10W,1%...
- Page 60 SWITCH,QUAD,ADG333ABRS,20- PIN SSOP,SMD ..3 224-0809 IC,MCU RESET,MAX809L,4.63V,SOT- 23,SMD ..3 270-101 Cap., monolithic chip, 100 pf 50v 5% C141 Kemet C1206C101J5GAC ..3 270-102 Cap,monolithic,1000pf 50v C20,C21,C22,C27 5%KemetC1206C102J5GACTR ,C30,C36,C41, marked C45,C48,C49,C52 ,C55,C56,C59, C60,C65,C68,C69 ,C72,C75,C76, C77,C80,C81,C92 C97,C136,C143, C144,C84,C85, C127,C122,C64, C38,C39,C37 ©2011 Broadcast Electronics...
- Page 61 LEVEL PART NO. DESCRIPTION REF. DES..3 270-103 Cap, Monolithic chip 10000pF 10% C26,C28,C46,C82 XR7 Kemet C1206C103J5RACTR ,C99,C83,C129, C133,C146,C148, C40,C101 ..3 270-104 Capacitor, Monolithic Chip 100000pF C86,C135,C91, 1% C1206C104J5RAC Kemet C107,C132,C147, C149,C100,C150, C152,C153,C155 ..3 270-682 CAPACITOR, SMT, 1206, 6800 PF, C142 ..3 298-106...
- Page 62 Transistor, SMT, Darlington, NPN, Q1,Q2,Q4,Q11, Mototrola MMBTA14LT1 Q12,Q13,Q14, Q15,Q16,Q17, Q18,Q19,Q20, Q25,Q27 ..3 431-4400 SOCKET,44-PIN,PLCC,SMD note ..3 439-041 TRANSISTOR, SMT, GENERAL Q21,Q3 PURPOSE, NPN ..3 513-2132 PCB,BLANK,DUAL WIDE BAND CONVERTER ..3 973-2132-U1 KIT,SOFTWARE,SR30/SR40A/SR20 C/SR20M,U1 ..4 224-8535- IC,MCU,ATMEGA8535,44-PIN PLCC,SMD ©2011 Broadcast Electronics...
- Page 63 LEVEL PART NO. DESCRIPTION REF. DES. 913-2132-240 ASSY,DUAL WIDE-BAND CONVERTER,240 MHZ (NOTE) ..2 270-608-1 CAP, SMT, 6.8 PF, 100V C61,C62,C63 ..2 350-203 IND, SMT, 1812, 33 NH L11,L12 ..2 350-205 IND, SMT, 1812, 22 NH L10,L13 ..2 360-0221 FILTER, HELICAL BANDPASS, F=221M FL2,FL3 ..2 360-0234...
- Page 64 Res Chip 18.2 ohm 1/10W 1% SMD R99,R100,R101, R127,R128,R129 ..3 102-2000 RES,CHIP,200 OHM,1/10 W,1% SMD R184 ..3 102-2001 RES,CHIP,2.00K OHMS,1/10W,1%,SMD ..3 102-2201 RES,CHIP,22.1 OHM,1/10W,1% R79,R80,R71 ..3 102-2214 RES,CHIP,2.21K OHM,1/10W,1% ..3 102-2490 RES,CHIP,24.9 OHM,1/10W,1% R102,R103,R130 ,R132 ..3 102-2491 RES,CHIP,2.49K,1/10W,1%,SMD ©2011 Broadcast Electronics...
- Page 65 LEVEL PART NO. DESCRIPTION REF. DES..3 102-2741 RES,CHIP,2.74K OHMS,1/10W,1%,SMD R37,R43,R74, R84,R94,R115, R107,R136,R122 ,R144,R146,R30, R20,R204 ..3 102-3010 RES, CHIP, 301 OHMS, 1/10W, 1%, SMD ..3 102-3011 RES,CHIP,3.01K OHMS,1/10W,1%,SMD R24,R29 ..3 102-3321 RES,CHIP,3.32K OHMS,1/10W,1%,SMD R3,R69 ..3 102-3832 RES, CHIP, 38.3 KOHMS, 1/10W, 1%, R203 ..3 102-3901...
- Page 66 INDUCTOR, SMT, 1812, 82NH ..3 360-0600 FILTER, HELICAL BANDPASS, F=60.0M FL10,FL11 ..3 360-0707 FILTER, HELICAL BANDPASS, F=70.7M FL12 ..3 366-0010-001 IND,10UH,1.5A L27,L28 ..3 366-0246 Inductor SMT 246 NH 5%,Maxi Spring ..3 366-0680 IND,CER,680NH,5%,SMD L1,L4,L14,L15 ..3 366-2700 IND,1008LS 2.7UH,10%,SMD ©2011 Broadcast Electronics...
- Page 67 LEVEL PART NO. DESCRIPTION REF. DES..3 400-196 IC, SMT, 1.5A STEP-UP REGULATOR ..3 400-295 IC,OP-AMP, GENERAL PURPOSE, U14,U34 OP295GS ..3 401-164 IC, SMT, 8-Bit Ser In, Par Out SR Phillips U6,U7 74HC164D ..3 401-275 IC,SMT,OP-AMP,LOW NOISE,HIGH U3,U4,U32,U36 AUDIO BW ..3 401-317 IC, SMT, Regulator,Adjustable, 1.5...
- Page 68 C113 ..3 011- Crystal,SMT,7.3728 MHz, 50ppm, Epson 7.3728 MA-506-7.3728M-C2 ..3 012-280-1 TCXO, SMT, 12.800 MHZ, 1PPM ..3 070-1054 CAP,TANT,1uF,35V,10%,SMD C18,C9,C10,C23, C24,C25,C31,C32, C29,C47,C50,C51, C53,C54,C57,C58, C70,C71,C66,C67, C78,C79,C73,C74, C87,C145,C96,C98, C93,C131,C126, C128,C90,C123,C42, C154 ..3 070-1064 CAP,TANT,10uF,35V,20%,SMD C138 ..3 070-1084 CAP,TANT,100uF,16V,10%,SMD C112 ©2011 Broadcast Electronics...
- Page 69 LEVEL PART NO. DESCRIPTION REF. DES..3 070-2204 CAP,TANT,22uF,25V,10%,SMD C11,C12 ..3 070-2265- CAP,TANT,22 MFD,20%,25V, E C139,C140 CASE,LOW ESR,SMD ..3 070-6854 TANT CAP, 6.8 UF, 16V, SIZE C C108 ..3 101-0100 RES,THICK FILM,100,1/8W,SMD R13,R14 ..3 102-1000 RES,CHIP,100 OHMS,1/10W,1%,SMD R19,R178,R179, R181,R185,R188, R189,R162 ..3 102-1001 RES,CHIP,1.00K OHMS,1/10W,1%,SMD...
- Page 70 IC, DIG ATTEN, 0-31 DB, 0.5 DB STEPS ..3 220-8065 IC, HIGH SPEED FET OP-AMP ..3 220-9832 IC, 25 MHZ DDS ..3 221-0006 RF Amp GALI-4 SMD Wideband 50 Ohm U10,U13,U19,U20, U21,U23,U24,U25,U ..3 221-4110 RF PLL FREQUENCY SYNTHESIZER ©2011 Broadcast Electronics...
- Page 71 LEVEL PART NO. DESCRIPTION REF. DES..3 221-4111 IC PLL SYN DM Prescalers 1.2GHz ..3 224-0333 SWITCH,QUAD,ADG333ABRS,20-PIN SSOP,SMD ..3 224-0809 IC,MCU RESET,MAX809L,4.63V,SOT- 23,SMD ..3 270-101 Cap., monolithic chip, 100 pf 50v 5% C141 Kemet C1206C101J5GAC ..3 270-102 Cap,monolithic,1000pf 50v C20,C21,C22,C27, 5%KemetC1206C102J5GACTR marked C30,C36,C41,C45, C48,C49,C52,C55,...
- Page 72 420-141 Transistor, SMT, Darlington, NPN, Q1,Q2,Q4,Q11,Q12, Mototrola MMBTA14LT1 Q13,Q14,Q15,Q16, Q17,Q18,Q19,Q20, Q25,Q27 ..3 431-4400 SOCKET,44-PIN,PLCC,SMD note ..3 439-041 TRANSISTOR, SMT, GENERAL Q21,Q3 PURPOSE, NPN ..3 513-2132 PCB,BLANK,DUAL WIDE BAND CONVERTER ..3 973-2132- KIT,SOFTWARE,SR30/SR40A/SR20C/SR 20M,U1 ..4 224-8535- IC,MCU,ATMEGA8535,44-PIN PLCC,SMD ©2011 Broadcast Electronics...
- Page 73 LEVEL PART NO. DESCRIPTION REF. DES. 913- ASSY,DUAL WIDE-BAND 2132-450 CONVERTER,450 MHZ (NOTE) ..2 270-407- Capacitor,SMT,size C61,C62,C63 1206,4.7pF,COG,100V Kemet C1206C479C1GAC ..2 350-192 INDUCTOR, 12.5nH, SMT, 1206 L10,L13 ..2 350-194 INDUCTOR, 18.5nH, SMT, 1206 L11,L12 ..2 360-0436 FILTER, HELICAL BANDPASS, F=436M FL2,FL3 ..2 360-0449...
- Page 74 102-2000 RES,CHIP,200 OHM,1/10 W,1% SMD R184 ..3 102-2001 RES,CHIP,2.00K OHMS,1/10W,1%,SMD ..3 102-2201 RES,CHIP,22.1 OHM,1/10W,1% R79,R80,R71 ..3 102-2214 RES,CHIP,2.21K OHM,1/10W,1% ..3 102-2490 RES,CHIP,24.9 OHM,1/10W,1% R102,R103,R130, R132 ..3 102-2491 RES,CHIP,2.49K,1/10W,1%,SMD ..3 102-2741 RES,CHIP,2.74K OHMS,1/10W,1%,SMD R37,R43,R74,R84, R94,R115,R107, R136,R122,R144, R146,R30,R20, R204 ©2011 Broadcast Electronics...
- Page 75 LEVEL PART NO. DESCRIPTION REF. DES..3 102-3010 RES, CHIP, 301 OHMS, 1/10W, 1%, SMD ..3 102-3011 RES,CHIP,3.01K OHMS,1/10W,1%,SMD R24,R29 ..3 102-3321 RES,CHIP,3.32K OHMS,1/10W,1%,SMD R3,R69 ..3 102-3832 RES, CHIP, 38.3 KOHMS, 1/10W, 1%, R203 ..3 102-3901 RES,CHIP,3.9K OHMS,1/10W,1%,SMD ..3 102-3902 Res, Chip 39.2 ohms 1/10W 1% SMD R104,R131 ..3...
- Page 76 366-2700 IND,1008LS 2.7UH,10%,SMD ..3 400-196 IC, SMT, 1.5A STEP-UP REGULATOR ..3 400-295 IC,OP-AMP, GENERAL PURPOSE, U14,U34 OP295GS ..3 401-164 IC, SMT, 8-Bit Ser In, Par Out SR Phillips U6,U7 74HC164D ..3 401-275 IC,SMT,OP-AMP,LOW NOISE,HIGH U3,U4,U32,U36 AUDIO BW ©2011 Broadcast Electronics...
- Page 77 LEVEL PART NO. DESCRIPTION REF. DES..3 401-317 IC, SMT, Regulator,Adjustable, 1.5 Amps,National LM317AEMP ..3 401-374 IC, OCTAL D FLIP-FLOP W 3-ST OUT U8,U9 ..3 407-0502 EMI SHIELD,MODIFIED 59-CBSAFN- 1.0x1.75x.50 ..3 413-1206 CHIP,TEST POINT,1206,SMD TP1,TP2,TP3 ..3 415-840 Diode, Zener, SMT, 13V, Vishay D6,D8 BZX84C13TR ..3...
- Page 78 LEVEL PART NO. DESCRIPTION REF. DES. 12 SCHEMATICS ©2011 Broadcast Electronics...
- Page 79 597–8104–2 SR–30/SR–40A BLOCK DIAGRAM COPYRIGHT 2003 MARTI ELECTRONICS, INC...
- Page 80 597–8104–3 COPYRIGHT 2003 MARTI ELECTRONICS, INC COMPONENT LOCATOR AND ADJUSTMENT CONTROLS...
Need help?
Do you have a question about the Marti Electronics SR-30 and is the answer not in the manual?
Questions and answers