Table of Contents
Advertisement
Quick Links
GENERAL DESCRIPTION
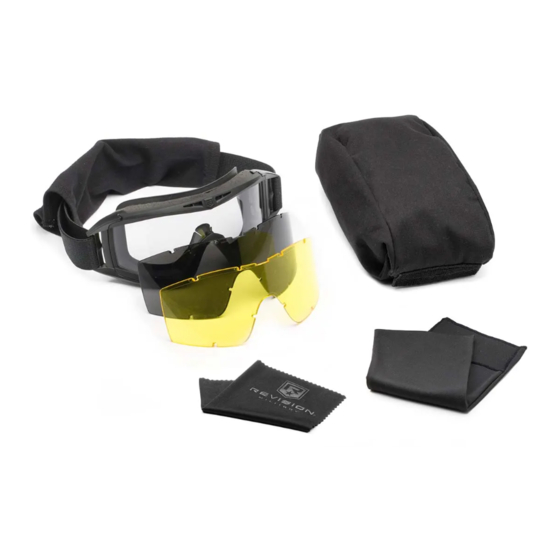
These Goggle Systems consist of an interchangeable protective lens that locks into the goggle frame with an adjustable headband. Depending upon the
model that you have received, there may be additional lenses that all provide 100% UV protection. For example:
The adjustable head strap keeps goggles secure during rigorous activity. Depending on the model you have received - Desert Locust, Asian Locust™ or
Desert Locust Extreme Weather Goggle, a thermal lens, facial comfort foam, anti-reflective sleeve, microfiber cleaning pouch/cloth (ideal for cleaning
your lenses) and rugged storage case may also be included.
OPTIONAL PRESCRIPTION (R
x
If you require corrective lenses, an optional R
your prescription lenses into the R
addresses. For information on ordering an R
WEAR OVER HELMET – STRAP ADJUSTMENT
To tighten the elastic head strap, move the slider clip on the strap to the left, adjusting until the system fits comfortably and snugly against your face. To
loosen, move the slider clip to the right.
CHANGING THE LENS
High-impact goggles require the lens to be held very securely within the goggle frame for best performance and for your protection. Do not be afraid to
apply force to the lens and put pressure on the flexible frame when removing or inserting the lens. Revision Goggles are built tough. They can take it.
REMOVING THE LENS FROM THE FRAME:
(If using an R
Carrier, remove the R
x
and R
Connector prior to removing the lens.)
x
Grasp the center of the top of the frame with
your thumb and forefinger of one hand, and
the center bottom of the frame with the other
hand. Pull the frame from the top and bottom,
peeling it away from the lens.
INSTALLING THE LENS INTO THE FRAME:
Working from the front of the goggles, first
insert the right edge of the lens then the left
edge into the corresponding areas in the frame.
Continue to work the lens into the frame,
working from the outer edges across the top,
around the side and across the bottom, fitting
the keyhole notches securely over the posts.
The nosepiece will be the final area which is
secured.
REMOVING/FASTENING THE SIDE-CLIP:
To remove the side-clip:
First remove the lens from the frame. Next,
grasp the goggle frame with your thumb and
forefinger. Peel away the side clip from the top
of the frame.
Note: There is no reason to remove the side
clip except to install or remove the anti-
reflective sleeve.
INSERTING THE OPTIONAL PRESCRIPTION (R
To insert your Rx Carrier, first insert the R
Connector into the frame by fitting the keyhole
notches over the posts at the nose bridge. Be
sure that the soft bumper pad faces toward the
lens, away from the face.
CARE, CLEANING & MAINTENANCE
The lenses in your Goggle System include abrasion and fog resistant coatings. To extend the life of the lenses, clean and store your eyewear away from
direct sunlight and at room temperature when not in use. To clean and disinfect standard lenses, wash with lukewarm water and blot dry with a
microfiber cloth. If your kit includes Thermal Lenses - DO NOT wash the thermal lens under running water or by immersing into water. The seal between
ballistic lens and thermal film should stay dry. Clean and disinfect the Thermal Lens using a microfiber cloth to remove smudges and finger prints. To
clean and disinfect the goggle frame and strap, remove the lens and hand wash the goggle frame in a mild soapy solution, rinse and air-dry.
© 2010 REVISION MILITARY INC., DESERT LOCUST
REVISION MILITARY LTD., 7 CORPORATE DRIVE, ESSEX JUNCTION VT 05452 USA
Desert Locust
®
Desert Locust
Asian Locust
USER INSTRUCTIONS
Clear for indoor and nocturnal use
Solar for daytime use to cut glare
High-Contrast for low-light conditions
) CARRIER
Carrier for prescriptions is available. You can provide the R
x
Carrier. Revision also offers R
x
Carrier and for fulfillment details visit:
x
IMPORTANT
Carrier
x
) CONNECTOR & CARRIER
x
x
®
, ASIAN LOCUST™ AND REVISION
®
Military Goggle
Extreme Weather Goggle
™
Military Goggle
fulfillment services for single vision prescription lenses to North American and APO
x
www.revisionmilitary.com.
Push the lens forward forcefully to
release it from the goggle frame.
When the lens is completely inserted,
ensure there are no gaps showing between
the lens and the frame.
Clean
lens
(see
fingerprints and smudges.
To fasten the side-clip:
Grasp the goggle frame with your thumb
and forefinger. Align the grip warts on the
bottom of the frame to the holes on the
lower portion of the side clip. Next, align the
hole on the top of the frame with the posts
on the side clip and press into place.
Insert the R
Carrier into the R
x
by aligning the oval post at the center of the
R
Carrier with the oval hole on the R
x
Connector. Gently push the R
until it fits snugly into place.
Patented, U.S. Patent No. 7,641,333 B2
®
ARE TRADEMARKS OF REVISION MILITARY.
revisionmilitary.com
Carrier to your Optometrist who will insert
x
below)
to
remove
Connector
x
x
Carrier down
x
5-0722-0001
FEBRUARY 2011
Advertisement
Table of Contents

Summary of Contents for Revision Desert Locust Military
- Page 1 High-impact goggles require the lens to be held very securely within the goggle frame for best performance and for your protection. Do not be afraid to apply force to the lens and put pressure on the flexible frame when removing or inserting the lens. Revision Goggles are built tough. They can take it.
- Page 2 14. This eyewear is not designed to protect the wearer from all injury in the event of an impact with a hard object or if the lens is not properly secured in the frame. 15. Revision does not recommend the following uses of tinted lenses: Night time driving or direct viewing of the sun or other artificial light source. Solar shields are not recommended for industrial protection such as welding, brazing, or cutting operations.
Need help?
Do you have a question about the Desert Locust Military and is the answer not in the manual?
Questions and answers