Table of Contents
Advertisement
Advertisement
Table of Contents

Related Manuals for ENGWE L20


Summary of Contents for ENGWE L20
- Page 1 CAUTION READ THIS MANUAL BEFORE USING YOUR EQUIPMENT...
-
Page 2: Table Of Contents
Table of contents 1.lmportant warning ............1 2.Product components ..........3 3.Technical parameters ..........4 4.Product installation ............ 5 4.1 Install the handlebar ...........6 4.2 Install the front wheel ......... 7 4.3 Install the front mudguard ........8 4.4 Install the front basket ........9 4.5 Install the headlight .......... -
Page 3: Lmportant Warning
1.lmportant warning This manual include important safety performance informatlon and service informatlon.Please make sure you have read the following warning content before the first time you use our product. lf you borrow your electric bicycle to other people, please let the user read this manual, it could help to decrease the risk of accident. - Page 4 chemical corrosion and electrical parts damage, resulting in operational failure and accidents. Your current insurance business may not cover the situation you may encounter when riding an electric bike, please contact your insurance company or insurance broker forrelevant consultation. If you use our ebike in your country, pls refer to the local laws and regulation.
-
Page 5: Product Components
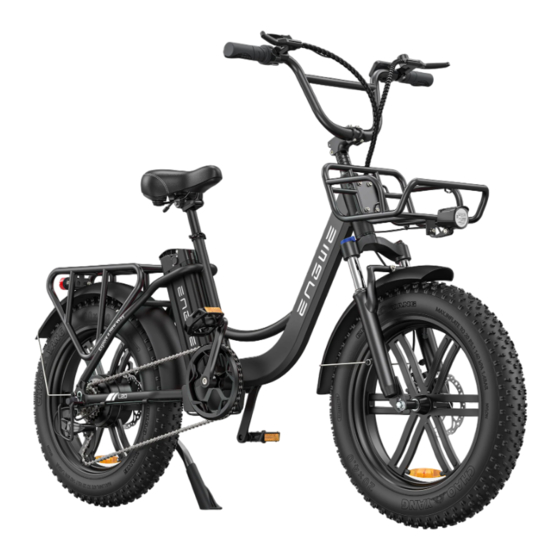
2.Product components 1.Display 2.Handlebar 3.Front basket 4.Front light 5.Fork 6.Tire 7.Pedal 8.Crank set 9.Battery 10.Chain 11.Freewheel 12.Motor 13.Rear light 14.Seatpost 15.Saddle... -
Page 6: Technical Parameters
3.Technical parameters Performance Project index Vehicle Size 1737*700*1140 1737*700*1140 wheel Size 20Inches 20Inches Basic Body Material Aluminium alloy Aluminium alloy Parameters Maximum Load 264 Ibs(120KG) 264 Ibs(120KG) Vehicle weight 74.8 Ibs(34KG) 74.8 Ibs(34KG) Maximum Speed 25mph(39km/h) 25km/h(15mph) Maximum 10° 10° Gradient Main Parameters of... -
Page 7: Product Installation
4.Product installation Tool checklist... -
Page 8: Install The Handlebar
4.1 Install the handlebar (1) Remove the handlebars to remove the packing material and place the center at the riser clamlet. (2)Install 4mm hexagon wrench clockwise. Do not tighten the 4 bolts in FIG. A. Adjust the handle to the proper Angle in Fig. B, and then tighten the 4 bolts with proper force. -
Page 9: Install The Front Wheel
4.2 Install the front wheel (1)Remove the front wheel to remove the packing material, and install the screw gasket shaft sleeve according to the drawing. (2)Place the front wheel in the front fork card slot and lock it with a 15mm wrench. -
Page 10: Install The Front Mudguard
4.3 Install the front mudguard (1)The lifting lug of the mud pan is connected with the hole of the front fork axle pipe,and then threaded in the screw to tighten (2)The mudguard support shall be aligned with the front fork mudguard take-up hole position,and then threaded into the screw for tightening. -
Page 11: Install The Front Basket
4.4 Install the front basket (1)Remove the basket to remove the packaging material, and install the screw gasket according to the drawing. (2)Install 4 bolts clockwise using a 4mm hexagon wrench, and place the harness in the front shelf hook. -
Page 12: Install The Headlight
4.5 Install the headlight ( 1 ) Install the headlight screw washer nut according to the drawing. (2)The headlight line is fixed as shown in the figure. -
Page 13: Install The Pedals
4.6 Install the pedals (1) Prepare left and right pedal, The pedal“R”is installed on one side of the chainring, and "L" is opposite to the chainring. (2)Tighten the right pedal “R” clockwise, Tighten the left pedal “L” counterclockwise. -
Page 14: Display Instructions
5.Display instructions 1.Product name and model name Intelligent LCD display for e-bike; model: YL81C. 2.Specifications ● 36V/48V power supply ● Rated working current 15mA ● Maximum working current 30mA ● Leakage current at power-off <1uA ● Working current at the supply controller end 50mA ●... - Page 15 average speed (AVG)) ● Distance indicator (including ODO and trip distance (Trip)) ● Error code indicator ● Bluetooth connection indicator (reserved) ● Parameter setting function 4.2 Functional area layout 4.3 Button definitions There are three buttons on the operating unit of display YL81C, i.e., the on/off button , plus button and minus button...
- Page 16 (km/h) and the trip distance (km) by default. By pressing the button , the information displayed will be switched between the trip distance (km), ODO (km), maximum speed (km/h) and average speed (km/h). When the distance reaches 9999.9 km, it will be automatically reset to zero.
- Page 17 charged immediately.
- Page 18 5.7 Error code indicator When a fault occurs in the electronic control system of your e-bike, the display will automatically indicate the error code in the distance area in the format of E0**. Detailed definitions of error codes are shown in Schedule 1. ■...
- Page 19 interface. Press the button for parameter selection. Press the button to save the parameter and return to the selection interface of general setting options. 6.4 Metric/imperial system setting P4 refers to the metric/imperial system setting option. 00 represents the metric system, and 01 represents the imperial system. Press the button to enter the parameter modification interface.
- Page 20 Schedule 1 Error Code Definitions Error codes for protocols YL-01 and YL-02: Error Error codes for codes for protocols protocols Definition Definition YL-01 YL-01 YL-02: YL-02: E001 Controller Abnormality E004 Throttle Abnormality E002 Communication E005 Brake Abnormality Abnormality E003 Motor Hall Signal E006 Motor Phase Abnormality...
-
Page 21: Battery
Keep the battery out of reach for children. ● Never try to open the battery. ● Only use the ENGWE supplied battery. Do not use a battery from any other different product models. ● If the battery is damaged because it has been dropped somewhere or biking accident, there may be a risk of electrolytes leakage. - Page 22 ● Do not allow the battery to run down completely before charging. Charge the battery before storing the product.If the battery is completely empty, it may cause the battery to no longer charge. ● Charge a new battery for at least 4-6 hours before you use it in your product for the first time.
-
Page 23: Charging
7.Charging ● You can charge the bike directly, or you can remove the battery for charging. ● The RED light indicates it is in charging and GREEN light indicates the battery is fully charged. (Please put off plug from wall)Usually the charging time is 4-6 hours depends on the battery capacity remain. -
Page 24: Warranty Policy
8.Warranty policy Dear customer ! Thank you for purchasing ENGWE series products ! Warranty service: Please enter into the official website https://engwe-bikes.com/ to view the warranty policy of Engwe. After purchasing Engwe products, please kindly contact Engwe after-sales service for help when there is a quality issue, which means that you can contact customer service of the seller where you buy your e-bike from.
Need help?
Do you have a question about the L20 and is the answer not in the manual?
Questions and answers
Where is the serial number found on the LE20 bike frame?
when does your assist kick in when pedaling
The pedal assist feature on the ENGWE L20 activates when you start pedaling, but users have reported it may require harder pedaling or pressing the boost button a few times before it engages.
This answer is automatically generated