Table of Contents
Advertisement
Quick Links
Digital Static Fieldmeter
Operation and Maintenance
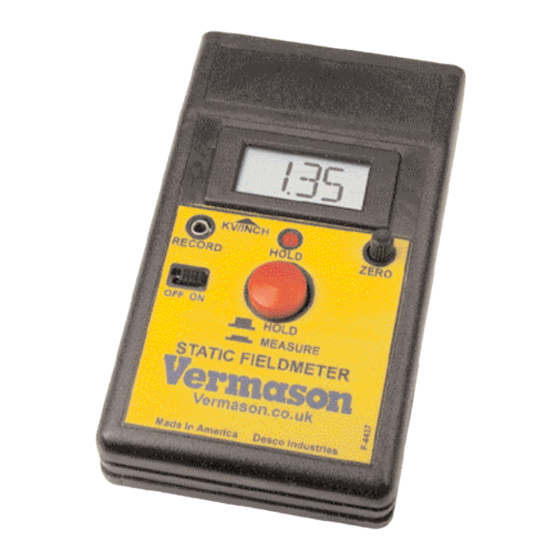
Figure 1. 222660 Digital Static
Fieldmeter
Description
The Vermason Digital Static Fieldmeter
is a high quality, portable non-contacting
static fieldmeter which produces
consistently accurate readings with ease
and provides years of trouble-free
operation.
"Periodic audits of facilities ...shall be
undertaken by a nominated person or
team using appropriate measuring
equipment where required. A check
shall be carried out on the adequacy
and availability of records. (EN 61340-
5-1 paragraph 10.1 Periodic audits)
"A check shall be carried out to ensure
that discarded packaging and other
materials that may be electrostatic
generative, or not in compliance with the
relevant parameters of clauses 5 and 7,
are disposed of promptly in a way that
does not put ESDS [ESD sensitive
items] at risk." (EN 61340-5-1
paragraph10.10 Check of discarded
packaging and other materials)
"A check shall be carried out to ensure
that electrostatic fields are not greater
than those specified in 5.3.5." [10,000
v/M] (EN 61340-5-1 paragraph 10.11
Electrostatic fields)
Phone: 0044 (0) 1462 672005, Fax: 0044 (0) 1462 670440 • e-mail: Service@Vermason.co.uk, Internet: Vermason.co.uk
TB-7552 December 2008 Page 1 of 3
TECHNICAL BULLETIN TB-7552
The Digital Static Fieldmeter indicates
surface voltage and polarity on objects
up to ±19.99 kV at a distance of 1 inch
with an accuracy of ±5% of the
displayed value. It is chopper-stabilized
for use under almost any conditions
including ionised environments. The
conductive case and ground snap
facilitate grounding for accurate
measurement. Also featured are a zero
knob and a push-button hold function. A
unique LED rangefinder system provides
accurate positioning of the meter from
the target.
Its accuracy is dependent upon three
factors:
• Grounding of the meter via a ground
cord or a grounded operator.
• The instrument must be properly
zeroed.
• The distance from the front edge of
the case to the target or surface
under examination must be
accurately defined.
Packaging
1 Digital Static Fieldmeter
1 9V Alkaline Battery
1 Cord with 2.5mm Mono Plug
1 Certificate of Calibration
Operation
Controls
The Digital Static Fieldmeter has two
switches, one for ON/OFF and one for
HOLD/MEASURE plus ZERO adjust
knob. The push button is two-position.
Pressing the button puts it into the lower
(MEASURE) position. Releasing the
button places it in its upper (HOLD)
position. The ZERO knob is turned to
the left or right to change the zero
setting of the display.
Turning the Meter ON and OFF
Slide the switch to the ON position. The
meter will turn on. To turn the meter
OFF, slide the switch to the OFF
position. The meter will now be off.
UNIT C, 4TH DIMENSION, FOURTH AVENUE, LETCHWORTH, HERTS, SG6 2TD UK
Battery Check
After turning on power to the meter,
check the display and make sure that
the low battery symbol is NOT lit. If the
battery symbol appears, replace the
battery (see page 2).
Zero the Meter
Turn on the meter with the ON/OFF
slide switch. Press the push button
down so that it is in the lower or
MEASURE position. Place the meter 1
inch from a GROUNDED metal surface.
The red bullseye (ranging lights) should
be in focus on the surface and the meter
should read "0.00". If the display does
not read "0.00", adjust the ZERO knob
until the display reads "0.00".
Making a Measurement
Place the meter 1 inch from the object to
be measured. This distance is
measured from the front edge of the
meter case to the surface of the object.
The meter now displays a reading (from
0 to ±19.99) of the electrostatic field in
kilovolts per inch.
NOTE: In the MEASURE position, the
RANGING LIGHTS are on. These lights
are provided to help place the meter at
the correct distance from the object.
The lights are set to produce a
concentric RED BULLSEYE pattern on a
flat opaque surface 1 inch form the front
edge of the meter. This can be
practiced by aiming the meter at a sheet
of white paper.
If the numeral "1" appears on the left
side of the display, the meter's range of
20 kV per inch has been exceded.
When this occurs, move the meter
farther away from the object and multiply
the reading by the distance (in inches)
away from the object being measured
(as shown in the figure). The
measurement accuracy is dependent on
a stable ground reference and the 1 inch
measuring distance. It is also
dependent on the "aspect ratio", relating
the size of the object to be measured to
the measurement distance.
© 2008 Vermason
Made in America
Advertisement
Table of Contents

Related Manuals for Vermason 222660

Summary of Contents for Vermason 222660
- Page 1 The meter will now be off. Electrostatic fields) UNIT C, 4TH DIMENSION, FOURTH AVENUE, LETCHWORTH, HERTS, SG6 2TD UK Phone: 0044 (0) 1462 672005, Fax: 0044 (0) 1462 670440 • e-mail: Service@Vermason.co.uk, Internet: Vermason.co.uk TB-7552 December 2008 Page 1 of 3 © 2008 Vermason...
- Page 2 It has been specially designed to measure UNIT C, 4TH DIMENSION, FOURTH AVENUE, LETCHWORTH, HERTS, SG6 2TD UK Phone: 0044 (0) 1462 672005, Fax: 0044 (0) 1462 670440 • e-mail: Service@Vermason.co.uk, Internet: Vermason.co.uk TB-7552 Page 2 of 3 © 2008 Vermason...
- Page 3 B: Insert the screw from the back of the Personal HBM Test Fixture. UNIT C, 4TH DIMENSION, FOURTH AVENUE, LETCHWORTH, HERTS, SG6 2TD UK Phone: 0044 (0) 1462 672005, Fax: 0044 (0) 1462 670440 • e-mail: Service@Vermason.co.uk, Internet: Vermason.co.uk TB-7552 Page 3 of 3 © 2008 Vermason...
Need help?
Do you have a question about the 222660 and is the answer not in the manual?
Questions and answers