Table of Contents
Advertisement
Quick Links
Advertisement
Table of Contents

Summary of Contents for Platin Gate Technology Stereo Hub
- Page 1 Stereo Hub Manual...
-
Page 2: Table Of Contents
2.2 Stereo Hub Layout 2.3 Remote Layout 2.3 Wi-Fi LED indications 3. How to set up 3.1 Setting up the Stereo Hub 3.2 Pairing the remote 3.3 Connecting the Hub to home network 3.4 Pairing speakers using WiSA 4. How to use . -
Page 3: Introduction
1. Introduction Thank you for buying the Stereo Hub. We hope you will enjoy it! Features: • Audio streaming Stream wireless audio from a wide variety of services. • DSP functions for manual and Room EQ Adjust your speakers using multiple audio filters or use our automatic Room EQ so your speakers sound just right. -
Page 4: Stereo Hub Overview
2. Stereo Hub Overview 2.1 Included in the box 1x Stereo Hub 1x Antenna 1x Power adapter (with EU/US/UK plug) 1x Remote 2x AAA Batteries 1x Allen key Stereo Hub Overview... -
Page 5: Stereo Hub Layout
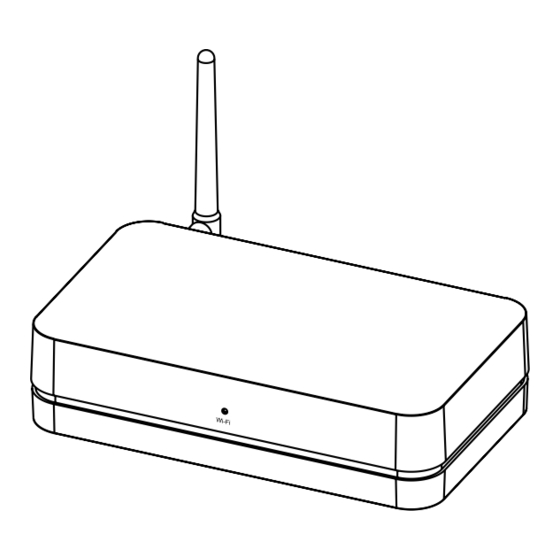
2.2 Stereo Hub Layout Antenna Wi-fi LED FRONT WiSA LED Service port Reset Optical LINE REAR HDMI COAX USB Audio Pairing button Power input Stereo Hub Overview... -
Page 6: Remote Layout
2.3 Remote Layout Mute Power ON/OFF Volume indicator Input indicator Navigation arrows PREV Pause/Play NEXT Stereo Hub Overview... -
Page 7: Wi-Fi Led Indications
2.3 Wi-Fi LED indications Solid white: Connected to network White (slow blinking): Booting White (rapid blinking): Wi-Fi configuration mode White (Irregular blinking): Updating software Solid green: Spotify streaming Stereo Hub Overview... -
Page 8: How To Set Up
3. How to set up 3.1 Setting up the Stereo Hub 1. Connect antenna to the back • Screw the included Wi-Fi ante- na on to the back plate of the Stereo Hub. 2. Connect power supply • Plug the included power adapt- er into the Stereo Hub. -
Page 9: Connecting The Hub To Home Network
2. Press and hold pair • Press and hold the ‘Pair’ button on the Stereo Hub for 3 seconds until the WiSA LED on the REAR of the Stereo Hub starts blinking rapidly. 3 SEC 3. Press any button on remote Press any button on the remote, •... -
Page 10: Pairing Speakers Using Wisa
2. Power on the Stereo Hub The Stereo Hub is ready for the next step when the ‘Wi-Fi LED’ starts flashing rapidly, meaning it has entered ‘Wi-Fi Configura- tion’ mode. 3. Open the Google Home app and follow the instructions You will be guided through each step in the app. -
Page 11: How To Use
4. How to use 4.1 Using the remote Power Surround Hub ON/OFF The Stereo Hub can be turned ON or OFF using the ‘ON/OFF’ button. Changing volume Volume can be adjusted on the remote using the up and down ‘Navigation’ buttons. -
Page 12: Channel Setup Using Remote
Before starting, make sure your remote is paired, and speakers are on and paired. 1. Start Channel Setup mode Press ‘Pair’ button on the REAR of the Stereo Hub quickly thee times. 3 clicks 2. Assign channel to speaker When Channel Setup mode is en- tered, one of the speakers in the setup will start producing noise. - Page 13 3. Check speaker assignment After assigning a speaker, the volume LED’s on the remote will indicate what channel is assigned to the speaker as follows: Left Right • 1 LED - Left channel • 3 LEDs - Subwoofer channel • 9 LEDs - Right channel 4.
-
Page 14: Audio Playback
HDMI cable. Change the audio output of your TV to HDMI(ARC/eARC) • If Stereo Hub is not identified as your TV’s output audio device, change the TV’s input to the HD- MI(ARC/eARC) input to make the handshake and then back to your desired source. - Page 15 - press-and-hold the mute button for 5 seconds to release it. • Any source with AUX output can be connected to your Stereo Hub through the AUX port on the REAR of the Hub. • Switch audio input to AUX using the remote.
- Page 16 Open the Spotify Connect app and make sure your device and the Stereo Hub is on the same network. • Find your Stereo Hub in the app and select it as playback device. • The input will automatically switch to “Wi-Fi”.
- Page 17 Open your designated DLNA app and make sure your device and the Stereo Hub is on the same network. • Find the your Stereo Hub in the app and select it as playback device. • The input will automatically switch to “Wi-Fi”.
-
Page 18: Automatic Standby
4.4 Automatic Standby The Stereo Hub will enter Automatic Standby mode after 20 minutes without audio signal. The Stereo Hub will become active again automatically when it recieves a signal. NB: When Stereo Hub goes to standby from the Optical,... -
Page 19: Trouble Shooting
Make sure there are at least 3 meters between the router (Or other wireless equipment) and the StereoHub. • Avoid having walls beteen the Stereo Hub and the speakers. • Avoid having the router placed in between the Stereo Hub and the speakers. -
Page 20: Power Cycling
1. Turn of the unit. 2. Wait for 30 seconds before returning power to the unit. 5.3 Factory reset If you for some reason need to factory reset the Stereo Hub, press the pinhole button on the REAR of the Stereo Hub. Trouble shooting... -
Page 21: Safety & Warnings
6. Safety & Warnings 6.1 Important Safety Instructions Read these instructions. Keep these instructions. Heed all warnings. Follow all instructions. Do no use this apparatus near water. Clean only with dry cloth. Do not block any ventilation openings. Install in accordance with manufacturer’s instructions. -
Page 22: Warning
6.2 Warning To reduce the risk of fire or electric shock, do not expose this apparatus to rain or moisture The apparatus shall not be exposed to dripping or splashing and that no objects filled with liquids, such as vases, shall be placed on the apparatus. This symbol is intended to alert the user to the presence of important operating and maintenance instructions in the literature accompanying this product.
Need help?
Do you have a question about the Stereo Hub and is the answer not in the manual?
Questions and answers