
Related Manuals for BCI 1884


Summary of Contents for BCI 1884
- Page 1 Pulse Oximeter Operation Manual Catalog Number 1884 Version 7, March 2003 Copyright BCI, Inc. - 2003...
-
Page 3: Table Of Contents
Table of Contents Clinician’s Operation Manual Warranty & Service Information ....................iii Proprietary Notice ........................iii WARRANTY ..........................iii Limited Warranty ........................iii Disclaimer of Warranties ......................iii Conditions of Warranty....................... iii Limitation of Remedies ....................... iii Warranty Procedure ........................iv CE Notice............................ - Page 4 Table of Contents Chapter 6: Printer Description........................... 6-1 What You’ll Need for Printing ....................6-1 Trend Printouts ..........................6-2 Collecting Trend Data....................... 6-2 Data log............................6-2 Paper Feed..........................6-3 Chapter 7: PC Communication Setup Description........................... 7-1 PC Communication Setup......................7-1 Chapter 8: Maintenance Schedule of Maintenance......................
-
Page 5: Warranty & Service Information
Information contained in this document is copyrighted by BCI, Inc. and may not be duplicated in full or part by any person without prior written approval of BCI, Inc. Its purpose is to provide the user with adequately detailed documentation to efficiently install, operate, maintain and order spare parts for the device supplied. -
Page 6: Warranty Procedure
To obtain warranty service in the USA, you must request a Customer Service Report (CSR) number from Technical Service. Reference the CSR number when returning your Product, freight and insurance prepaid, to: BCI, Inc., N7 W22025 Johnson Road, Waukesha, WI 53186-1856. Telephone: 1-800-558-2345. Facsimile: 262-542-3325. Seller will not be responsible for unauthorized returns or for loss or damage to the Product during the return shipment. -
Page 7: Warnings, Cautions, & Notes
Warnings, Cautions, & Notes Warnings, Cautions, & Notes KEYWORD DEFINITION WARNING Tells you about something that could hurt the patient or hurt the operator CAUTION Tells you something that could damage the monitor NOTE Tells you other important information Symbol Definitions SYMBOL DEFINITION Type BF equipment... -
Page 8: Cautions
IEC 601-1-1. Warning: Patient safety can be compromised by the use of a power supply not supplied by BCI, Inc. Use only the power supply included with your monitor, or approved by BCI, Inc. WARNING! IEC 950 approved equipment must be placed outside the “patient environment.”... - Page 9 Warnings, Cautions, & Notes NOTE! Dyes introduced into the bloodstream, such as methylene blue, indocyanine green, indigo carmine, patent blue V (PBV), and fluorescein may adversely affect the accuracy of the SpO reading. NOTE! Any condition that restricts blood flow, such as use of a blood pressure cuff or extremes in systemic vascular resistance, may cause an inability to determine accurate pulse rate and SpO readings.
-
Page 11: Chapter 1: Introduction
Chapter 1: Introduction Chapter 1: Introduction About the Manual The Operation Manual provides installation, operation, and maintenance instructions for health-care professionals and other users, trained in monitoring respiratory and cardiovascular activity. Theory of Operation The oximeter determines SpO and pulse rate by passing two wavelengths of low intensity light, one red and one infrared, through body tissue to a photodetector. -
Page 13: Chapter 2: Intended Use And Monitor Features Intended Use
The oximeter will operate accurately over an ambient temperature range of 32 to 131°F (0 to 55°C). The oximeter works with all BCI oximetry sensors providing SpO 2 and pulse rate on all patients from neonate to adult. -
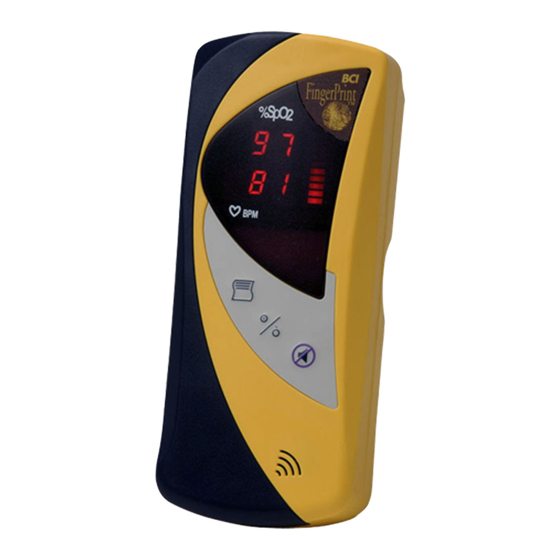
Page 15: Chapter 3: Controls & Features
Chapter 3: Controls & Features Chapter 3: Controls & Features Monitor Front Panel Figure 3.1: Monitor Front Panel %SpO 1. Sensor/Printer Connector The sensor connects here, or an oximetry cable can be connected between the monitor and the sensor. The serial printer or pc communication cable is also connected here. 2. -
Page 16: On Off Key
Chapter 3: Controls & Features Figure 3.2: Monitor Operating Keys %SpO ON OFF Key Pressing this key turns the monitor ON and OFF. PRINT Key Pressing this key turns on the optional printer located at the back of the monitor. Speaker Silence Key Momentarily pressing this key silences the speaker. -
Page 17: Chapter 4: Operating Instructions
Chapter 4: Operating Instructions Chapter 4: Operating Instructions WARNING: This device must be used in conjunction with clinical signs and symptoms. This device is only intended to be an adjunct in patient assessment. Unpacking the Monitor 1. Carefully remove the monitor and its accessories from the shipping carton. Save the packing materials in case the monitor must be shipped or stored. -
Page 18: Attaching The Sensor To The Patient
Chapter 4: Operating instructions Attaching the Sensor to the Patient What you need to know about attaching the sensor to the patient: WARNING! Prolonged use or the patient’s condition may require changing the sensor site periodically. Change sensor site and check skin integrity, circulatory status, and correct alignment at least every 4 hours. -
Page 19: Care And Handling Of The Sensor
Chapter 4: Operating Instructions Care and Handling of the Sensor WARNING! Misuse or improper handling of the sensor and cable could result in damage to the sensor. This may cause inaccurate readings. Hold the connector rather than the cable when connecting or disconnecting the sensor to the device as shown in Figure 4.1. -
Page 20: Checking The Sensor And Oximetry Cable
Chapter 4: Operating instructions Checking the Sensor and Oximetry Cable Follow these instructions each time before you attach the sensor to the patient. This helps ensure the sensor and oximetry cable are working properly. WARNING! Using a damaged sensor may cause inaccurate readings. Inspect each sensor. -
Page 21: Turning On The Monitor
Chapter 4: Operating Instructions Turning On the Monitor 1. To turn on the monitor, press the key. When turned ON, the monitor does the following: • The top segment of the pulse strength bar graph illuminates. • The monitor's software revision is momentarily displayed. •... -
Page 22: Low Battery Indicator
Pulse oximeters do not require user calibration. If checking the function of the device is desired, an optional Oximeter/ECG Patient Simulator (BCI catalog number 1606HH) is available as an accessory. The simulator attaches to the oximeter in place of the sensor or oximetry cable. -
Page 23: Chapter 5: Patient Numbers & Trend Data
Chapter 5: Patient Numbers & Trend Data Chapter 5: Patient Numbers & Trend Data Description Whenever the monitor is on, it stores one SpO and one pulse rate reading every thirty (30) seconds. The stored readings are called trend data. The monitor remembers trend data for up to 99 patients and 14 hours of run-time, depending on battery condition. -
Page 25: Chapter 6: Printer
Chapter 6: Printer Chapter 6: Printer Description Data can be printed in either data log, or trend data mode. In the trend data mode, up to 14 hours of previously stored data, collected from 1 to 99 patients, is printed. Data log prints real time data. -
Page 26: Trend Printouts
Chapter 6: Printer Trend Printouts Collecting Trend Data Whenever the monitor is on, it stores one SpO and one pulse rate reading every thirty (30) seconds. The stored readings are called trend data. The monitor remembers trend data for up to 99 patients and 14 hours of run-time, depending upon battery life. -
Page 27: Paper Feed
Chapter 6: Printer Paper Feed To advance paper through the printer, press and hold PRINT for 3 seconds (not at power up). The paper-feed will start. Press the PRINT key again to stop the printer, otherwise the printer will stop in about 25 seconds after printing 30 empty lines. This is enough time to flip the device over and slide the paper end into the slot until the printer captures the paper and feeds it through. -
Page 29: Chapter 7: Pc Communication Setup
Chapter 7: PC Communication Setup Chapter 7: PC Communication Setup Description The device will send out Trend Data through the sensor connector when the sensor / patient cable is not plugged in. An additional cable is used to connect the device to a serial printer or PC computer. -
Page 31: Chapter 8: Maintenance
Chapter 8: Maintenance Chapter 8: Maintenance Schedule of Maintenance MAINTAIN THIS ITEM: HOW OFTEN: BY DOING THIS: Battery. When Low Battery Attention Follow the instructions for indicator is flashing, or audible installing the batteries. battery indicator sounds, or 12-15 hours of battery use has elapsed. -
Page 33: Chapter 9: Troubleshooting
No trends in memory. Take trend data. Sensor must be disconnected Disconnect the sensor. for trend data printout. Printer interface Contact your authorized repair malfunction. center for help. ROM Error Contact BCI Service RAM Error Contact BCI Service Oximeter Operation Manual... -
Page 34: Emi Interference
Turn equipment in the vicinity off and on to isolate the offending equipment. • Reorient or relocate the other receiving device. • Increase the separation between the interfering equipment and this equipment. If assistance is required, contact BCI Incorporated’s Service Department or you local BCI, Inc. representative. Oximeter Operation Manual... -
Page 35: Chapter 10: Optional Supplies & Accessories
Comfort Clip™ finger Sensor each 6012 Paper Printer 4/pk Ordering Information: For ordering information, contact your local distributor or the BCI, Inc. customer service department. BCI, Inc. Phone: (262) 542-3100 N7 W22025 Johnson Road Fax: (262) 542-3325 Waukesha, WI USA 53186-1856 Toll Free;... -
Page 37: Chapter 11: Specifications
Chapter 11: Specifications Chapter 11: Specifications Equipment Classification Type of Protection Against Internally Powered Electric shock: Mode of operation: Continuous Degree of Protection Against IPX1, drip proof ingress of Liquids: Degree of Mobility: Portable Degree of Protection Against Type BF Electric Shock: Safety Requirements: EN60601-1: 1990... -
Page 38: Pulse Rate
Chapter 11: Specifications Pulse Rate Range: 30-254 BPM (1 bpm increments) Accuracy: ±2% or 2 BPM, which ever is greater Averaging: 8 second average Display Update Rate 1 Hz Optional Printer 1 inch wide paper thermal printer 15 characters per line with two dots between symbols 5x7 dot characters Power Requirements Four standard “AA”... - Page 39 Smiths Medical – a part of Smiths Group plc 0473 Authorized Representative (as defined by the Medical Device Directive): Graseby Medical Ltd. Phone: (44) 1923 246434 Colonial Way, Watford, Herts, Fax: (44) 1923 240273 UK WD2 4LG...
Need help?
Do you have a question about the 1884 and is the answer not in the manual?
Questions and answers