Table of Contents
Advertisement
Quick Links
This document outlines how to setup your TM50 for automated monitoring using GeoMoS.
1. Ensure that GeoMoS is not trying to control the instrument you are setting up during this process.
The best way to ensure this is to stop GeoMoS from running or de-activate GeoMoS in the
"Sensor Manager" before you begin.
2. Screw the tribrach down on the 5/8
hole in the aluminum instrument housing. Ensure it is screwed down tightly as this is what locks
the instrument housing to the pillar.
3. Once it is fitted tightly, use the foot screws on the tribrach to make it level with the bubble built
in to the tribrach.
4. Now place the instrument into the tribrach and use the locking clamp to lock it down. Check that
you can access the Lemo connecter in the TM50 when you do this and then connect the Leica
cable aligning the red dots.
5. Turn the TM50 on by pressing and briefly holding down the power button on the keyboard which
looks like this.
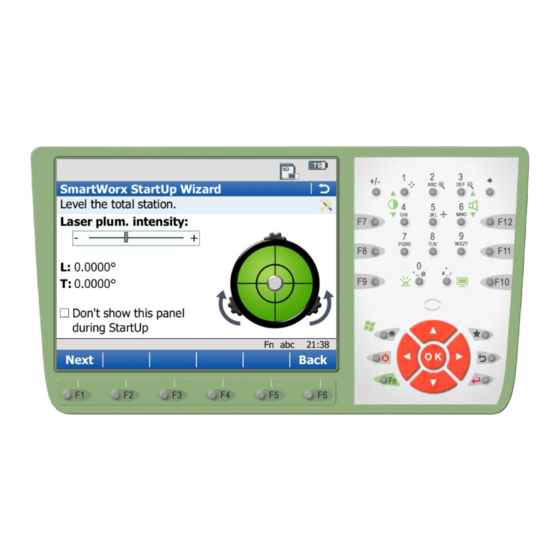
6. Now you must fine tune the TM50 using the electronic bubble. This is more precise than the
bubble on the tribrach. The arrows on the screen show the direction to turn the foot screws.
Once it is perfectly level, select "Next". See below.
7. Next you will be prompted to enter the atmospheric conditions. This is not necessary as GeoMoS
uses a dedicated weather station however, you will need to ensure that the atmospheric ppm" is
set to zero.
TM50 Setup Procedure
th
thread that protrudes from the top of the pillar through the
Advertisement
Table of Contents

Summary of Contents for Pangea TM50
- Page 1 4. Now place the instrument into the tribrach and use the locking clamp to lock it down. Check that you can access the Lemo connecter in the TM50 when you do this and then connect the Leica cable aligning the red dots.
- Page 2 10. Enter a point number for the reference prism. This can be any number, for example, number 2. When the TM50 is pointed at the REF prism select F2 (Distance) to confirm that the reference prism can be measured. A distance will be shown in the “Horiz distance” field if successful.
Need help?
Do you have a question about the TM50 and is the answer not in the manual?
Questions and answers