
Summary of Contents for EyeLink Portable Duo
- Page 1 EyeLink Portable Duo Installation Guide Version 1.0.2 Copyright ©2016-2017, SR Research Ltd. EyeLink is a registered trademark of SR Research Ltd., Mississauga, Ontario, Canada...
- Page 2 Intertek, an independent testing agency. SAFETY WARNINGS WARNING: Do not open or modify the EyeLink Portable Duo in any way. This may render the unit unsafe, resulting in shock or burn hazards, and will void the warranty and safety certifications.
- Page 3 • If the EyeLink Portable Duo fails to operate properly, is running at a higher than normal temperature, or if the cable is damaged / the illuminator is not glowing, disconnect the USB cable or turn off the Host PC, until the operator can troubleshoot the system.
- Page 4 CONTACT ADDRESS SR Research Ltd 35 Beaufort Drive Ottawa, Ontario, K2L 2B9 Canada Fax: (613) 482-4866 Phone: (613) 271-8686 Toll Free: 1-866-821-0731 (North America only) Email: support@sr-research.com Sales: http://www.sr-research.com Support: http://www.sr-support.com © 2016-2017 SR Research Ltd.
-
Page 5: Table Of Contents
Table of Contents Introduction ....................... 1 EyeLink Portable Duo Installation - Suggested Equipment Layout ..1 Installation and System Cabling ................3 Unpacking .................... 3 Pre-Installation Checklist ..............3 Setting up the Host PC ................4 System Wiring ..................4 Eye Tracker Installation Using a Tripod Mount ............. - Page 6 Figure 3-1: EyeLink Portable Duo Eye Tracker Mounted on a Tripod ........6 Figure 3-2: Install Camera onto the Tripod ................6 Figure 4-1: EyeLink Portable Duo Eye Tracker Installed on a Laptop Mount ......8 Figure 4-2 Parts of a Laptop Mount ..................8 Figure 4-3: Adjusting the Span of the Mounting Brackets (A –Screws Need to Be Loosened for...
-
Page 7: Introduction
EyeLink Portable Duo Installation - Suggested Equipment Layout It is important to consider the layout of the EyeLink Portable Duo system in order to optimize participant setup, and to avoid lighting problems that might degrade tracking performance. Before setting up the equipment, check the arrangement of the room to be used against these suggestions. -
Page 8: Figure 1-1: Suggested System Layout
Figure 1-1: Suggested System Layout • Ideally, the table you select should be deep enough to accommodate both the monitor and eye tracker. For a 24” monitor with a 32° horizontal viewing angle, the minimum table depth should be about 110 cm. A high table will ensure that even the tallest participants do not need to hunch over in order for their view to be aligned with the top of the Display monitor. -
Page 9: Installation And System Cabling
3. Ethernet cable to connect the Host and Display PCs to one another. 4. EyeLink Host PC (a Laptop PC or a Workstation PC with monitor) with power supply. 5. EyeLink Portable Duo Installation Guide, User Manual, and Quick Start Guide. -
Page 10: Setting Up The Host Pc
Ethernet port on the computer. Connect the other end of the cable to the Ethernet port on the Display PC that you will later configure for use with the EyeLink system. Ensure the cable is securely connected at both ends. -
Page 11: Figure 2-1: Basic Host Pc And Camera Cabling
Figure 2-1: Basic Host PC and Camera Cabling Installation and System Cabling © 2016-2017 SR Research Ltd. -
Page 12: Eye Tracker Installation Using A Tripod Mount
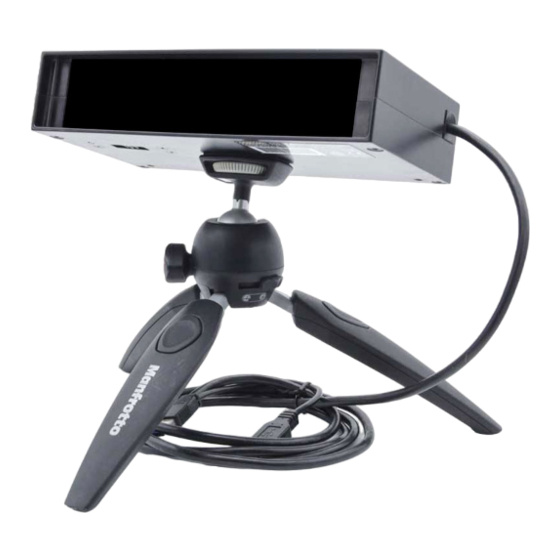
Eye Tracker Installation Using a Tripod Mount The EyeLink Portable Duo eye tracker can be mounted on a tripod and placed just below the Display monitor that the participant is looking at. Please follow the steps below to set up the eye tracker on a tripod. -
Page 13: Adjusting The Eye Tracker Setup
Adjusting the Eye Tracker Setup Follow the steps below to adjust the eye tracking unit, monitor, and head support (if operating the eye tracker in the head-stabilized mode). 1) The Display PC monitor should be set such that when participants are seated and looking straight ahead, their eyes are level with the top quarter of the monitor. -
Page 14: Eye Tracker Installation Using A Laptop Mount
Eye Tracker Installation Using a Laptop Mount Another option for mounting the camera of the EyeLink Portable Duo eye tracker is to use a laptop mount, if users are going to use the screen of a 15” or 17” laptop computer to present stimuli to the participants. -
Page 15: Figure 4-3: Adjusting The Span Of The Mounting Brackets
Figure 4-3: Adjusting the Span of the Mounting Brackets (A – Screws Need to Be Loosened for Adjustments; B – Stopper on the Mounting Brackets Should be Seated in one of the Holes; C – Stopper not Properly Seated; D – Stopper Properly Seated) Eye Tracker Installation Using a Laptop Mount ©... -
Page 16: Adjusting The Eye Tracker Setup
Place the laptop mount on top of the keyboard area of the laptop, with the clamping knob on the right side (see panel A of Figure 4-3). If the two side rails of the mounting brackets are not resting on the edges of the laptop, then the span of the mounting brackets needs to be adjusted. - Page 17 1) Please make sure you use a height-adjustable chair so that you can raise/lower the participant to the appropriate height. When the subject is seated, tilt the screen of the laptop so that it is perpendicular to the participant’s line of sight. 2) Place the laptop mount over the keyboard area of the laptop, with the two side rails resting on the edges of the laptop.
-
Page 18: Testing The Host Pc Installation
Now turn on the computer. The EyeLink Portable Duo Host application will start automatically. You will first see an EyeLink Portable Duo splash screen, followed by the Setup screen of the Host Application. The version of the Host software that is being used is displayed on the splash screen as well as in the lower-left corner of the Setup screen. -
Page 19: Host Software Update
Figure 5-1: Host Application Camera Setup Screen A screenshot of the large field of view of the EyeLink Portable Duo camera (remote, head free- Figure 5-1 to-move mode) is illustrated in . Please consult Chapter 3 of the EyeLink Portable Duo User Manual for a tutorial related to setting up the camera, calibration, and validation. -
Page 20: Troubleshooting Instructions
Figure 5-3: Updating Host Software through Web UI Troubleshooting Instructions If the EyeLink Portable Duo Host Application fails to start, please watch closely for the error message displayed on the Host screen. The complete error message is saved to the eye.log file in the “\elcl\data”... -
Page 21: Error: -67: Can't Find Sr Research Usb Camera
To correctly compute visual angles, saccade amplitudes, and eye velocities, the EyeLink Portable Duo eye tracker needs to know the physical characteristics of your setup. Any time you change your physical configuration (for example, if a new monitor is used, the position of... -
Page 22: Screen Dimensions
Display PC monitor that is being used in the experiments. All screen physical coordinate measurements are in millimeters. Turn on both the EyeLink Host PC and Display PC. Run your intended experiment (if you don't have one, use the Track example supplied). When the experiment starts up, measure the currently lit-up/viewable portion of the monitor. -
Page 23: Eye-To-Screen Distance
EyeLink Developers Kit for an illustration of how this can be done). If the EyeLink Developers Kit/API is not being used (e.g., you are doing a stand-alone recording, or your own experimental programming software doesn't send out the "screen_pixel_coords"... -
Page 24: Camera-To-Screen Distance
“/ELCL/EXE” folder for detailed instructions. 5.4.4 Camera-to-Screen Distance When setting up the EyeLink Portable Duo eye tracker, the camera may be placed at various distances relative to the Display PC monitor. In some setups, the camera might be placed right in front of the Display monitor with no extra space between the eye tracker and the monitor. -
Page 25: Optimal Target-To-Camera Distance
Setup screen. Given the operating range of the Portable Duo, this value should not be less than 470 or more than 600. We recommend you leave the default value of 520 unless there are some specific circumstances that require you to routinely place participants slightly closer or further away. - Page 26 Use the “remote_distance_warn_range” command if you choose to pass the optimal target-to- camera distance to the Host PC via your stimulus presentation software - see the PDUORBTABLEU.INI file in the “/ELCL/EXE” folder for detailed instructions. Testing the Host PC Installation ©...
-
Page 27: Display Pc Hardware And Software Installation
A CRT or LCD monitor with high refresh rates and low response times • A dedicated Ethernet port to connect the Display PC to the EyeLink Host PC Optional Ethernet card for use on local network or internet access •... -
Page 28: Windows Installation
EyeLink Data Viewer and SR Research Experiment Builder are optional applications for the EyeLink eye tracker. If you do not plan on using these software packages this section may be skipped. To update or install the most recent copy of EyeLink Data Viewer, please visit https://www.sr-support.com/showthread.php?4434-EyeLink-Data-Viewer. -
Page 29: Usb License Key Installation
You must have an Ethernet port in your Display Computer in order to make the connection to the EyeLink Host PC. Allow Windows to install drivers for that Ethernet port (if it is new hardware), then follow these instructions to configure the TCP/IP network protocol. These instructions are based on Windows 7;... -
Page 30: Figure 6-2: Configure Ip Address On Windows 7
8. Click on “OK” to return to the Properties dialog. Click “OK” again to save your changes. Click “Close” to exit from the network card dialog. To test the network connection, start the EyeLink Portable Duo eye tracker and start the “Track” application from “Start -> All Programs -> SR Research -> Track”. The link should connect, and the screen will display instructions. -
Page 31: Mac Os X Installation
Ethernet port. Mac OS X Installation To use Mac OS X as a Display computer with the EyeLink Portable Duo system, various EyeLink software components should be installed on the computer. The installation process consists of the following basic steps: •... -
Page 32: Figure 6-3: Configure Ip Address On Mac Os X
the Configure IPv4 drop-down list, and enter the above IP address and subnet mask Figure 6-3 (see Figure 6-3: Configure IP Address on Mac OS X If you plan to program your experiments in MATLAB, install the latest version of the Psychtoolbox and reboot the computer.
Need help?
Do you have a question about the Portable Duo and is the answer not in the manual?
Questions and answers