Table of Contents
Advertisement
Quick Links
Advertisement
Table of Contents

Related Manuals for Strymon OJAI R30


Summary of Contents for Strymon OJAI R30
- Page 1 USER MANUAL...
- Page 2 OJAI R30 - High Current DC Power Supply User Manual ® Getting Started Connect one end of the Connect one end of the included IEC cable to the 24V included power adapter cable power adapter, and the other to the 24V power adapter.
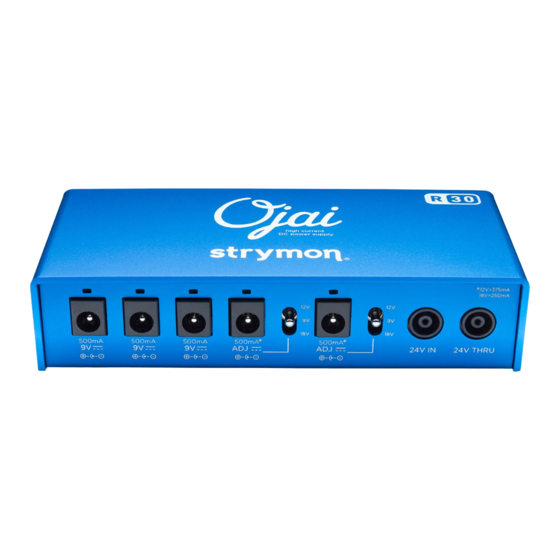
- Page 3 NOTE: Use non-adjustable outputs first to power your Strymon pedals. If using adjustable outputs with Strymon pedals, make sure these outputs are set to 9V. Check with each pedal manufacturer for recommended voltage, polarity, and required current.
- Page 4 Link additional Ojai units in the same manner. Ojai R30 provides a huge amount of power. You can link together as many as 7 Ojai units powered from one 24V power adapter, powering up to 35 effects pedals (depending on the total current requirement for the pedals).
- Page 5 Choose your mounting location. Tape the Drill Template, logo side up, in the location you want to install your Ojai R30. This illustration shows mounting to the top of your pedalboard. To mount Ojai R30 to the bottom of your pedalboard, turn the pedalboard over before placing the Drill Template logo side up in the location you want to install your Ojai R30.
- Page 6 One (1) EIAJ-05 power adapter cable • Five (5) 2.1mm x 5.5mm pedal cables (18” long, right angle to right angle connectors) • Two (2) #4 3/8” wide pan head screws for mounting the Ojai R30 to your pedalboard • Mounting Guide •...
- Page 7 In no event will Strymon be liable for more than the amount of the purchase price, not to exceed the current retail price of the product. Strymon disclaims any other warranties, expressed or implied. By using the product, the user accepts all terms herein.
Need help?
Do you have a question about the OJAI R30 and is the answer not in the manual?
Questions and answers