Table of Contents
Advertisement
Quick Links
Advertisement
Table of Contents

Summary of Contents for Ocean Reef OCEANREEF GAMMA ALPHA HD
- Page 1 GAMMA ALPHA HD OWNER’S MANUAL...
-
Page 2: Table Of Contents
GAMMA ALPHA HD - OWNER’S MANUAL TABLE OF CONTENTS 1 - INTRODUCTION 2 - GENERAL WARNINGS / OWNER’S RESPONSIBILITIES 3 - REMINDERS AND TIPS FOR USE 4 - PACKAGE CONTENTS 4.1 SURFACE UNIT 4.2 PROFESSIONAL SURFACE/DIVER AUDIO CABLE 4.3 PROFESSIONAL SURFACE/DIVER VIDEO CABLE 4.4 UNDERWATER COMMUNICATION UNIT (ALPHA PRO 2.0) 4.5 UNDERWATER WIDE ANGLE AHD CAMERA 5 - ASSEMBLYING THE THE UNDERWATER COMM. -
Page 3: Introduction
1 - INTRODUCTION For more than 75 years, OCEAN REEF has been involved in the underwater diving industry. We have contributed much to this industry, from fins and snorkels to the most modern systems of underwater communication. Through the spirit of intrepid pioneers, brilliant inventors, passionate divers, and dynamic entrepreneurs, OCEAN REEF has been able to turn dreams into reality in the underwater world. -
Page 4: General Warnings / Owner's Responsibilities
OCEAN REEF terms of sales and delivery. In order to maintain the warranty, service and routine, maintenance of the products must be performed by the end user as indicated by OCEAN REEF and described in chapter - MAINTENANCE, CLEANING AND STORAGE. -
Page 5: Reminders And Tips For Use
3 - REMINDERS AND TIPS FOR USE Before charging, please make sure the charging port is dry. Charge in a safe, dry place. Use the original charger only. It is your responsibility solely to assure the charger works properly. Product should be stored in shade, dry and cool location. Do not expose to extreme low and high temperatures. -
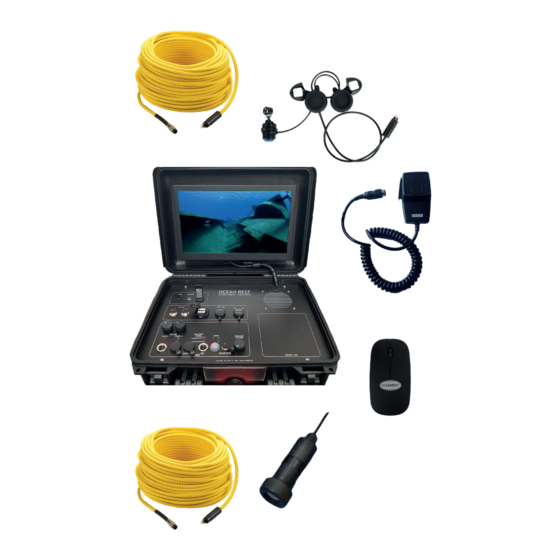
Page 6: Package Contents
PACKAGE CONTENTS INCLUDES: 3 - PROFESSIONAL VIDEO 2 - PROFESSIONAL AUDIO 1 - SURFACE UNIT 50 M. CABLE 50 M. CABLE W/MIC & CHARGER, Can be ordered separately / Can be ordered separately / REMOTE CONTROL AND MOUSE custom length custom length 3 - UW UNIT 2.0 4 - CAMERA... -
Page 7: Surface Unit
The underwater comm. unit can be sold separately, and customized for use with some other brand surface units, but is designed to be used specifically with the OCEAN REEF hardwire surface unit (GAMMA ALPHA - ALPHA PRO X-DIVERS). - Page 8 SURFACE UNIT GLOSSARY 2 3 4 MOUSE PAD 3 4 5 6 Surface unit, hardwired, full duplex underwater communication. It has the following features: AUDIO VIDEO 2 ports for 2 communication cables - 2 ports for 2 video cables - Gamma Gamma Alpha can receive audio from two Alpha can receive video from two divers) divers)
-
Page 9: Professional Surface/Diver Audio Cable
- OCEAN REEF cable floaters available as an accessory. It is a good idea to connect the cable with a hook to the BC, avoiding any traction between the surface and the underwater comm. -
Page 10: Professional Surface/Diver Video Cable
PROFESSIONAL SURFACE/DIVER VIDEO CABLE One surface/diver video cable (50 meters -165 ft long) (if sold separately code OR008575) 4 pin cable/wire with yellow rope exterior. The cable’s diameter is 10mm with a resistance of more than 4000 Newtons. The cable is a mini RG59 + 4x0.18mm² cable with a polyurethane jacket to better resist to salt water. -
Page 11: Underwater Communication Unit (Alpha Pro 2.0)
Audio recall button • 6 pin waterproof connector The underwater comm. unit can be connected to any professional OCEAN REEF Mask using the OCEAN REEF Extender Frame The connector between the cable and the underwater comm. unit can be disconnected and connected again underwater Do not touch the hydrophobic membrane of the mic - as it may break with any sharp object that may damage it. - Page 12 5 - ASSEMBLYING THE UNDERWATER COMM. UNIT 2.0 Assemblying the underwater comm. unit 2.0 on the Extender Frame. Start removing from the Extender Frame both side neutrals connections, as shown in the picture below. Begin mounting the left (the one connected to the mic), earphone of the underwater comm. unit 2.0 securing it to the Extender Frame exactly like a neutral or an earphone support.
- Page 13 Proceed connecting the MIC on the COMMUNICATION side port of the mask by screwing it on. The crown around the PTT will turn until flush. Last, connect the R earphone to the right side of the Extender Frame by having the cable connecting the two ears passing underneath the straps into the face seal groove.
-
Page 14: Possible Audio Interactions
POSSIBLE AUDIO INTERACTIONS By adding an additional surface/diver cable and underwater comm. unit, the Gamma Alpha HD may communicate with two divers at the same time. It is also possible for the surface to switch between each of the divers. AUDIO DIVER MODE CHART: DIVER 1 SELECTED Receive from... -
Page 15: Assemblying The Camera
To protect the camera always add extra tape in the central part The best way to mount the camera to your ocean reef full face mask is with the ocean reef professional accessories mount (available separately as accessory) OR025260 - Professional Accessories Mount... -
Page 16: Underwater Cables Set-Up
The intended setup is designed by adding the OCEAN REEF cable fleeters (sizes for both single and multiple cables threading) – available sold separately. It is highly recommended to secure topside cables also to avoid direct stress on connectors/topside unit. -
Page 17: Test The Underwater And Surface Comm. Unit
9 - TEST THE UNDERWATER AND SURFACE COMMUNICATION UNIT Turning on the unit trough the main Once your cable set up is done and POWER ON/OFF SWITCH inserted the microphone in the MIC Green light on the bottom right input port you are ready to test the corner of the monitor = unit ON. -
Page 18: Start/Stop Recording
10 - START/STOP RECORDING START RECORDING Using the included mouse right click anywhere → on the screen and select record mode in the → Manual line you can select diver 1 or 2 or both → and then confirm to start recording. The cassette recorder symbol (bottom left corner of screen) confirms when the recording has started. -
Page 19: Access Playback
11 - ACCESS PLAYBACK refresh button → → Right click on the screen Playback choose wich channel you want to access (1/2 or ALL) click the refresh button to display the files. Remote control On the right side: list of multimedia contents related data for each file. -
Page 20: Export Files On External Drive
12 - EXPORT FILES ON EXTERNAL DRIVE Insert pen drive or hard disk in the USB BACKUP → → port right click on the screen playback choose wich channel you want to access (1/2 or all) → click the refresh button to display the files list of multimedia contents and related data for each →... -
Page 21: Delete All Files On Gamma Hd
13 - DELETE ALL FILES ON GAMMA HD DELETE ALL FILES ON GAMMA HD → → → Right click on the screen Main Menu Advanced HDD info Storage” button then confirm simply by Select the hard disk and click on “Format pressing the “OK”... -
Page 22: Hdmi Cable Connection
15 - HDMI CABLE CONNECTION Video and audio out from Gamma Alpha HD to a screen Use a (non provided) HDMI cable. Connect it to the HDMI Gamma Alpha HD port. Connect other end of cable to your screen. GAMMA ALPHA HD rel. 1.0... -
Page 23: Diver 2 To Computer Call Mode
16 - DIVER 2 TO COMPUTER CALL MODE The Diver 2 to Computer - “Call Mode” allows the use of audio and video of diver 1 to be displayed live on an internet based call (ie : google meet, zoom, teams, skype). Diver 1 will be one of the participants of the call. - Page 24 Connect the (optional) Diver 2 Computer (Code:OR08513) cable to the Diver 2 port on the GammaAlpha HD Turn the audio unit on by turning the speaker volume button. Set Diver 1 and Diver 2 volume to half power. Make sure both channels (Diver1 and Diver 2 ) are on! Connect audio out and microphone jack connectors of the “Diver 2 to...
-
Page 25: Usb Live Cable And Audio Out Cable: "Broad. Mode
17 - USB LIVE CABLE AND AUDIO OUT CABLE: BROADCASTING MODE With Alpha Gamma HD it is also possible to use the brodcasting mode using the USB male to male cable (not supplied) in the USB live port and the audio out cable (sold separately as optional) as shown above at pag NOTE! if you do not need to broadcast the audio signal you can simply use only the USB male to USB male cable for video signal out. -
Page 26: Useful Setting Options To Know
Use a (optional) audio out cable (code: 008590) Connect it to the AUDIO OUT/CHARGHER Gamma Alpha HD port. Connect other end of cable to your audio source 18 - USEFUL SETTING OPTIONS TO KNOW SETTING THE LANGUAGE → → → →... - Page 27 DISPLAY OPTIONS: HIDE/SHOW/MODIFY DATA ON RECORDING FRAME → → → → Right click on the screen Main Menu System Display set data as preferred → OK to confirm Language changes after restarting the unit BALANCE CAMERA COLORS AND SETTINGS → →...
- Page 28 BALANCE THE MONITOR COLORS AND SETTINGS → → → Right click on the screen output adjustg adjust the settings as preferred to confirm It is also possible to adjust these settings with the remote control. Replacing the Mic Remove the MIC assembly from the mask, unscrew few threads of the two little side screws and pull off the Mic.
-
Page 29: Troubleshooting
OCEAN Recall system button REEF service center Issues with the surface Return to surface and send to unit alarm system OCEAN REEF service center Disconnected plugs Disconnected plugs Surface not General power off General power off receiving... -
Page 30: Maintenance, Cleaning And Storage
20 - MAINTENANCE, CLEANING AND STORAGE 20.1 MAINTENANCE AND CLEANING The underwater comm. unit will work perfectly if the periodic program of maintenance and cleaning collected in Table 2 is applied during its whole life from the first use. General and visual inspection means checking that all the components and parts are not damaged, and verifying there is not any wear and tear. -
Page 31: Warranty
The product has been tampered with or has been repaired/service with non-original parts. You can find a copy of this and other OCEAN REEF manuals online on our website. In order to limit our paper consumption, and as a part of our environmental friendly and responsible approach, OCEAN REEF recommends, in case you lose or damage this manual, to consult the documentation present online rather than print it out. - Page 32 ACCESSORY INTEGRATION • Extender Kit Inlcuded.. • Surface air valve integrated. • Customize your mask to your professional needs. OCEAN REEF Inc MESTEL Safety s.r.l 2510 Island View Way Via Arvigo 2, 16010 Genova (Italia) Vista, CA 92081 Phone +39 010 7082011 Phone +1 760 744 9430 E-mail: infoitaly@oceanreefgroup.com Fax +1 760 744 9525 E-mail: operator@oceanreefgroup.com...
Need help?
Do you have a question about the OCEANREEF GAMMA ALPHA HD and is the answer not in the manual?
Questions and answers