Advertisement
Quick Links
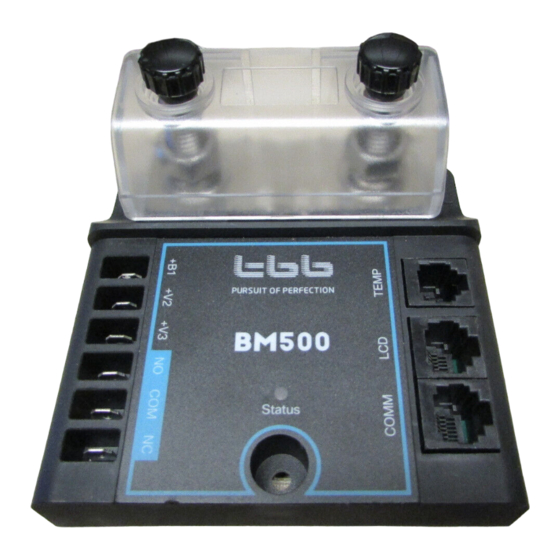
B A T T E R Y M O N I T O R K I T
Smart battery monitor kit to fit the Hero Camper. It enables you
to see charge and discharge regardless of which battery you have
installed. The information is shown on display and can be shown
on the app as well.
C O M P O N E N T S A N D D I M E N S I O N S
#HeroCamper™ – www.herocamper.com
Lammefjordsvej 5 – 6715 Esbjerg N – Denmark
Phone +45 7022 5840 – sales@herocamper.com
VAT No DK – 40193189
Version 07-02-2023
Advertisement

Summary of Contents for HeroCamper BM500
- Page 1 C O M P O N E N T S A N D D I M E N S I O N S #HeroCamper™ – www.herocamper.com Lammefjordsvej 5 – 6715 Esbjerg N – Denmark Phone +45 7022 5840 – sales@herocamper.com VAT No DK – 40193189 Version 07-02-2023...
- Page 2 PH 10x2mm PH 20x3mm #HeroCamper™ – www.herocamper.com Lammefjordsvej 5 – 6715 Esbjerg N – Denmark Phone +45 7022 5840 – sales@herocamper.com VAT No DK – 40193189 Version 07-02-2023...
-
Page 3: Tools For Installation
T O O L S F O R I N S T A L L A T I O N #HeroCamper™ – www.herocamper.com Lammefjordsvej 5 – 6715 Esbjerg N – Denmark Phone +45 7022 5840 – sales@herocamper.com VAT No DK – 40193189 Version 07-02-2023... - Page 4 If the product in not for a Hero Camper we refer to the original manual of the manufactor for each product. 1) Pull down the seat inside the Hero Camper. #HeroCamper™ – www.herocamper.com Lammefjordsvej 5 – 6715 Esbjerg N – Denmark Phone +45 7022 5840 – sales@herocamper.com VAT No DK – 40193189 Version 07-02-2023...
- Page 5 2) Remove the battery from the holder to ensure you have enough working space. You do not nessesarly have to deattach the wires. #HeroCamper™ – www.herocamper.com Lammefjordsvej 5 – 6715 Esbjerg N – Denmark Phone +45 7022 5840 – sales@herocamper.com VAT No DK – 40193189 Version 07-02-2023...
- Page 6 3) Use leveller to position the BM500. Mark the 3 holes with a pencil. Remove the BM500 and use an ø2mm drill. Attach the BM500 with the provided PH 20x3mm screws. Use vaccuum to remove any leftovers. #HeroCamper™ – www.herocamper.com Lammefjordsvej 5 –...
- Page 7 Remove the Display holder and use an ø2mm drill. Attach the Display holder with preffered screws. Use vaccuum to remove any leftovers. #HeroCamper™ – www.herocamper.com Lammefjordsvej 5 – 6715 Esbjerg N – Denmark Phone +45 7022 5840 – sales@herocamper.com VAT No DK – 40193189 Version 07-02-2023...
- Page 8 PH 10x2mm screws. Be careful not to overtighten. Re-mount the plastic cover afterwards. #HeroCamper™ – www.herocamper.com Lammefjordsvej 5 – 6715 Esbjerg N – Denmark Phone +45 7022 5840 – sales@herocamper.com VAT No DK – 40193189 Version 07-02-2023...
- Page 9 7) Install the Communication cable into the display and the MBM port on the BM500 #HeroCamper™ – www.herocamper.com Lammefjordsvej 5 – 6715 Esbjerg N – Denmark Phone +45 7022 5840 – sales@herocamper.com VAT No DK – 40193189 Version 07-02-2023...
- Page 10 8) Start with unscrewing the safety plate for the BM500 by hand. Then remove the nut, spring washer and washer. If you can not do it by hand, use a M16 wrench. 9) Remove the negative system ground cable and connect it to the BM500 S- port. Use a M16 wrench to tighten.
- Page 11 10) Measure the length from negative pole on battery to B- on the BM500. Cut your cable in correct length and install cable lugs in each end (Ø5,5mm). 11) Mount the cable to B- on the BM500. (The other end will go to negative (-)) 12) Reinstall the protection cover on the BM500.
- Page 12 13) Insert the 1A250v Fuse cable to +B1 on the BM500. (The other end will go to negative (-)) #HeroCamper™ – www.herocamper.com Lammefjordsvej 5 – 6715 Esbjerg N – Denmark Phone +45 7022 5840 – sales@herocamper.com VAT No DK – 40193189...
- Page 13 Please ensure the connection is fastened as below picture. S E T U P B Y A P P For Android: Open Google Play on your mobile device and download TBB BM500 App. For iOS: Open App Store on your mobile device and download TBB BM500 App.
- Page 14 This is not necessary for the Hero Camper and we refer to the original manual for these modifications. #HeroCamper™ – www.herocamper.com Lammefjordsvej 5 – 6715 Esbjerg N – Denmark Phone +45 7022 5840 – sales@herocamper.com VAT No DK – 40193189 Version 07-02-2023...
- Page 15 1 – GEL 2 – Semi traction 3 – Traction 4 – Lead Carbon 5 – LFP #HeroCamper™ – www.herocamper.com Lammefjordsvej 5 – 6715 Esbjerg N – Denmark Phone +45 7022 5840 – sales@herocamper.com VAT No DK – 40193189 Version 07-02-2023...
- Page 16 Press “Scroll up button” to change the number in 0-9 Press “Scroll down button” for 2 seconds to confirm. #HeroCamper™ – www.herocamper.com Lammefjordsvej 5 – 6715 Esbjerg N – Denmark Phone +45 7022 5840 – sales@herocamper.com VAT No DK – 40193189 Version 07-02-2023...
- Page 17 Choose between on or off. Press “Scroll down button” for 2 seconds to confirm between on or off mode (on is default setting) #HeroCamper™ – www.herocamper.com Lammefjordsvej 5 – 6715 Esbjerg N – Denmark Phone +45 7022 5840 – sales@herocamper.com VAT No DK – 40193189 Version 07-02-2023...
-
Page 18: Safety Instructions
Always connect the battery negative terminal to the B- of the shunt. Connecting this terminal to the S-, will result in wrong readings on the display. Please ensure the BM500 and Display are mounted in a dry environment. Do not expose BM500 and Display to direct sunlight. - Page 19 V.HIGH (+V3) High battery voltage for 2 starter battery Status flash interval Description Red alternated with the Power on initialization state. When the BM500 is just energized, the green battery must be in static status Green flashing Normal Red flashing...
-
Page 20: Troubleshooting
100% as calibration procedure. Issue Trouble shooting - Check the B- and battery The BM500 does not operate. LED - Check battery voltage. Battery might be flat. The B1+ voltage status does not flash. must be >7VDC - Try to restart the monitor by removing and reconnecting the supply wire to B+ The monitor does not operate. - Page 21 +B1 input Shows the current flowing in or out of the Current auxiliary battery #HeroCamper™ – www.herocamper.com Lammefjordsvej 5 – 6715 Esbjerg N – Denmark Phone +45 7022 5840 – sales@herocamper.com VAT No DK – 40193189 Version 07-02-2023...
-
Page 22: Specifications
Please help us conserve the environment we live in! All products that are not mounted by an authorized #HeroCamper dealer are at your own risk! #HeroCamper™ – www.herocamper.com Lammefjordsvej 5 – 6715 Esbjerg N – Denmark Phone +45 7022 5840 –...
Need help?
Do you have a question about the BM500 and is the answer not in the manual?
Questions and answers