
Subscribe to Our Youtube Channel
Summary of Contents for OKAI EB50
- Page 1 The manufacturer reserves the right to change and release product firmware updates and to keep this manual up to date. https://www.okai.co...
- Page 2 EB50 Instruction Manual...
-
Page 3: Table Of Contents
Contents 1.Introduction 1-1.Technical Data 1-2.Symbol Explanations 1-3.List of finished product and parts 2.Intended Use 3.Safety Instructions 3-1.Safety instructions 3-2.Battery safety precautions 3-3.Safety instructions for battery charger 4.How To Use 4-1.Instrallation instructions 4-2.Charging the battery 4-3.Ride preparation 5.Maintenance,Cleaning and Service 5-1.Maintain 5-2.Clean 5-3.Storage and transportation 6.Handling... -
Page 4: Introduction
Failure to comply with this user manual may cause serious injury to people or cause damage to the product. OKAI does not assume any responsibility for this. In order to be concise and easy to read, the OKAI E-Bike will be referred to as “product” in the following Content. -
Page 5: 1-1.Technical Data
1-1.Technical Data Item Content EB50 Dimensions (unfolded): 1925*710*1104(mm) LxWxH Frame Size 26" N.W. 38kg Maximum Speed 32 km/h (20mph) Range ≤72km (45miles) Parameter Adapted Terrain Flat/Mountain land Operating Temperature 0~40℃ Storage Temperature —20~45℃ IP Rating IPX5 Charging Time 2.8A<6H Rated Voltage Rated Capacity 14.7Ah... - Page 6 Item Content EB50 Input Voltage 100-240V Charger Output Voltage 54.6V Output Current 2.8A Max Load 150kg Rider AGE Recommended >14 years old Height Required 140~200cm Brake Light Normally on Features Riding Mode Zero start (rear drive) Certification FCC、 CPSC Manner Of Packing...
-
Page 7: 1-2.Symbol Explanations
1-2.Symbol Explanations DANGER Indicates a hazard signal with a high degree of danger. If not avoided, death or serious injury may occur. WARNING A hazard signal that indicates a moderate hazard. If not avoided, death or serious injury may occur. CAUTION A hazard signal that indicates a lower hazard. -
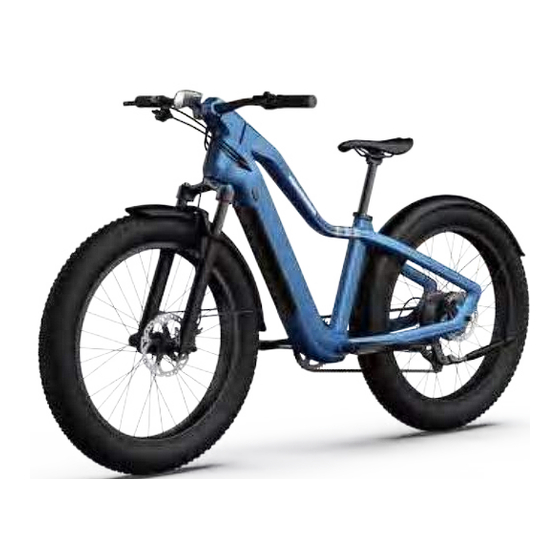
Page 8: 1-3.List Of Finished Product And Parts
1-3.List of finished product and parts Display Buttons Eight speed shifter Cushion Headlights Battery key port Brake lever Rear fender Charging port group Front fender 26*4.0 in Rear wheel group Rear motor Front quick Pedal release Front and rear disc brake Size: length 1925*width 710*height 1104mm... -
Page 9: Intended Use
China, please be sure to comply with the safety require- ments for drivers in this manual. Zhejiang Okai Vehicle Co., Ltd will not bear any direct or joint liabilities for any financial losses, losses of life, legal disputes, or any other unfavorable events that occur due to the violation of the recommended uses indicated in this manual. - Page 10 4. Do not use this product after taking alcohol, sedatives or psychoactive drugs. 5. Keep a distance of at least 1m/3ft from pedestrians, other vehicles and any obstacles. 6. This product can only be used when the environment permits it and the personal safety of bystanders is guaranteed.
- Page 11 35. It is prohibited to refit this product, including steering tubes, steering sleeves, steering rods, folding mechanisms and rear brakes. 36. Accessories and any additional items which are not approved by the manufacturer shall not be used. 37. When riding, the noise should not exceed 70dB. 38.
-
Page 12: 3-2.Battery Safety Precautions
3-2.Battery safety precautions ·The battery should not be exposed to excessive heat such as sunlight, fire or the like. Otherwise there will be a risk of explosion! ·If this product is not used for more than 30 days, please fully charge the battery. ·Fully charge the battery every 90 days. -
Page 13: How To Use
4.How to use 4-1.Instrallation instructions This section provides information on how to use the product correctly. To ensure user safety and service life, it is important to follow these instructions. 1. Cut the packing straps, remove the white plastic buckle under the package. White plastic buckle 2. - Page 14 3. Lift the carton and take out the rear wheel fixed foam. 4. Take out the front wheel. Front fender Front wheel...
- Page 15 5. Install the handlebar.(Tighten M5 screws with a hex screwdriver,connect wiring terminal.) Wiring terminal 6. Get the vehicle out of package, remove the packaging, put down the kickstand. 7. Install fenders.(Tighten M6 screws with a hex screwdriver) locknut...
- Page 16 8.Remove the Protection stents and disc brake protection plate respectively. Protection Protection stents plate 9. Front wheel installation procedures: b. Insert the quick release skewer into the front a. Align the front wheel hub with the front fork . wheel hub,Tighten the quick release skewer. Front fork Front wheel hub...
- Page 17 11.Wear a helmet and protective gear. 12.Long press the power button, the display screen is lit to indicate that the start up is successful. Power on button 13.Check that the brake levers are working properly. Brake lever Brake lever Disc brake Disc brake 14.Stand with one foot on the pedal and leave with the other and start to slide.
- Page 18 15.Place your other foot on the pedal to keep your feet steady. Focus and keepbalance on yourself, step on the pedal for acceleration. For your safety, the motor won't start until the bike reaches 3.1 MPH (5 km/h). 16.Stop pedaling to reduce speed and squeeze brake lever to brake.(Left brake lever controls front wheel braking, right brake lever controls rear wheel braking).
- Page 19 18.Activate the app Please scan the QR code to download the app (the system version and Bluetooth version are subject to the actual requirements of the app). You can find the cruise control function in the app, and discover more ways to use the bike. ①Install APP, please register/login ②...
-
Page 20: 4-2.Charging The Battery
4-2.Charging the battery ·Charger connector Plug in power Charging port Connect to the vehicle charging port Note: For first use, please connect the charger to activate vehicle. ·Function button Power button: Long press the power button to power on/off. Light button: Press the light button once to turn the headlights on/off while the bike is powered on; Gear button: Press"+"\"-"... -
Page 21: 4-3.Ride Preparation
4-3.Ride preparation Checklist: ·Wheels - check that the wheels are not damaged or excessively worn. ·Loose parts - make sure that all parts, such as nuts, bolts and fasteners are safe. Parts should not make any abnormal sounds. ·Operating area-make sure that the operating area is open and flat without any obstacles. ·Laws and requirements - check and comply with any local laws or regulations. -
Page 22: 5-3.Storage And Transportation
5-3.Storage and transportation ·Store the product in a dry, clean place, out of the reach of children, preferably in the original packaging. ·During transportation, turn off the product. ·The product can only be shipped in its original packaging. Don't throw away the packaging because shipping the product may be required in the future. -
Page 23: Explanation Of Error Codes
7.Explanation of error codes Error Error name The reason Troubleshooting method number The instantaneous output current Recovered When the output current Overcurrent of the controller is less than MAX of the controller exceeds the Protection current limit range current. 1:The fault will be relieved after Low-voltage Battery voltage lower than 30±1 V charging.
Need help?
Do you have a question about the EB50 and is the answer not in the manual?
Questions and answers