Advertisement
Available languages
Available languages
Quick Links
Advertisement

Summary of Contents for MASCOT MOL-HA-MSM01-W
- Page 1 USER MANUAL MODEL: MOL-HA-MSM01-W...
-
Page 3: Package Contents
English USER MANUAL MINI SEWING MACHINE (MOL-HA-MSM01-W) TABLE OF CONTENTS: 1) Package contents 2) Safety instructions 3) Installing and using the device 4) Features and specifications 1) PACKAGE CONTENTS 1) Mini sewing machine 2) Foot pedal 3) USB power cable... - Page 4 • Keep the device out of the reach of children below the age of 8 years. • This device is not a toy and keep children under strict supervision to prevent them from using the device as a toy. • Do not allow unsupervised children to clean or maintain this device. •...
- Page 5 other than its intended purpose. • If you give the device to a third party, also supply the user manual. • Retain the device’s user manual and packaging. Batteries and heat • Ensure the battery compartment is securely closed. • Only use AA batteries (Alkaline batteries are recommended). •...
- Page 6 3) INSTALLING AND USING THE DEVICE The device is intended for indoor domestic and private use. The device is not intended for any other purposes. Follow the instructions in this user manual to make sure the device is installed and used safely. Open the packaging carefully before taking out the device.
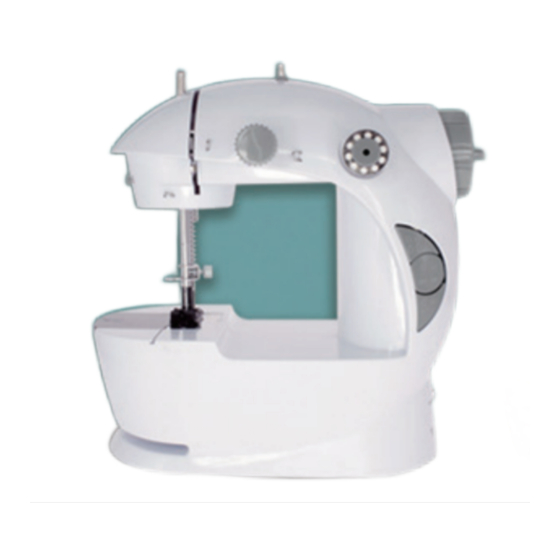
- Page 7 ON/OFF power switch Tension adjustment screw Battery compartment (under the device) Needle clamp screw Spool pin Needle clamp Take up lever Adjusting screw Thread spool Needle Presser foot Bobbin Presser foot lifter Bobbin winding spindle Thread gap Bobbin pin Bobbin compartment (cover) Bobbin holder Bobbin holder Light...
- Page 8 and insert the thread from above downwards. 7) Pull the thread down to the thread guide 8) Pull the thread downward through the thread guide . If necessary, lower the needle slightly counter clockwise. to reach this thread guide by turning the handwheel 9) Insert the thread through the eye of the needle from the front toward the back of the device.
- Page 9 the low speed for intricate work which requires a lot of stopping, starting and fabric turning. Use the high speed for long uninterrupted seams. to the ON position. 7) Turn the power switch 8) Gently guide the fabric to keep the seam straight by pressing it lightly down with your fingertips on both sides as it feeds through the presser foot 9) When the seam is finished, turn the power switch to OFF.
- Page 10 Note! Needles come in various sizes designated by numbers. The smaller the number, the thinner the needle. Use smaller needles for more delicate fabrics and larger needles for heavier fabrics. How to wind the thread on a bobbin: Choose your favorite color of thread for winding on the bobbin. You can sew with threads of the same color as the fabric or create contrasts with threads of different shades.
-
Page 11: Technical Specifications
Sorage and transportation • When storing the device, it should first be cleaned in accordance with this user manual. The device should be stored in its original packaging. • Always store the device in a dry and well-ventilated room and beyond the reach of children and pets. -
Page 12: Inhoud Verpakking
Nederlands GEBRUIKERSHANDLEIDING MINI-NAAIMACHINE (MOL-HA-MSM01-W) INHOUDSOPGAVE: 1) Inhoud verpakking 2) Veiligheidsinstructies 3) Installatie en gebruik van het apparaat 4) Functies en specificaties 1) INHOUD VERPAKKING 1) Mini-naaimachine 2) Voetpedaal 3) USB-voedingskabel 4) Hulpstukken 5) Gebruikershandleiding 2) VEILIGHEIDSINSTRUCTIES Tref altijd de volgende voorzorgsmaatregelen voordat u de ‘Mini-naaimachine’ (hierna het ‘apparaat’... - Page 13 door kinderen, tenzij ze ouder zijn dan 8 en onder toezicht staan van een volwassene. • Houd het apparaat buiten het bereik van kinderen jonger dan 8 jaar. • Dit apparaat is geen speelgoed. Houd kinderen altijd in de gaten om te voorkomen dat ze met het apparaat spelen.
- Page 14 voor schade als gevolg van het niet in acht nemen van de gebruikershandleiding, onzorgvuldig gebruik of gebruik dat niet overeenstemt met de voorwaarden in deze gebruikershandleiding. • Dit apparaat is geen speelgoed en moet uit de buurt worden gehouden van kinderen en huisdieren.
- Page 15 • Gooi het apparaat niet weg met het huisvuil, omdat het batterijen bevat. Breng batterijen naar uw lokale inzamelpunt voor chemisch afval. Neem contact op met uw gemeente voor nadere informatie. Waarschuwingen betreffende het gebruik Voordat u begint met naaien, moet u altijd controleren of de draden van het apparaat goed zijn ingeregen.
- Page 16 Beschrijving van het apparaat: DC JACK AAN-/UIT-schakelaar Stelschroef spanning Batterijvakje (onder het apparaat) Schroef naaldklem Spoelas Naaldklem Draadhefboom Stelschroef Draadspoel Naald Naaivoet Draadklos Naaivoetlichter Spindel draadkloswinder Draadopening Draadklosas Draadkloshuis (deksel) Draadkloshouder Draadkloshouder Lampje AAN-/UIT-schakelaar verlichting Handwiel Snelheidsknop DC JACK Aansluiting externe voeding Stekker voetpedaal Instructies voor gebruik: Druk op de AAN-/UIT-toets...
- Page 17 Naaien met de draadspoel naar buiten door deze omhoog te trekken. 1) Trek de draadspoelas zoals getoond in de afbeelding. 2) Plaats de draadspoel op de draadspoelas 3) Trek aan de draad van de draadspoel en geleid deze naar de voorkant van het te leiden.
- Page 18 • Draai het handwiel rechtsom. De naald gaat omlaag en pakt de draad van de draadklos op. Blijf aan het handwiel draaien totdat de naald terugkeert naar de hoogste stand. Stop wanneer de naald weer begint omlaag te gaan. • Breng de naaivoet omhoog en leid de draad van de spoel naar de voorkant.
- Page 19 14) Herhaal dezelfde procedure om andere naden/steken/zomen uit te voeren. Gebruik van het voetpedaal: Volg stap 1 t/m 4 van de paragraaf ‘Gebruik van het apparaat zonder voetpedaal’ (hierboven) 1) Controleer of het apparaat UIT staat. 2) Steek de stekker van het voetpedaal in de aansluiting aan de achterkant van het apparaat 3) Zet het apparaat AAN door op het voetpedaal te drukken.
- Page 20 draadklos windt. 2) Plaats de draadspoel op de spoelas en draai deze iets linksom. 3) Plaats de spoelas in het gat van het handwiel 4) Neem een lege draadspoel. Trek de draad vanaf de draadspoel naar beneden en steek het losse uiteinde vanaf de zijkant door het kleine gat op de draadklos. 5) Laat het losse uiteinde aan de buitenkant van de draadklos en wind de draad een aantal slagen om de BINNENKANT van de draadklos.
-
Page 21: Technische Specificaties
4) TECHNISCHE SPECIFICATIES • Elektrisch vermogen Batterijen: 4x AA van elk 1,5V DC (niet inbegrepen) Adapter: 5-6V DC, 1A (niet inbegrepen) • Stroomverbruik: 5 Watt • Afmetingen: 19,5 x 11,5 x 20,3 cm (lxbxh) • Gewicht: 670 gram Alle in deze handleiding vermelde informatie en specificaties kunnen zonder voorafgaande kennisgeving worden gewijzigd. -
Page 22: Contenu Du Paquet
Français MANUEL D’UTILISATION MINI MACHINE À COUDRE (MOL-HA-MSM01-W) SOMMAIRE : 1) Contenu du paquet 2) Instructions de sécurité 3) Installation et utilisation de l’appareil 4) Caractéristiques et spécifications 1) CONTENU DU PAQUET 1) Mini machine à coudre 2) Pédale 3) Cordon d’alimentation USB 4) Accessoires 5) Manuel d’utilisation... - Page 23 l’appareil. Le nettoyage et la maintenance ne doivent pas être effectués par des enfants, à moins qu’ils aient plus de 8 ans et qu’ils soient sous la surveillance d’un adulte. • Tenir l’appareil hors de portée des enfants de moins de 8 ans. •...
- Page 24 respect du manuel d’utilisation. Le fabricant décline toute responsabilité pour les dommages causés par le non-respect du manuel d’utilisation, une utilisation négligente ou une utilisation qui ne respecte pas les conditions du manuel d’utilisation. • Cet appareil n’est pas un jouet et doit être tenu hors de portée des enfants et animaux domestiques.
- Page 25 Avertissement Avant de commencer à coudre, vérifier si l’appareil est correctement enfilé. Si le fil ou la canette n’est pas en position correcte, l’appareil pourrait être endommagé. Pendant la couture, maintenir les doigts éloignés de toute pièce mobile. Faire surtout attention à l’aiguille.
- Page 26 Description de l’appareil : DC JACK Interrupteur MARCHE/ARRÊT Molette de réglage de tension du fil Compartiment à piles (au bas de l’appareil) Vis serre aiguille Porte-bobine Serre aiguille Vis de réglage Levier releveur Bobine de fil Aiguille Canette Pied-de-biche Levier du pied-de-biche Bobineur de canette Orifice pour fil Axe de canette...
- Page 27 Coudre avec la bobine de fil de l’appareil en le tirant vers le haut. 1) Faire sortir le porte-bobine 2) Placer la bobine de fil comme indiqué sur l’image. sur le porte-bobine 3) Tirer le fil de la bobine de fil vers l’avant de l’appareil en le passant à...
- Page 28 canette. Continuer à tourner le volant jusqu’à ce que l’aiguille revienne à la position la plus élevée. Arrêter de tourner lorsque l’aiguille commence à redescendre. • Relever le pied-de-biche et ramener le fil de la bobine vers l’avant. Prendre ensemble les fils de la bobine et de la canette, les tirer vers l’arrière et les poser sous le pied-de- biche •...
- Page 29 14) Pour faire d’autres coutures, répéter la même procédure. Comment utiliser la pédale : Suivre les étapes 1 à 4 du paragraphe “comment utiliser l’appareil sans la pédale” (ci- dessus) 1) S’assurer que l’appareil soit éteint. 2) Insérer la fiche de la pédale dans la prise à l’arrière de l’appareil 3) Allumer l’appareil en appuyant sur la pédale.
- Page 30 1) Toujours retirer la canette du compartiment à canette avant d’enrouler une nouvelle canette. 2) Placer la bobine de fil sur le porte-bobine 3) Insérer le porte-bobine dans le trou sur le volant et le tourner légèrement dans le sens antihoraire. 4) Prendre une canette vide.
-
Page 31: Spécifications Techniques
4) SPÉCIFICATIONS TECHNIQUES • Alimentation Piles : 4x AA, 1.5Vdc chacune (non fournies) Adaptateur : 5-6Vdc, 1A (non fourni) • Consommation d’énergie : 5 watts • Dimensions : 19,5 x 11,5 x 20,3 cm (LxlxH) • Poids : 670 grammes Tous contenus et spécifications mentionnés dans ce manuel peuvent être modifiés sans préavis. - Page 32 Deutsch BEDIENUNGSANLEITUNG MINI NÄHMASCHINE (MOL-HA-MSM01-W) INHALT: 1) Verpackungsinhalt 2) Sicherheitsanweisungen 3) Installation und Verwendung des Geräts 4) Funktionen und technische Angaben 1) VERPACKUNGSINHALT 1) Mini-Nähmaschine 2) Fußpedal 3) USB-Kabel 4) Zubehör 5) Bedienungsanleitung 2) SICHERHEITSANWEISUNGEN Vor Gebrauch der „Mini-Nähmaschine“ (nachfolgend als „Gerät“ bezeichnet) müssen immer die folgenden grundlegenden Vorsichtsmaßnahmen getroffen werden:...
- Page 33 • Dieses Gerät kann von Kindern ab 8 Jahren und von Personen mit körperlichen, sensorischen oder mentalen Einschränkungen sowie mangelnder Erfahrung und Wissen verwendet werden, sofern sie zuvor entsprechend von einer für ihre Sicherheit verantwortlichen Person in der Verwendung des Geräts unterwiesen wurden. Kinder dürfen mit dem Gerät nicht spielen.
- Page 34 • Verwenden Sie das mitgelieferte USB-Kabel mit einem geeigneten Adapter für Gleich- und Wechselstrom. • Lassen Sie Reparaturen immer von einem qualifizierten Techniker durchführen. Versuchen Sie nie, das Gerät selbst zu reparieren. Unsachgemäße Reparaturen können große Gefahren für den Benutzer darstellen und führen zum Erlöschen jeglicher Garantieansprüche.
- Page 35 • Das Gerät nicht zerdrücken, durchstechen, zerlegen, da sonst die Batterien beschädigt werden können. • Das Gerät nicht im Feuer entsorgen, weil die Batterien explodieren könnten. • Das Gerät und die Batterien nicht übermäßiger Wärmezufuhr wie Feuer aussetzen. • Das Gerät nicht im Haushaltsmüll entsorgen, weil es Batterien enthält. Batterien können an Ihren lokalen Recycling-Stationen entsorgt werden.
- Page 36 Beschreibung des Geräts: DC JACK Ein-/Aus-Schalter Spannungseinstellschraube Batteriefach (unter dem Gerät) Nadelklammerschraube Garnrollenstift Nadelklammer Fadengeber Einstellschraube Garnrolle Nadel Nähfuß Spule Nähfußhebel Spuleneinrichtung Fadenführung Spulenstift Spulenkapsel (Abdeckung) Spulenhalter Spulenhalter Licht Handrad Lichtschalter Geschwindigkeitstaste externe Stromsteckdose DC JACK Fußpedalbuchse Gebrauchsanweisungen: Drücken Sie den Ein-/Aus-Schalter , um das Gerät ein- oder auszuschalten.
- Page 37 Nähen mit der Garnrolle 1) Ziehen Sie den Garnrollenstift heraus, indem Sie ihn nach oben heben. 2) Setzen Sie die Garnrolle auf den Garnrollenstift , wie es auf der Abbildung zu sehen ist. 3) Ziehen Sie das Garn von der Garnrolle und führen Sie es zur Vorderseite des Geräts, indem Sie es über den ersten Fadenleiter ziehen.
- Page 38 • Legen Sie die Spule mit einem Garn Ihrer Wahl in den Spulenhalter , sodass ungefähr 25 cm Garn vom Spulenhalter abgerollt sind und verlängern Sie das Garn bis in die Fadenführung • Drehen Sie das Handrad im Uhrzeigersinn. Die Nadel wird sich senken und den Unterfaden aufnehmen.
- Page 39 Uhrzeigersinn drehen. 11) Heben Sie den Nähfuß an, indem Sie den Nähfußhebel hochheben. 12) Ziehen Sie den Stoff in Ihre Richtung und lassen Sie dabei ungefähr 25 cm Faden zwischen dem Stoff und dem Gerät. 13) Schneiden Sie den Faden nah am Stoff ab, sodass der restliche Faden lose auf der Nähplatte in der Richtung des Nähfußes und zu Ihnen hin liegt.
- Page 40 Hinweis! Nadeln gibt es in verschiedenen mit Nummern gekennzeichneten Größen. Je kleiner die Nummer, desto dünner ist die Nadel. Verwenden Sie kleinere Nadeln für empfindlichere Stoffe und größere Nadeln für schwerere Stoffe. Wie man das Garn auf eine Spule wickelt: Wählen Sie das Garn in Ihrer Lieblingsfarbe aus, um es auf die Spule zu wickeln.
-
Page 41: Technische Angaben
Mitteln, Scheuer- oder Desinfektionsmitteln –da sie die Oberfläche des Produkts beschädigen könnten. • Tauchen Sie das Gerät nicht in Wasser oder in eine andere Flüssigkeit. Lagerung und Transport • Wenn Sie das Gerät aufbewahren, sollte es zuerst, wie in der Bedienungsanleitung beschrieben, gereinigt werden. - Page 42 EC Declaration Of Conformity Mascot Online BV Veluwezoom 32 1327 AH Almere The Netherlands Declare under our sole responsibility that the product: • Product Brand: • Product Model No: HA-MSM01-W • Product Description: Mini Sewing Machine • Product Rating: Input: 6Vdc (4x AA battery) •...
- Page 44 Version 6-2-2020...
Need help?
Do you have a question about the MOL-HA-MSM01-W and is the answer not in the manual?
Questions and answers