Table of Contents

Summary of Contents for Feider Machines FNHPT240
- Page 1 ORIGINAL INSTRUCTIONS TECHNICAL SPECIFICATIONS GASOLINE PRESSURE WASHER Instruction manual FNHPT240 CAUTION - Read the instructions before using the machine. BUILDER SAS ZI, 32 rue Aristide Bergès – 31270 Cugnaux - France MADE IN PRC...
-
Page 2: Safety Rules
PRESSURE WASHER PARTS ASSEMBLY SAFETY RULES - Read all instructions before using the machine. - Use this unit as described in this manual. Any mishandling and any use contrary to instructions for use shall in no case be the responsibility of the manufacturer. - Follow all instructions given in this manual regarding putting into... - Page 3 PRESSURE WASHER PARTS ASSEMBLY - WARNING: Do not use the machine near people unless they wear protective clothing. - Do not direct the jet against yourself or others to clean clothes or footwear. - WARNING: Risk of explosion. Do not spray flammable liquids.
- Page 4 PRESSURE WASHER PARTS ASSEMBLY prove hazardous. - Children, animals and persons not participating in the use of the machine must remain at a minimum distance of 10 meters from the sprayer. - The high pressure hose must remain connected to the compressor as long as the system is under pressure.
- Page 5 PRESSURE WASHER PARTS ASSEMBLY - Improper transport of the machine may result accidents and injuries. - During use, transport, assembly, disassembly, in case of failure, during foreseeable tests or breakdowns, the tool must always remain upright. - Do not use the tool in dangerous situations or when an accident has occurred.
- Page 6 PRESSURE WASHER PARTS ASSEMBLY expected for operation. - Do not operate the machine if fuel has been spilled; change location, and wait until the device is dry before restarting it. - Use the machine in an open space and avoid contact with heat generating appliances, such as boilers, water heaters, etc.
- Page 7 PRESSURE WASHER PARTS ASSEMBLY be cleaned with your sprayer; the manufacturer cannot be held responsible for any damage resulting from improper use. The main applications of this product are household cleaning tasks such as: - Cars, motorcycles, bicycles; - Patios, fences, garden walls, pathways, garages and facades of houses;...
-
Page 8: Pressure Washer Parts Assembly
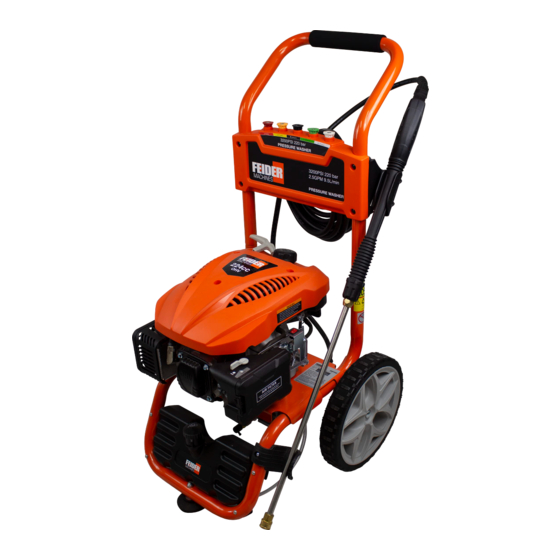
PRESSURE WASHER PARTS ASSEMBLY Symbols The high-pressure jet must not be directed at persons, animals, live electrical equipment or at the appliance itself. The appliance must not be directly connected to the public drinking water network. Guaranteed sound power level Read instruction manual Warning symbol Warning –... - Page 9 PRESSURE WASHER PARTS ASSEMBLY DESCRIPTION Handle Air cleaner HighPressureHose Recoil Starter Choke Muffler Engine ON/OFF Switch Detergent tankcap Dipstick Detergent tank Water outlet Spray Gun Water inlet Locking Trigger Fuel tank...
-
Page 10: Technical Specifications
PRESSURE WASHER PARTS ASSEMBLY TECHNICAL SPECIFICATIONS Type FNHPT240 Rated pressure 20 MPa Allowable pressure 24 MPa Rated flow 9,8 l/min Max. flow 11 l/min Max. water intake temperature 60°C Max. inlet water pressure 0.55 MPa Net weight 30 kg Water hose diameter Min. - Page 11 ASSEMBLY ASSEMBLY Do not attempt to assemble or operate this pressure washer until you have read and WARNING understood this entire manual. If you have any problems assembling or operating this unit Do not operate this pressure washer if any of the parts are damaged or missing until WARNING the part is replaced.
- Page 12 Handle assembly ASSEMBLY • Install upper frame (handle) onto the lower frame by sliding the handle over the two upright tubes on the lower frame and pressing down firmly until the handle is seated and the two detent pins snap in place. Attaching Upper and Lower Gun Hooks Attach the upper gun hook, install two plastic rivets, until the plastic rivets are snug, you may need to tap with a mallet or small hammer to seat the lock pin.
- Page 13 ASSEMBLY Add engine oil • Place pressure washer on a level surface. • Open the oil tank. • Carefully add between 400 ml (13.5 oz) of 4-Cycle engine oil (SAE10W30) in the tank. • Close the oil tank. Adding Fuel •...
- Page 14 ASSEMBLY Connecting Garden Hose to Pressure Washer • • Inspect inlet screen and remove any debris. • Connect hose to water inlet and tighten by hand. • Turn on water. • Purge the system’s pump of air by releasing the safety and squeezing the trigger of the spray gun. The minimum recommended length for the water supply pipe is 10 meters (but not more than 25 meters) with a diameter of 12.5 mm to avoid back pressure and any potential damage to your appliance.
-
Page 15: Operation
OPERATION OPERATION Pre-Operation Check List • Check oil level and add oil to the proper level if low. • Check fuel level and add fuel if needed. • Check connections of handle and all hoses to make sure they are secure. •... - Page 16 OPERATION Pull cord recoils rapidly and pulls arm towards engine faster than you can let go WARNING which could result in injury. • Always relieve pressure from spray gun before pulling starter cord, including every failed attempt to start engine. •...
- Page 17 OPERATION • For stripping, spot cleaning, blasting, and hard to reach areas use the 25° spray tip. This option is for removing paint, rust, mildew, or grease stains. This option can be used for the removal of paint, rust, oil stains, tar, gum, and other stubborn substances.
-
Page 18: Maintenance
MAINTENANCE MAINTENANCE Regular maintenance will extend the life of this pressure washer and improve its performance. The warranty does not cover items that result from operator negligence, misuse, or abuse. To receive full value from the warranty, operator must maintain the pressure washer as instructed in this manual, including proper storage. Before inspecting or servicing this machine, make sure the engine is off and no parts are WARNING! moving. - Page 19 MAINTENANCE Checking Detergent Siphoning Tube • Check the detergent siphoning tube for clogs, leaks, or tears. • • Replace siphoning tubes if damaged. Never repair high pressure hose or use unit if hose is damaged. If hose is damaged replace WARNING! with identical BUILDER part.
- Page 20 Checking Spark Plug • Disconnect the spark plug wire from the spark plug. • Before removing the spark plug, clean the area around its base to prevent debris from entering the engine. • Clean carbon deposits off the electrode with a wire brush. •...
-
Page 21: Troubleshooting
TROUBLESHOOTING PROBLEM CAUSE SOLUTION Engine does not start 1. Out of fuel 1. Fill fuel tank 2. Engine oil low 2. Add engine oil 3. Spark plug wire disconnected 3. Connect spark plug wire from spark plug 4. Replace spark plug 4. - Page 22 WIRING DIAGRAM...
-
Page 23: Declaration Of Conformity
ZI, 32 rue Aristide Bergès – 31270 Cugnaux - France Declares that the machinery designated below: GASOLINE PRESSURE WASHER Ref.: FNHPT240 Serial number: 2021040001101-2021040001277 Complies with the provisions of the Directive “machinery” 2006/42/CE and national laws transposing Also complies with the following European directives:... -
Page 24: Warranty
WARRANTY WARRANTY The manufacturer guarantees the product against defects in material and workmanship for a period of 2 years from the date of the original purchase. The warranty only applies if the product is for household use. The warranty does not cover breakdowns due to normal wear and tear. The manufacturer agrees to replace parts identified as defective by the designated distributor. -
Page 25: Product Failure
PRODUCT FAILURE WHAT TO DO IF MY MACHINE BREAKS DOWN? If you bought your product in a store: a) Empty the fuel tank. b) Make sure that your machine is complete with all accessories supplied, and clean! If this is not the case, the repairer will refuse the machine. -
Page 26: Warranty Exclusions
WARRANTY EXCLUSIONS THE WARRANTY DOES NOT COVER: • Start-up and setting up of the product. • Damage resulting from normal wear and tear of the product. • Damage resulting from improper use of the product. • Damage resulting from assembly or start-up not in accordance with the user manual. •...
Need help?
Do you have a question about the FNHPT240 and is the answer not in the manual?
Questions and answers