
Subscribe to Our Youtube Channel
Related Manuals for Mirion Technologies MiniSentry-2


Summary of Contents for Mirion Technologies MiniSentry-2
- Page 1 USER MANUAL MiniSentry-2 TRANSPORTABLE GAMMA PORTAL MONITOR Ref: 108082 DECEMBER 2019...
- Page 3 USER MANUAL MiniSentry-2 TRANSPORTABLE GAMMA PORTAL MONITOR REF: 108082 December 2019...
- Page 5 USER MANUAL MINISENTRY-2 WARNING MIRION TECHNOLOGIES (Canberra) SAS cannot be held responsible for any damage incurred by the buyer due to faulty use, connection to the wrong voltage, or non-observance of the instructions found in this manual. This device is designed to be used exclusively in an industrial environment.
- Page 6 USER MANUAL MINISENTRY-2 107911_D User manual MINISENTRY-2_En.docx MIRION TECHNOLOGIES (Canberra) S.A.S, BP249, ZI de Vauzelles, 37602 4 / 170 Loches Cedex...
-
Page 7: Table Of Contents
9.9.1 Unit ............................35 9.9.2 Walk through settings ....................... 36 9.9.2.1 Alarm management 9.9.3 Enter wait settings ......................39 9.9.3.1 Auto count time management 107911_D User manual MINISENTRY-2_En.docx MIRION TECHNOLOGIES (Canberra)S.A.S., BP249, ZI de Vauzelles, 37602 5 / 170 Loches Cedex... - Page 8 13.4 PC ....................85 TO PORTAL PROBES ONNECTION 13.5 F ..................87 ACTORY PRE CALIBRATION PARAMETERS 13.6 H ..........................90 IGH VOLTAGE 107911_D User manual MINISENTRY-2_En.docx MIRION TECHNOLOGIES (Canberra) S.A.S, BP249, ZI de Vauzelles, 37602 6 / 170 Loches Cedex...
- Page 9 25.2 A ......................... 122 SSEMBLY INSTRUCTION ASEMBLY GUIDE, VEHICLE CONFIGURATION ................124 26.1 P ..........................124 EDESTRIAN 26.2 V ........................126 EHICLE ART LIST 107911_D User manual MINISENTRY-2_En.docx MIRION TECHNOLOGIES (Canberra)S.A.S., BP249, ZI de Vauzelles, 37602 7 / 170 Loches Cedex...
- Page 10 30.5.4 Installation ......................... 153 30.6 D ..................155 ONGLE BOARD REMOVAL INSTALLATION 30.6.1 Tools: ..........................155 30.6.2 Preliminary operations: ....................155 30.6.3 Removal ..........................155 107911_D User manual MINISENTRY-2_En.docx MIRION TECHNOLOGIES (Canberra) S.A.S, BP249, ZI de Vauzelles, 37602 8 / 170 Loches Cedex...
- Page 11 ................168 ISPLAY PROTECTION REMOVAL INSTALLATION 30.12.1 Tools: ..........................168 30.12.2 Preliminary operations: ....................168 30.12.3 Removal .......................... 168 30.12.4 Installation ........................169 107911_D User manual MINISENTRY-2_En.docx MIRION TECHNOLOGIES (Canberra)S.A.S., BP249, ZI de Vauzelles, 37602 9 / 170 Loches Cedex...
-
Page 12: General Safety Instructions
Always disconnect the mains cable completely from the case whenever you use the device. Only qualified personnel will be able to open the box. : Caution, the accompanying documents must be consulted. 107911_D User manual MINISENTRY-2_En.docx MIRION TECHNOLOGIES (Canberra)S.A.S, BP249, ZI de Vauzelles, 37602 10 / 170 Loches Cedex... -
Page 13: Use Precautions
: The MiniSentry-2 can be used only according to the characteristics and technical specifications in § 19, defined by MIRION TECHNOLOGIES (Canberra) SAS. If the device is used of a way which is not specified by MIRION TECHNOLOGIES (Canberra) SAS, the protection provided by the device may be compromised. -
Page 14: Disposal Of This Equimpent
The following symbol, which you will also find on MIRION TECHNOLOGIES (Canberra) SAS products, indicates that these products should not be disposed in unsorted municipal waste. It must be sorted. -
Page 15: Packing Lists For Minisentry-2
Nylon carry bag 108182 Flexible nylon protection with foam pad Monitor upgrade kit 108125 To connect a new monitor to an old detector assembly 107911_D User manual MINISENTRY-2_En.docx MIRION TECHNOLOGIES (Canberra)S.A.S., BP249, ZI de Vauzelles, 37602 13 / 170 Loches Cedex... -
Page 16: Presentation
MINISENTRY-2 PRESENTATION The MiniSentry-2 Computer Based Portable Portal Monitor is a portable emergency gamma portal monitor. It was designed as a monitoring solution for emergency response to allow the screening of people exiting a contaminated area, as well as monitoring the entrances to large public gatherings to detect people who are carrying dangerous radioactive materials. -
Page 17: Description
Top cross piece Secondary detector post Primary detector Red / green light tower post (Optional) Presence sensors MiniSentry Control unit Footplates Figure 1 Pedestrian Configuration 107911_D User manual MINISENTRY-2_En.docx MIRION TECHNOLOGIES (Canberra)S.A.S., BP249, ZI de Vauzelles, 37602 15 / 170 Loches Cedex... -
Page 18: Vehicle Or Extended Passage Configuration (Optional)
(Optional) Primary MiniSentry detector post Control unit Presence sensors 2.5m (8.20 ft) Rubber spacers Vehicle baseplates Footplates Figure 2 Vehicle configuration 107911_D User manual MINISENTRY-2_En.docx MIRION TECHNOLOGIES (Canberra) S.A.S, BP249, ZI de Vauzelles, 37602 16 / 170 Loches Cedex... -
Page 19: Minisentry Control Unit
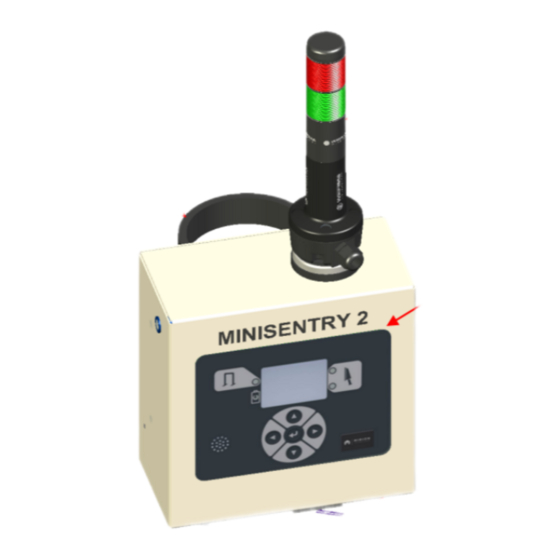
Front panel LCD display Portal detector LED status FRISKER CSP probe LED Charging LED status Loud speaker Keyboard Figure 4 MiniSentry-2 - Front panel 107911_D User manual MINISENTRY-2_En.docx MIRION TECHNOLOGIES (Canberra)S.A.S., BP249, ZI de Vauzelles, 37602 17 / 170 Loches Cedex... -
Page 20: Keyboard And Menu Bar Functions
Close a folder Validate a setting Save a data Back left arrow or cancel Move the selection to the left Decrease a level 107911_D User manual MINISENTRY-2_En.docx MIRION TECHNOLOGIES (Canberra) S.A.S, BP249, ZI de Vauzelles, 37602 18 / 170 Loches Cedex... -
Page 21: Charging Indicator
Not plugged > 25% pulse Not plugged >5% and <25% pulse Not plugged <5% pulse Not present or Not plugged Low bat flat Blink 107911_D User manual MINISENTRY-2_En.docx MIRION TECHNOLOGIES (Canberra)S.A.S., BP249, ZI de Vauzelles, 37602 19 / 170 Loches Cedex... -
Page 22: Frisker Csp Probe Leds
(2 flashing LEDs, channel 1&2) Fixed Channel 2 connected probe green Flashing High threshold alarm Flashing Low threshold alarm orange 107911_D User manual MINISENTRY-2_En.docx MIRION TECHNOLOGIES (Canberra) S.A.S, BP249, ZI de Vauzelles, 37602 20 / 170 Loches Cedex... -
Page 23: Protal Probe Led
Saturation or probe fault Flashing or system fault or presence of person during BGK acquisition Purple (flashing LED) Fixed Clean Measure green Fixed Contaminated Measure 107911_D User manual MINISENTRY-2_En.docx MIRION TECHNOLOGIES (Canberra)S.A.S., BP249, ZI de Vauzelles, 37602 21 / 170 Loches Cedex... -
Page 24: Loudspeaker
ON / OFF Switch connector Fuses Electrical Mains connector 12V external power supply connector I/O / RS485 connector Portal probe connector Figure 5 Bottom panel 107911_D User manual MINISENTRY-2_En.docx MIRION TECHNOLOGIES (Canberra) S.A.S, BP249, ZI de Vauzelles, 37602 22 / 170 Loches Cedex... -
Page 25: Use
In the « Count-Rate » mode the MiniSentry continuously measures while the photo-sensor indicates that the portal is occupied. Figure 6 MiniSentry Assembled (Pedestrian Version). 107911_D User manual MINISENTRY-2_En.docx MIRION TECHNOLOGIES (Canberra)S.A.S., BP249, ZI de Vauzelles, 37602 23 / 170 Loches Cedex... -
Page 26: Background Management
ALARM MANAGEMENT The MiniSentry-2 is equipped with visual (front panel LED), red / green light tower (Optional) and audible (annunciator) alarms. The alarm levels and modes are set in the "Measure settings" menus for each of the operational modes. - Page 27 USER MANUAL MINISENTRY-2 Access to the functions of MiniSentry-2 according to the user level are given in the table: Functions Administrator Technician Operator Alarm acknowledgement Power off (§ 9.13) Unit of portal probe (§ Erreur ! Source du ...
- Page 28 By connecting a CSP probe, the two LEDs associated will flash with on the screen the message « Searching…. », « Probe found » then « Initializing »: At the end of the probe search, Minisentry-2 is in Walk Through Mode and the lights are fixed green on the connected interface.
- Page 29 Logarithmic scale Threshold alarm Portal probe FRISKER probe Indicator of the maximum value reached every 3 s Portal probe with FRISKER CSP probe 107911_D User manual MINISENTRY-2_En.docx MIRION TECHNOLOGIES (Canberra)S.A.S., BP249, ZI de Vauzelles, 37602 27 / 170 Loches Cedex...
-
Page 30: Walk-Through Mode
2. Press the key to display the « Measure Mode » and press the key to select the line « Walk through ». 107911_D User manual MINISENTRY-2_En.docx MIRION TECHNOLOGIES (Canberra) S.A.S, BP249, ZI de Vauzelles, 37602 28 / 170 Loches Cedex... -
Page 31: Before Measurement
The MiniSentry system is ready with the blue beacon on. The user must walk slowly through the gate without stopping. The user leaves the portal and the Minisentry-2 is ready for another measure with the blue beacon on. 9.5.1 Before measurement •... -
Page 32: During Measurement
Note: The « Measure Mode » line is selected by default. If necessary, press the keys to select the line. 107911_D User manual MINISENTRY-2_En.docx MIRION TECHNOLOGIES (Canberra) S.A.S, BP249, ZI de Vauzelles, 37602 30 / 170 Loches Cedex... - Page 33 The user walks up to the gate and stop for a set amount of time until the measure is done when the blue beacon is on. 107911_D User manual MINISENTRY-2_En.docx MIRION TECHNOLOGIES (Canberra)S.A.S., BP249, ZI de Vauzelles, 37602 31 / 170 Loches Cedex...
-
Page 34: Before Measurement
USE MANUAL MINISENTRY-2 The user leaves the portal and the Minisentry-2 is ready for another measure with the blue beacon on. 9.6.1 Before measurement • The device continuously updates the background noise while no presence is detected. • The device triggers a blue beacon when the measure is ready to be performed. - Page 35 The following screen appears with background measurement (or not according to the « Count rate settings »): The MiniSentry-2 system is ready with the blue beacon on. 107911_D User manual MINISENTRY-2_En.docx MIRION TECHNOLOGIES (Canberra)S.A.S., BP249, ZI de Vauzelles, 37602...
-
Page 36: Before Measurement
When a FRISKER probe is connected, the LED associated will flash with on the screen the message « Searching… », « Probe found » then « Initializing »: Measurement is displayed and the simulated sound becomes on. 107911_D User manual MINISENTRY-2_En.docx MIRION TECHNOLOGIES (Canberra) S.A.S, BP249, ZI de Vauzelles, 37602 34 / 170 Loches Cedex... -
Page 37: Measure Settings
(To change the user level, refer to § 9.12). 9.9.1 Unit Unit of MiniSentry-2 can be set and is applied for all measure modes of the portal probe. The Frisker probe unit can be set separately (see § 9.9.5). Units of portal probes available are:... -
Page 38: Walk Through Settings
Note: The « Measure Mode » line is selected by default. If necessary, press the keys to select the line « Measure settings ». 107911_D User manual MINISENTRY-2_En.docx MIRION TECHNOLOGIES (Canberra) S.A.S, BP249, ZI de Vauzelles, 37602 36 / 170 Loches Cedex... - Page 39 • Select the value or confirm the option with the key, • Change column with key, • Exit edit mode with the .key. 107911_D User manual MINISENTRY-2_En.docx MIRION TECHNOLOGIES (Canberra)S.A.S., BP249, ZI de Vauzelles, 37602 37 / 170 Loches Cedex...
-
Page 40: Alarm Management
• SigmaLvl: Digital value of the Standard Deviation « » (« STD » setting) • CountTime: Duration in second of the measure 107911_D User manual MINISENTRY-2_En.docx MIRION TECHNOLOGIES (Canberra) S.A.S, BP249, ZI de Vauzelles, 37602 38 / 170 Loches Cedex... -
Page 41: Enter Wait Settings
« Measure settings » screen and select the line « Enter 2. Press the wait » with 3. Press the key to display the « Enter wait settings » screen: 107911_D User manual MINISENTRY-2_En.docx MIRION TECHNOLOGIES (Canberra)S.A.S., BP249, ZI de Vauzelles, 37602 39 / 170 Loches Cedex... - Page 42 « Coeff wrong alarm » with « Auto count time » enabled Wrong alarm coefficient value used to compute integration time « Count time » Duration of integration time in second 107911_D User manual MINISENTRY-2_En.docx MIRION TECHNOLOGIES (Canberra) S.A.S, BP249, ZI de Vauzelles, 37602 40 / 170 Loches Cedex...
-
Page 43: Auto Count Time Management
BkgRate: Rate of the Background in cps • SigmaLvl: Digital value of the Standard Deviation « » (« STD » setting) • CountTime: Duration in second of the measure 107911_D User manual MINISENTRY-2_En.docx MIRION TECHNOLOGIES (Canberra)S.A.S., BP249, ZI de Vauzelles, 37602 41 / 170 Loches Cedex... -
Page 44: Count Rate Settings
Select the value or confirm the option with the key, • Change column with key, • Exit edit mode with the .key. 107911_D User manual MINISENTRY-2_En.docx MIRION TECHNOLOGIES (Canberra) S.A.S, BP249, ZI de Vauzelles, 37602 42 / 170 Loches Cedex... -
Page 45: Alarm Management
In « Count rate » mode, the alarm can be set manually by the user either in net count rate or net activity. 107911_D User manual MINISENTRY-2_En.docx MIRION TECHNOLOGIES (Canberra)S.A.S., BP249, ZI de Vauzelles, 37602 43 / 170 Loches Cedex... -
Page 46: Frisker Settings
« Measure settings » 2. Press the key to display the « Measure settings » screen and select the line « Frisker » with 107911_D User manual MINISENTRY-2_En.docx MIRION TECHNOLOGIES (Canberra) S.A.S, BP249, ZI de Vauzelles, 37602 44 / 170 Loches Cedex... -
Page 47: Alarm Management
9.9.5.1 Alarm management In case of exceeding of the threshold alarm, sound alarm is activated and Frisker LED blinks red. 107911_D User manual MINISENTRY-2_En.docx MIRION TECHNOLOGIES (Canberra)S.A.S., BP249, ZI de Vauzelles, 37602 45 / 170 Loches Cedex... -
Page 48: Unit System
Unit system choice Unit Values available c/s, Bq and Ci cpm, dpm and Ci 4. Press the key to return to the previous screen, 107911_D User manual MINISENTRY-2_En.docx MIRION TECHNOLOGIES (Canberra) S.A.S, BP249, ZI de Vauzelles, 37602 46 / 170 Loches Cedex... -
Page 49: General Setting
GENERAL SETTING 9.10.1 Backlight adjustment : The backlight adjustment level can greatly reduce the battery level when MiniSentry-2 is operating on battery power. In the measure screens, the backlighting can be switched off by briefly pressing the key direct access to the setting by pressing and holding the key (See step 4), in this case The backlight level only appears for a few seconds without pressing a key. -
Page 50: Simulated Sound Volume Setting
« General settings » screen and if necessary press the 2. Press the keys to select the « Display and Sound » line. 107911_D User manual MINISENTRY-2_En.docx MIRION TECHNOLOGIES (Canberra) S.A.S, BP249, ZI de Vauzelles, 37602 48 / 170 Loches Cedex... -
Page 51: Contrast Adjustment
Contrast adjustment 1. Press the key to access the main menu and press the keys to select the « General settings » line 107911_D User manual MINISENTRY-2_En.docx MIRION TECHNOLOGIES (Canberra)S.A.S., BP249, ZI de Vauzelles, 37602 49 / 170 Loches Cedex... - Page 52 5. Press the key to keep the setting and return to the previous menu. 6. Press the key to return to the main menu. 107911_D User manual MINISENTRY-2_En.docx MIRION TECHNOLOGIES (Canberra) S.A.S, BP249, ZI de Vauzelles, 37602 50 / 170 Loches Cedex...
-
Page 53: Date And Time
3. Press the key to display and select the time zone Note: A restart of the MiniSentry-2 is required to apply the new time zone. 107911_D User manual MINISENTRY-2_En.docx MIRION TECHNOLOGIES (Canberra)S.A.S., BP249, ZI de Vauzelles, 37602 51 / 170... - Page 54 « Options » menu. 5. Press the key to return to the main. 107911_D User manual MINISENTRY-2_En.docx MIRION TECHNOLOGIES (Canberra) S.A.S, BP249, ZI de Vauzelles, 37602 52 / 170 Loches Cedex...
-
Page 55: Erasing Log Files
« Memory » line. 3. Press the key to display the « Memory » screen Note: The « Clear LOG » line is selected by default 107911_D User manual MINISENTRY-2_En.docx MIRION TECHNOLOGIES (Canberra)S.A.S., BP249, ZI de Vauzelles, 37602 53 / 170 Loches Cedex... -
Page 56: Reset Of Settings
9.10.6 Reset of settings This function restore the file « DeviceSettings.cfg » (see § 16) to restore the MiniSentry-2 in the factory output configuration. This function is only accessible at the « Administrator » user level (To change the user level, refer to §... - Page 57 « Reset settings ». 4. Press the key for reset the settings. 5. Press the key to confirm the reset. The MiniSentry-2 restarts with the factory settings and with the user level "Operator". The user must fill in: • Language, •...
-
Page 58: Internal Memory Format
« Memory » screen and press the keys to select the line « Fast format » or « Format ». 107911_D User manual MINISENTRY-2_En.docx MIRION TECHNOLOGIES (Canberra) S.A.S, BP249, ZI de Vauzelles, 37602 56 / 170 Loches Cedex... - Page 59 5. Press the key to confirm formatting. 6. Press the key to return to the main menu. 107911_D User manual MINISENTRY-2_En.docx MIRION TECHNOLOGIES (Canberra)S.A.S., BP249, ZI de Vauzelles, 37602 57 / 170 Loches Cedex...
-
Page 60: Language Setting
4. Press the key several times to return to the main menu 107911_D User manual MINISENTRY-2_En.docx MIRION TECHNOLOGIES (Canberra) S.A.S, BP249, ZI de Vauzelles, 37602 58 / 170 Loches Cedex... -
Page 61: Profile Settings
« General settings » screen and press the keys to select the « Profiles settings » line 3. Press the key to view the « Profiles settings » screen. 107911_D User manual MINISENTRY-2_En.docx MIRION TECHNOLOGIES (Canberra)S.A.S., BP249, ZI de Vauzelles, 37602 59 / 170 Loches Cedex... - Page 62 • Validate password with key, a confirmation message is displayed. 6. Press the key several times to return to the main menu 107911_D User manual MINISENTRY-2_En.docx MIRION TECHNOLOGIES (Canberra) S.A.S, BP249, ZI de Vauzelles, 37602 60 / 170 Loches Cedex...
-
Page 63: Password Resetting
« Profiles setting » line 3. Press key to view the « Profiles settings » screen and press the to select the « Password reset » line. 107911_D User manual MINISENTRY-2_En.docx MIRION TECHNOLOGIES (Canberra)S.A.S., BP249, ZI de Vauzelles, 37602 61 / 170 Loches Cedex... -
Page 64: Enabling/Disabling Profiles
2. Press key to view the « General settings » screen and press the keys to select the « Profiles setting » line 107911_D User manual MINISENTRY-2_En.docx MIRION TECHNOLOGIES (Canberra) S.A.S, BP249, ZI de Vauzelles, 37602 62 / 170 Loches Cedex... - Page 65 « Disabled ». To reactivate the profiles, repeat the previous operation. 6. Press the key several times to return to the main menu 107911_D User manual MINISENTRY-2_En.docx MIRION TECHNOLOGIES (Canberra)S.A.S., BP249, ZI de Vauzelles, 37602 63 / 170 Loches Cedex...
-
Page 66: Software Version Display
Two versions are available: • Bootloader (startup software) • Application (main application) • Configuration («MINISENTRY-2») 107911_D User manual MINISENTRY-2_En.docx MIRION TECHNOLOGIES (Canberra) S.A.S, BP249, ZI de Vauzelles, 37602 64 / 170 Loches Cedex... -
Page 67: Advanced Settings
AC power loss. These conditions can generate a warning or take the MiniSentry-2 « Out of Service » until the condition is remedied. This is discussed in the « Fault Alarms » Menu. - Page 68 « Monitor calibration expired » « Out of service » the MiniSentry-2 wait until the condition is remedied « Warning » The message is displayed and the MiniSentry-2 is operational « Ignore » No message is displayed « Probes calibration expired »...
-
Page 69: Background Noise
« Advanced settings ». 2. Press the key to display the « Advanced settings » screen and select the line « Background noise » with 107911_D User manual MINISENTRY-2_En.docx MIRION TECHNOLOGIES (Canberra)S.A.S., BP249, ZI de Vauzelles, 37602 67 / 170 Loches Cedex... -
Page 70: Low Background Noise
If the SD decision threshold is greater than or equal to the set alarm threshold in the probe, there is the « Excessive noise » message notification. 107911_D User manual MINISENTRY-2_En.docx MIRION TECHNOLOGIES (Canberra) S.A.S, BP249, ZI de Vauzelles, 37602 68 / 170 Loches Cedex... -
Page 71: Monitor Calibration
« Advanced settings » screen and press the keys to select the line « Calibration ». key to display the « Calibration » screen: 3. Press the 107911_D User manual MINISENTRY-2_En.docx MIRION TECHNOLOGIES (Canberra)S.A.S., BP249, ZI de Vauzelles, 37602 69 / 170 Loches Cedex... -
Page 72: Performing The Calibration
3. Press the key to display the « Advanced settings » screen and press the keys to select the line « Calibration ». 107911_D User manual MINISENTRY-2_En.docx MIRION TECHNOLOGIES (Canberra) S.A.S, BP249, ZI de Vauzelles, 37602 70 / 170 Loches Cedex... - Page 73 Select the number with key, • Change column with key, 7. Press the key to save the duration (in days) of the calibration. 107911_D User manual MINISENTRY-2_En.docx MIRION TECHNOLOGIES (Canberra)S.A.S., BP249, ZI de Vauzelles, 37602 71 / 170 Loches Cedex...
-
Page 74: Portal Probe Calibration Check
« Calibration » screen: key to display the « Portal calibration » screen: 4. Press the 5. Press the key to return to previous screen. 107911_D User manual MINISENTRY-2_En.docx MIRION TECHNOLOGIES (Canberra) S.A.S, BP249, ZI de Vauzelles, 37602 72 / 170 Loches Cedex... -
Page 75: Frisker Calibration Check
4. Press the 5. Press the key to return to previous screen. The calibration must be performed using Canberra Smart Probe Software (CSPS). 107911_D User manual MINISENTRY-2_En.docx MIRION TECHNOLOGIES (Canberra)S.A.S., BP249, ZI de Vauzelles, 37602 73 / 170 Loches Cedex... -
Page 76: Selection Of User Profiles & Default Passwords
« Profiles » 2. Press the key to display the « Profiles » screen and press the key to select a user level. 107911_D User manual MINISENTRY-2_En.docx MIRION TECHNOLOGIES (Canberra) S.A.S, BP249, ZI de Vauzelles, 37602 74 / 170 Loches Cedex... -
Page 77: Shutdown
• Confirm the password with the key. 9.13 SHUTDOWN The shutdown of the MiniSentry-2 is automatically by pressing the ON / OFF switch of the MiniSentry control unit. USER MESSAGES Messages on screen Action Unauthorized function for current user, change «... - Page 78 The portal probes is usable but it is imperative to carry out a calibration with Canberra Smart Probe Software (CSPS) software (§ Erreur ! Source du renvoi introuvable.) 107911_D User manual MINISENTRY-2_En.docx MIRION TECHNOLOGIES (Canberra) S.A.S, BP249, ZI de Vauzelles, 37602 76 / 170 Loches Cedex...
- Page 79 Smart Probe Software (CSPS) software Replace the probe cable Replace the probe Replace the probe cable Replace the probe Replace the probe Replace the probe 107911_D User manual MINISENTRY-2_En.docx MIRION TECHNOLOGIES (Canberra)S.A.S., BP249, ZI de Vauzelles, 37602 77 / 170 Loches Cedex...
- Page 80 When the probe is not compatible with the current mode and configuration of the monitor. « Probe not compatible » Change the background noise settings or change the probe. 107911_D User manual MINISENTRY-2_En.docx MIRION TECHNOLOGIES (Canberra) S.A.S, BP249, ZI de Vauzelles, 37602 78 / 170 Loches Cedex...
-
Page 81: Default User Parameters
Out of service – Ignore – Warning expired action AC power loss warning Disabled – Enabled Background Averaging time Delay Discard Validity time 1440 Variation coefficient 107911_D User manual MINISENTRY-2_En.docx MIRION TECHNOLOGIES (Canberra)S.A.S., BP249, ZI de Vauzelles, 37602 79 / 170 Loches Cedex... -
Page 82: Usb Mode
This mode is only accessible at the « Administrator » and « Technician » user level (To change the user level, refer to § 9.12). USB mode connects the MiniSentry-2 to a computer with a USB port using the USB type A cable or to a USB stick. -
Page 83: Computer Connection
4. Connect the USB Cable. For computers with Windows 7 or later (with no user restrictions), the device driver installation is done automatically and the « MINISENTRY_2 » appears in the file explorer as an external storage device. 107911_D User manual MINISENTRY-2_En.docx MIRION TECHNOLOGIES (Canberra)S.A.S., BP249, ZI de Vauzelles, 37602 81 / 170 Loches Cedex... -
Page 84: Disconnecting A Computer
The « Measure Mode » line is selected by default. If necessary press the Note: keys to select the « USB Mode » line 107911_D User manual MINISENTRY-2_En.docx MIRION TECHNOLOGIES (Canberra) S.A.S, BP249, ZI de Vauzelles, 37602 82 / 170 Loches Cedex... -
Page 85: Disconnecting Ausb Stick
§ 16 to save / restore the "DeviceSettings.cfg" configuration file. 12.4 DISCONNECTING A USB STICK key , to return to the screen « USB Mode ». 1. Press the 107911_D User manual MINISENTRY-2_En.docx MIRION TECHNOLOGIES (Canberra)S.A.S., BP249, ZI de Vauzelles, 37602 83 / 170 Loches Cedex... -
Page 86: Portal Probe Calibration
These sources can be kept in the MiniSentry-2 case with no danger to the instrument or the people around it. However, since the MiniSentry-2 is very sensitive, the source(s) should not be located near (within 3 m or 10 feet of) the instrument while it is being used to avoid artificially raising the background radiation level. -
Page 87: Discriminator
In some applications the discriminator is used as a measure of the energy deposited in the detector by the radiation event, but the MiniSentry-2 is a gross counting instrument (all pulses above the noise level) and uses the discriminator setting to distinguish between radiation pulses and weaker pulses due to other sources such as electronic noise. - Page 88 4. Connect the USB Cable. For computers with Windows 7 or later (with no user restrictions), the device driver installation is done automatically. 5. Perform the portal calibration procedure. 107911_D User manual MINISENTRY-2_En.docx MIRION TECHNOLOGIES (Canberra) S.A.S, BP249, ZI de Vauzelles, 37602 86 / 170 Loches Cedex...
-
Page 89: Factory Pre Calibration Parameters
This step makes it possible to specify the default parameters of the probe. It is essential to calibrate the probe correctly. This step is mandatory. icon to display the « Default setting – factory level » screen: 1. Click on 107911_D User manual MINISENTRY-2_En.docx MIRION TECHNOLOGIES (Canberra)S.A.S., BP249, ZI de Vauzelles, 37602 87 / 170 Loches Cedex... - Page 90 2. Click on « Write » button, a message is displayed and click on « Yes » button to accept that probe will be erased and will be calibrated again. 3. Click on « OK » button to save Portal probe parameters: 107911_D User manual MINISENTRY-2_En.docx MIRION TECHNOLOGIES (Canberra) S.A.S, BP249, ZI de Vauzelles, 37602 88 / 170 Loches Cedex...
- Page 91 4. The portal probe is in initializated and in « Probe not calibrated » state, click on « X » button to quit. 107911_D User manual MINISENTRY-2_En.docx MIRION TECHNOLOGIES (Canberra)S.A.S., BP249, ZI de Vauzelles, 37602 89 / 170 Loches Cedex...
-
Page 92: High Voltage
« Probe settings » screen and select « Configuration »" tab: 1. Click on 107911_D User manual MINISENTRY-2_En.docx MIRION TECHNOLOGIES (Canberra) S.A.S, BP249, ZI de Vauzelles, 37602 90 / 170 Loches Cedex... - Page 93 HV start 1000 HV end 1050 1100 step stabilization time integration time 107911_D User manual MINISENTRY-2_En.docx MIRION TECHNOLOGIES (Canberra)S.A.S., BP249, ZI de Vauzelles, 37602 91 / 170 Loches Cedex...
- Page 94 Click on the “OK” to close the confirmation box. 6. Close the “High Voltage plateau” window, as shown on the following screenshot. 107911_D User manual MINISENTRY-2_En.docx MIRION TECHNOLOGIES (Canberra) S.A.S, BP249, ZI de Vauzelles, 37602 92 / 170 Loches Cedex...
-
Page 95: Electronic Discrimination
1. Click on « Modifiy.. » button of « Electronic discrimination: » line to display the following screen: 2. Locate the “Settings” section. See the following screenshot. 107911_D User manual MINISENTRY-2_En.docx MIRION TECHNOLOGIES (Canberra)S.A.S., BP249, ZI de Vauzelles, 37602 93 / 170 Loches Cedex... - Page 96 Click on the command “Set up this value”. The dialog box shown on the following screenshot appears. 107911_D User manual MINISENTRY-2_En.docx MIRION TECHNOLOGIES (Canberra) S.A.S, BP249, ZI de Vauzelles, 37602 94 / 170 Loches Cedex...
- Page 97 Click on “OK” to close the confirmation box. 6. Close the “Electronic discriminator set up” window, as shown on the following screenshot 107911_D User manual MINISENTRY-2_En.docx MIRION TECHNOLOGIES (Canberra)S.A.S., BP249, ZI de Vauzelles, 37602 95 / 170 Loches Cedex...
-
Page 98: Background Noise
Check the background noise of the probe against light leakage and electronic noise. This measurement is systematic. Click on « Calibration » tab: 107911_D User manual MINISENTRY-2_En.docx MIRION TECHNOLOGIES (Canberra) S.A.S, BP249, ZI de Vauzelles, 37602 96 / 170 Loches Cedex... - Page 99 3. Enter the integration time and click on the "Calculate" button. 4. Click on the "Valid" button to record the background noise. 107911_D User manual MINISENTRY-2_En.docx MIRION TECHNOLOGIES (Canberra)S.A.S., BP249, ZI de Vauzelles, 37602 97 / 170 Loches Cedex...
-
Page 100: Coefficient Calculation
1. Click on « Calibration » tab: 107911_D User manual MINISENTRY-2_En.docx MIRION TECHNOLOGIES (Canberra) S.A.S, BP249, ZI de Vauzelles, 37602 98 / 170 Loches Cedex... - Page 101 The source emitter is displayed automatically. Selecting a reference source enable the "Start" button. 6. Choose the “Calibration validity period” in months. 107911_D User manual MINISENTRY-2_En.docx MIRION TECHNOLOGIES (Canberra)S.A.S., BP249, ZI de Vauzelles, 37602 99 / 170 Loches Cedex...
- Page 102 After measurement, if you have not taken into account the time calculated by the “Auto” function and set manually the integration time, the following prompt message may show up to warn about missing statistics. 107911_D User manual MINISENTRY-2_En.docx MIRION TECHNOLOGIES (Canberra) S.A.S, BP249, ZI de Vauzelles, 37602 100 / 170 Loches Cedex...
- Page 103 The “Write” button is enabled. • 9. Click on the button "Write" to enter in red the coefficient in the window of "Calibration" gamma 107911_D User manual MINISENTRY-2_En.docx MIRION TECHNOLOGIES (Canberra)S.A.S., BP249, ZI de Vauzelles, 37602 101 / 170 Loches Cedex...
-
Page 104: Coefficient Validation
The calibration file is saved in the following non-modifiable path, located in the application directory: « C:\...\Application directory\DataFiles\Calibration\Minisentry2\ ». The file name, unchangeable, as follows: « CALIB_Minisentry 2_SERIAL NUMBER_YYYYMMDD ». 107911_D User manual MINISENTRY-2_En.docx MIRION TECHNOLOGIES (Canberra) S.A.S, BP249, ZI de Vauzelles, 37602 102 / 170 Loches Cedex... -
Page 105: Log Files
14.1 LOG FILE FORMAT The MiniSentry-2 allow storage more than 100 days of data at the rate of one point per minute. In case of full memory, the first records are erased. Overrun and overflow alarms and alerts are time stamped by the second. - Page 106 Detector information Area of the probe in cm Software Version Software of the probe 107911_D User manual MINISENTRY-2_En.docx MIRION TECHNOLOGIES (Canberra) S.A.S, BP249, ZI de Vauzelles, 37602 104 / 170 Loches Cedex...
-
Page 107: Exporting Log Files To Usb Stick
LOG folders To select a directory or file: • Select the directory or file with • Expand/collapse the directory with the key 107911_D User manual MINISENTRY-2_En.docx MIRION TECHNOLOGIES (Canberra)S.A.S., BP249, ZI de Vauzelles, 37602 105 / 170 Loches Cedex... -
Page 108: Backing Up And Browsing Log Files On A Computer
4. Disconnect the MiniSentry-2 from the PC (Refer to § 12.2). 5. Turn off and unplug the MiniSentry-2 from AC and external battery. 6. Turn on the MiniSentry-2 and wait for the update to complete. 7. Check the software version at the bottom of the screen at startup or in the « Parameters »... -
Page 109: Update From Usb Stick
USER MANUAL MINISENTRY-2 15.2 UPDATE FROM USB STICK 1. Connect the USB stick to the MiniSentry-2. 2. Select the « Connect USB stick » function (refer to § 12.3). 3. Select the line « Software Update » with the keys 4. -
Page 110: Configuration File Setting
SAVING THE CONFIGURATION FILE ON USB STICK To save the « DeviceSettings. cfg » configuration file on a USB stick: 1. Connect the USB stick to the MiniSentry-2. 2. Select the « Connect USB stick » function (refer to § 12.3). - Page 111 5. Press the button to restore the « DeviceSettings.cfg » file. The following message appears: 6. Press the to return to the previous screen. 107911_D User manual MINISENTRY-2_En.docx MIRION TECHNOLOGIES (Canberra)S.A.S., BP249, ZI de Vauzelles, 37602 109 / 170 Loches Cedex...
-
Page 112: Configuration File Backup And Viewing On Computer
The « DeviceSettings.cfg » files can be consulted and exported directly to a computer using the Microsoft Windows © File Explorer. 1. Using the USB cable, connect the MiniSentry-2 to the computer. 2. Select the « Connect to a PC » function (refer to § 12.1). -
Page 113: Network Communication Function & Digital I / O
Relay 4 NO Digital output No.4 Relay 4 COM Relay 4 NC Relay 5 NO Digital output No.5 Relay 5 COM Relay 5 NC 107911_D User manual MINISENTRY-2_En.docx MIRION TECHNOLOGIES (Canberra)S.A.S., BP249, ZI de Vauzelles, 37602 111 / 170 Loches Cedex... -
Page 114: Networking
USE MANUAL MINISENTRY-2 18.2 NETWORKING Communication with the Minisentry-2 can be done via an RS485 network following the ModBus protocol. 18.3 MODBUS SETTING To change the slave ID of the device: 1. Connect the device to a PC and launch the « Connect to a PC » USB mode . -
Page 115: Digital Input/Output
Probe fault Measure Saturation Channel 2 Alarm Interface 1 Alert Measure Saturation Channel 1 Alarm Alert Setting table of fault relays of MiniSentry-2 « DeviceSettings. cfg » file Relays Decimal value Parameter rl1signalcondition 0000000000000000000111 rl2signalcondition 0000000000000001110000 0000000000111000000000 3584 rl3signalcondition 0000001110000000000000... -
Page 116: Caracteristics Of The Monitor
CARACTERISTICS OF THE MONITOR 19.1 DECLARATION OF CONFORMITY Electromagnetic compatibility: The MiniSentry-2 has successfully passed the electromagnetic compatibility (EMC) tests according to the EU directive and 62244 standard MiniSentry-2 comply with FEM-REP-21 Full declarations of conformity are available upon request to:... -
Page 117: Performance
Display: 3 digits, floating point with 2 significant digits – Efficiency : • 241Am : 0.0002 cps/Bq • 60Co : 0.018 cps/Bq • 137Cs : 0.009 cps/Bq 107911_D User manual MINISENTRY-2_En.docx MIRION TECHNOLOGIES (Canberra)S.A.S., BP249, ZI de Vauzelles, 37602 115 / 170 Loches Cedex... -
Page 118: Frisker Probe Compatibility Tables
I : Individual alarm value per probe chosen among 10 predefined values, stored in the probe (1) : Non-exhaustive list of CSP compatible probes. 107911_D User manual MINISENTRY-2_En.docx MIRION TECHNOLOGIES (Canberra) S.A.S, BP249, ZI de Vauzelles, 37602 116 / 170 Loches Cedex... -
Page 119: Storage And Transport
: During storage, the battery of the Minisentry 2 requires recharging every 18 months. 21.2 TRANSPORT The packaging of Minisentry-2 for transportation must be sized to protect it from shock and shock and to be compatible with standard delivery conditions. PREVENTIVE MAINTENANCE 22.1... -
Page 120: Properly Working Check
Check the state of the relays with an ohmmeter (see § Erreur ! Source du renvoi introuvable.). Receipt of data by the RS485 Connect the Minisentry-2 to a PC via the I/O RS485 connector. Open a software using the ModBus protocol and then interrogate the device. -
Page 121: Decontamination And Cleaning
Sponge • Vacuum General precautions: • MiniSentry-2 should be cleared of radioactive dust and liquid agent as soon as possible after detection. • Tools, equipment and work areas must be free of radioactive contamination. • The user is responsible for conducting the surveys and the rapid decontamination of all objects and surfaces. -
Page 122: Troubleshooting
Replace the probe cable Replace the probe 2 Frisker LEDs flashing purple Difficulty erasing LOG files Format the RAM (See § 9.10.7) 107911_D User manual MINISENTRY-2_En.docx MIRION TECHNOLOGIES (Canberra) S.A.S, BP249, ZI de Vauzelles, 37602 120 / 170 Loches Cedex... -
Page 123: Assembly Guide, Pedestrian Configuration
Secondary detector post End caps (x2) for vehicle configuration needs and shipping Power cord Kit for Extended passage width (91.5 cm (36 in)) (Option) 107911_D User manual MINISENTRY-2_En.docx MIRION TECHNOLOGIES (Canberra)S.A.S., BP249, ZI de Vauzelles, 37602 121 / 170 Loches Cedex... -
Page 124: Assembly Instruction
4. Place a flat washer and a wing nut on each of the footplate’s retaining bolts. 5. Tighten each of the four wing nuts. 107911_D User manual MINISENTRY-2_En.docx MIRION TECHNOLOGIES (Canberra) S.A.S, BP249, ZI de Vauzelles, 37602 122 / 170 Loches Cedex... - Page 125 Sensors on both detector posts need to face one another. Stand the unit up right 107911_D User manual MINISENTRY-2_En.docx MIRION TECHNOLOGIES (Canberra)S.A.S., BP249, ZI de Vauzelles, 37602 123 / 170 Loches Cedex...
-
Page 126: Asembly Guide, Vehicle Configuration
Top cross piece with attached elbows for pedestrian configuration Secondary detector post End caps (x2) for vehicle configuration needs and shipping Power supply cable 107911_D User manual MINISENTRY-2_En.docx MIRION TECHNOLOGIES (Canberra) S.A.S, BP249, ZI de Vauzelles, 37602 124 / 170 Loches Cedex... - Page 127 USER MANUAL MINISENTRY-2 107911_D User manual MINISENTRY-2_En.docx MIRION TECHNOLOGIES (Canberra)S.A.S., BP249, ZI de Vauzelles, 37602 125 / 170 Loches Cedex...
-
Page 128: Vehicle Part List
Description Vehicle baseplates and bolts for each post 2.5 m (8.20 ft) Rubber spacers Cable 2.7 m (8.86 ft.) cables and protections 107911_D User manual MINISENTRY-2_En.docx MIRION TECHNOLOGIES (Canberra) S.A.S, BP249, ZI de Vauzelles, 37602 126 / 170 Loches Cedex... -
Page 129: Assembly Instruction
3. Once the connections are complete, go to step 4 to attach the foot plates. Tuck connections Tuck connections inside inside the detector the detector post. 107911_D User manual MINISENTRY-2_En.docx MIRION TECHNOLOGIES (Canberra)S.A.S., BP249, ZI de Vauzelles, 37602 127 / 170 Loches Cedex... - Page 130 Sensors on both detector posts stakes (not included) or by other means must face one so they do not slip and shear cables. another. 107911_D User manual MINISENTRY-2_En.docx MIRION TECHNOLOGIES (Canberra) S.A.S, BP249, ZI de Vauzelles, 37602 128 / 170 Loches Cedex...
-
Page 131: Spare Parts List For The Initial Period (1-2 Years)
Mother board kit 108337 101826 Protection glass kit 101827 107878 Ready to measure light kit 107987 Loud speaker kit 108339 Rear cover kit 108340 107911_D User manual MINISENTRY-2_En.docx MIRION TECHNOLOGIES (Canberra)S.A.S., BP249, ZI de Vauzelles, 37602 129 / 170 Loches Cedex... -
Page 132: Spare Parts For 3-5 Years Operation (Additional Quantities)
Front panel 107750 107758 107909 Labels 107910 107908 Dongle board kit 108334 Main power supply connector kit 108335 Switch On/Off kit 108336 107911_D User manual MINISENTRY-2_En.docx MIRION TECHNOLOGIES (Canberra) S.A.S, BP249, ZI de Vauzelles, 37602 130 / 170 Loches Cedex... - Page 133 High voltage top member cable 107741 1 x 107740 High voltage cable monitor to detector 108490 1 x 107745 High voltage connector to monitor 107911_D User manual MINISENTRY-2_En.docx MIRION TECHNOLOGIES (Canberra)S.A.S., BP249, ZI de Vauzelles, 37602 131 / 170 Loches Cedex...
-
Page 134: Monitor Spare Parts
USE MANUAL MINISENTRY-2 MONITOR SPARE PARTS 29.1 FRONT PANEL Item Designation Order No. Lexan Front Panel 107750 107911_D User manual MINISENTRY-2_En.docx MIRION TECHNOLOGIES (Canberra) S.A.S, BP249, ZI de Vauzelles, 37602 132 / 170 Loches Cedex... -
Page 135: Labels
USER MANUAL MINISENTRY-2 29.2 LABELS Item Designation Order No. MINISENTRY 2 LOGO 107758 Connectors label 107909 Product label 107910 Ready to measure Label 107908 107911_D User manual MINISENTRY-2_En.docx MIRION TECHNOLOGIES (Canberra)S.A.S., BP249, ZI de Vauzelles, 37602 133 / 170 Loches Cedex... -
Page 136: Dongle Board Kit - 108334
Item Designation Order No. Dongle board 108210 High voltage cable 107988 Washer Detector connector 107787 Dongle board to interface board cable 107829 107911_D User manual MINISENTRY-2_En.docx MIRION TECHNOLOGIES (Canberra) S.A.S, BP249, ZI de Vauzelles, 37602 134 / 170 Loches Cedex... -
Page 137: Main Power Supply Connector Kit
USER MANUAL MINISENTRY-2 29.4 MAIN POWER SUPPLY CONNECTOR KIT Item Designation Order No. Connector – cables – protection – Fuses 108335 Screws 107911_D User manual MINISENTRY-2_En.docx MIRION TECHNOLOGIES (Canberra)S.A.S., BP249, ZI de Vauzelles, 37602 135 / 170 Loches Cedex... -
Page 138: Switch On/Off Kit
USE MANUAL MINISENTRY-2 29.5 SWITCH ON/OFF KIT Item Designation Order No. Switch and cable 108336 107911_D User manual MINISENTRY-2_En.docx MIRION TECHNOLOGIES (Canberra) S.A.S, BP249, ZI de Vauzelles, 37602 136 / 170 Loches Cedex... -
Page 139: Battery Kit
USER MANUAL MINISENTRY-2 29.6 BATTERY KIT Item Designation Order No. Li-ion battery 93652 Battery support 108346 14349 107911_D User manual MINISENTRY-2_En.docx MIRION TECHNOLOGIES (Canberra)S.A.S., BP249, ZI de Vauzelles, 37602 137 / 170 Loches Cedex... -
Page 140: Inteface Board Kit
USE MANUAL MINISENTRY-2 29.7 INTEFACE BOARD KIT Item Designation Order No. Interface board - nuts 108199 107911_D User manual MINISENTRY-2_En.docx MIRION TECHNOLOGIES (Canberra) S.A.S, BP249, ZI de Vauzelles, 37602 138 / 170 Loches Cedex... -
Page 141: Mother Board Kit - 108337
USER MANUAL MINISENTRY-2 29.8 MOTHER BOARD KIT - 108337 Item Designation Order No. Avior-2 board with display 102361 Spacer 108188 Washer 85406 28649 107911_D User manual MINISENTRY-2_En.docx MIRION TECHNOLOGIES (Canberra)S.A.S., BP249, ZI de Vauzelles, 37602 139 / 170 Loches Cedex... -
Page 142: Protection Glass Kit
USE MANUAL MINISENTRY-2 29.9 PROTECTION GLASS KIT Item Designation Order No. Double-sided tape 101826 Display glass protection 101827 107911_D User manual MINISENTRY-2_En.docx MIRION TECHNOLOGIES (Canberra) S.A.S, BP249, ZI de Vauzelles, 37602 140 / 170 Loches Cedex... -
Page 143: Ready To Measure Light Kit
READY TO MEASURE LIGHT KIT Item Designation Order No. Blue light Washer 107878 Ready to measure cable 107987 29.11 LOUD-SPEAKER Item Designation Order No. Loud speaker 108339 107911_D User manual MINISENTRY-2_En.docx MIRION TECHNOLOGIES (Canberra)S.A.S., BP249, ZI de Vauzelles, 37602 141 / 170 Loches Cedex... -
Page 144: Rear Cover Kit - 108340
USE MANUAL MINISENTRY-2 29.12 REAR COVER KIT - 108340 Item Designation Order No. Back plate cover Washer Screw Gasket 107911_D User manual MINISENTRY-2_En.docx MIRION TECHNOLOGIES (Canberra) S.A.S, BP249, ZI de Vauzelles, 37602 142 / 170 Loches Cedex... -
Page 145: Disassembling
2. Disconnect any external connection 3. While supporting the monitor, unscrew the 4 nuts using the 17 mm wrench. 4. Remove the monitor and the 2 clamps. 107911_D User manual MINISENTRY-2_En.docx MIRION TECHNOLOGIES (Canberra)S.A.S., BP249, ZI de Vauzelles, 37602 143 / 170 Loches Cedex... -
Page 146: Installation
1. Install and maintain the monitor with the two clamps on primary post. 2. Screw the 4 screws using the 17 mm wrench. 107911_D User manual MINISENTRY-2_En.docx MIRION TECHNOLOGIES (Canberra) S.A.S, BP249, ZI de Vauzelles, 37602 144 / 170 Loches Cedex... - Page 147 4. Power up the unit and go to the start-up screen. Upon powering up the MiniSentry, the above start-up screen will appear after a few seconds. 107911_D User manual MINISENTRY-2_En.docx MIRION TECHNOLOGIES (Canberra)S.A.S., BP249, ZI de Vauzelles, 37602 145 / 170 Loches Cedex...
-
Page 148: Rear Cover Removal/Installation
1. Unscrew the 8 screw from the rear of the monitor. Be careful to not loose the washers by removing the screw. 2. Remove the cover 107911_D User manual MINISENTRY-2_En.docx MIRION TECHNOLOGIES (Canberra) S.A.S, BP249, ZI de Vauzelles, 37602 146 / 170 Loches Cedex... -
Page 149: Installation
- Remove rear cover § Erreur ! Source du renvoi introuvable. 30.3.3 Removal 1. Disconnect the flex wire from the mother board (red arrows). 107911_D User manual MINISENTRY-2_En.docx MIRION TECHNOLOGIES (Canberra)S.A.S., BP249, ZI de Vauzelles, 37602 147 / 170 Loches Cedex... -
Page 150: Installation
3. Connect the flex wire on the mother board (red arrows). 4. Install rear cover § Erreur ! Source du renvoi introuvable. 107911_D User manual MINISENTRY-2_En.docx MIRION TECHNOLOGIES (Canberra) S.A.S, BP249, ZI de Vauzelles, 37602 148 / 170 Loches Cedex... -
Page 151: Mother Board Removal/Installation
30.4.3 Removal 1. Remove the 5 Flex wires (red arrows), from mother board 2. Disconnect the wire from the mother board (red arrows 107911_D User manual MINISENTRY-2_En.docx MIRION TECHNOLOGIES (Canberra)S.A.S., BP249, ZI de Vauzelles, 37602 149 / 170 Loches Cedex... -
Page 152: Installation
4. Extract the mother board 30.4.4 Installation 1. Install the mother board 2. Screw the 4 screw with washer using T9 TORX screw driver (Blue arrow) 107911_D User manual MINISENTRY-2_En.docx MIRION TECHNOLOGIES (Canberra) S.A.S, BP249, ZI de Vauzelles, 37602 150 / 170 Loches Cedex... - Page 153 4. Connect the 5 Flex wires (red arrows), on the mother board. 5. Install rear cover § Erreur ! Source du renvoi introuvable. 107911_D User manual MINISENTRY-2_En.docx MIRION TECHNOLOGIES (Canberra)S.A.S., BP249, ZI de Vauzelles, 37602 151 / 170 Loches Cedex...
-
Page 154: Interface Board Removal/Installation
1. Remove the 4 Flex wires (red arrows), from Interface board 2. Disconnect the 5 cables (red arrows) from the interface board 107911_D User manual MINISENTRY-2_En.docx MIRION TECHNOLOGIES (Canberra) S.A.S, BP249, ZI de Vauzelles, 37602 152 / 170 Loches Cedex... -
Page 155: Installation
4. Remove from the external bottom of the monitor, the 6 screws (Red arrows) using the 5 mm wrench. 5. Extract the interface board of the enclosure. 30.5.4 Installation 1. Install the interface board inside the enclosure. 107911_D User manual MINISENTRY-2_En.docx MIRION TECHNOLOGIES (Canberra)S.A.S., BP249, ZI de Vauzelles, 37602 153 / 170 Loches Cedex... - Page 156 3. Connect the flex wire (Red arrows) of the front panel lexan 4. Connect the 5 cables (red arrows) from the interface board 107911_D User manual MINISENTRY-2_En.docx MIRION TECHNOLOGIES (Canberra) S.A.S, BP249, ZI de Vauzelles, 37602 154 / 170 Loches Cedex...
-
Page 157: Dongle Board Removal/Installation
Preliminary operations: - Remove rear cover § Erreur ! Source du renvoi introuvable. 30.6.3 Removal 1. Remove the cable from the dongle board 107911_D User manual MINISENTRY-2_En.docx MIRION TECHNOLOGIES (Canberra)S.A.S., BP249, ZI de Vauzelles, 37602 155 / 170 Loches Cedex... -
Page 158: Installation
2. Remove the 3 screws using the T9 screw driver 3. Extract the dongle board. 30.6.4 Installation 1. Install the dongle board inside the enclosure. 107911_D User manual MINISENTRY-2_En.docx MIRION TECHNOLOGIES (Canberra) S.A.S, BP249, ZI de Vauzelles, 37602 156 / 170 Loches Cedex... - Page 159 4. Solder the High voltage wire on the connector. 5. Connect the cable to the dongle board 6. Install rear cover § Erreur ! Source du renvoi introuvable.. 107911_D User manual MINISENTRY-2_En.docx MIRION TECHNOLOGIES (Canberra)S.A.S., BP249, ZI de Vauzelles, 37602 157 / 170 Loches Cedex...
-
Page 160: Main Power Supply Removal/Installation
2. Remove the 2 bolt using the 8mm wrench (blue arrows) 3. Extract the power supply 4. Remove the 2 bolts using the PZ1 screwdriver 5. Remove metal plate from power supply 107911_D User manual MINISENTRY-2_En.docx MIRION TECHNOLOGIES (Canberra) S.A.S, BP249, ZI de Vauzelles, 37602 158 / 170 Loches Cedex... -
Page 161: Installation
2. Screw the 2 nuts using the 8mm wrench (blue arrows) 3. Connect both wires to the power supply (Red Arrows) 4. Install rear cover § Erreur ! Source du renvoi introuvable. 107911_D User manual MINISENTRY-2_En.docx MIRION TECHNOLOGIES (Canberra)S.A.S., BP249, ZI de Vauzelles, 37602 159 / 170 Loches Cedex... -
Page 162: Blue Lights Removal/Installation
1. Unplug the two wires of the blue light. 2. Unscrew the nut using the 17 mm wrench. 3. Extract light from outside taking care to not loose the washer. 107911_D User manual MINISENTRY-2_En.docx MIRION TECHNOLOGIES (Canberra) S.A.S, BP249, ZI de Vauzelles, 37602 160 / 170 Loches Cedex... -
Page 163: Installation
4. Connect the black wires on the grey terminal and red wires on the golden terminal. 5. Install rear cover § Erreur ! Source du renvoi introuvable.. 107911_D User manual MINISENTRY-2_En.docx MIRION TECHNOLOGIES (Canberra)S.A.S., BP249, ZI de Vauzelles, 37602 161 / 170 Loches Cedex... -
Page 164: Power Switch Removal/Installation
1. Mark the position of wires and unplug the four wires 2. From inside, press on each side of the switch, and push it to outside. 107911_D User manual MINISENTRY-2_En.docx MIRION TECHNOLOGIES (Canberra) S.A.S, BP249, ZI de Vauzelles, 37602 162 / 170 Loches Cedex... -
Page 165: Installation
- Remove rear cover § Erreur ! Source du renvoi introuvable. 30.10.3 Removal 1. Disconnect wire from power supply 2. Remove nuts on threaded rod and remove the yellow/green wire from it. 107911_D User manual MINISENTRY-2_En.docx MIRION TECHNOLOGIES (Canberra)S.A.S., BP249, ZI de Vauzelles, 37602 163 / 170 Loches Cedex... - Page 166 4. Remove the power supply connector assembly from inside 5. Remove the protective cover. 6. Mark the position of wires and unplug the three wires 107911_D User manual MINISENTRY-2_En.docx MIRION TECHNOLOGIES (Canberra) S.A.S, BP249, ZI de Vauzelles, 37602 164 / 170 Loches Cedex...
-
Page 167: Installation
1. Connect the three wire as marked before and Install the protective cover. 2. Install the connector assembly in the enclosure 3. Add Loctite and tighten the two screws using PH1 screw driver 107911_D User manual MINISENTRY-2_En.docx MIRION TECHNOLOGIES (Canberra)S.A.S., BP249, ZI de Vauzelles, 37602 165 / 170 Loches Cedex... - Page 168 8mm wrench. 6. Install rear cover § Erreur ! Source du renvoi introuvable.. 107911_D User manual MINISENTRY-2_En.docx MIRION TECHNOLOGIES (Canberra) S.A.S, BP249, ZI de Vauzelles, 37602 166 / 170 Loches Cedex...
-
Page 169: Usb Connector Removal/Installation
1. Install the USB assembly and screw the two screws form outside of the enclosure 2. Connect the cable on the mother board 3. Install rear cover § Erreur ! Source du renvoi introuvable.. 107911_D User manual MINISENTRY-2_En.docx MIRION TECHNOLOGIES (Canberra)S.A.S., BP249, ZI de Vauzelles, 37602 167 / 170 Loches Cedex... -
Page 170: Display Protection Removal/Installation
- Remove Mother Board § 30.4 30.12.3 Removal 1. Remove the display protection (2) 2. Clean the double-sided tape (1) of the enclosure. 107911_D User manual MINISENTRY-2_En.docx MIRION TECHNOLOGIES (Canberra) S.A.S, BP249, ZI de Vauzelles, 37602 168 / 170 Loches Cedex... -
Page 171: Installation
4. Place the display protection on the tape and press it. 5. Install the Mother Board § 30.4 6. Install rear cover § Erreur ! Source du renvoi introuvable.. 107911_D User manual MINISENTRY-2_En.docx MIRION TECHNOLOGIES (Canberra)S.A.S., BP249, ZI de Vauzelles, 37602 169 / 170 Loches Cedex... - Page 172 USE MANUAL MINISENTRY-2 107911_D User manual MINISENTRY-2_En.docx MIRION TECHNOLOGIES (Canberra) S.A.S, BP249, ZI de Vauzelles, 37602 170 / 170 Loches Cedex...
Need help?
Do you have a question about the MiniSentry-2 and is the answer not in the manual?
Questions and answers