Table of Contents
Advertisement
Quick Links
Advertisement
Table of Contents

Summary of Contents for Mirion Technologies iPIX
- Page 1 USER MANUAL iPIX code 96675...
- Page 3 USER MANUAL iPIX CODE 96675 June 2018...
- Page 5 USER MANUAL IPIX WARNING MIRION TECHNOLOGIES (Canberra) SAS cannot be held responsible for damages incurred or sustained by the buyer in case of improper use, a connection with incorrect voltage, or non- compliance with the instructions contained herein. The information contained herein may be changed without notice.
- Page 6 96675_E.docx MIRION TECHNOLOGIES (Canberra) S.A.S 4 / 91 BP249, ZI de Vauzelles, 37602 Loches Cedex...
-
Page 7: Table Of Contents
6.1.2.2. Effect of the masks on the angular resolution 6.1.2.3. Selecting the mask based on the measurement to be taken 6.1.3. PoE power supply ......................20 6.1.4. iPIX imager external power supply .................. 20 6.1.5. iPIX imager battery ......................21 6.1.6. Laptop computer ........................ 21 6.2. - Page 8 7.6. I ......................32 NSTALLING THE I IMAGER 7.6.1. Installing the iPIX imager onto the manual ball head ............. 33 7.6.2. Installing the iPIX imager on the motorised ball head (optional) ........34 7.7. I ......................35 NSTALLING THE OPTION 7.8.
- Page 9 PPLICATION STATUS ICON FEATURES ............................86 10.1................86 ECHANICAL EATURES AND NVIRONMENT 10.1.1. Basic iPIX kit case ....................86 10.1.2. iPIX imager ......................86 10.1.3. Laptop computer....................86 10.1.4. iPIX optional carrying case ................86 10.1.5. NID (option) ......................86 10.1.6.
- Page 10 ......................87 LECTRICAL EATURES 10.2.1. iPIX imager ......................87 10.2.2. iPIX battery ......................87 10.2.3. iPIX external power supply ................87 10.2.4. PoE power supply ....................88 10.2.5. Laptop computer ....................88 10.2.6. PC battery ......................88 10.2.7. PC power supply ....................88 10.2.8.
-
Page 11: General Safety Instructions
If the device exhibits a significant change in its performance, which indicates the need to call on qualified service personnel to have the device repaired. 96675_E.docx MIRION TECHNOLOGIES (Canberra) S.A.S 9 / 91 BP249, ZI de Vauzelles, 37602 Loches Cedex... -
Page 12: Safety Measures
Do not look at the beam or examine it directly using optical instruments. 3.5. PROTECTION FROM CONTAMINATION The iPIX has an IP65 protection index (requires the installation of a leak-tight overcap and 4 connector caps). However, when the iPIX is used in a contaminated environment, protecting the iPIX and the cables is recommended. -
Page 13: Ipix Construction
Tripod with manual ball head and carrying case 88868 Motorised ball head 106777 Battery module for motorised ball head 106779 Battery module lead - iPIX 106780 Battery module lead – motorised ball head 106781 Li-ion 12V/2A charger, with US, UK and EU adapters 106778 Additional options Reel with 50m (54.6yd) Ethernet cable... -
Page 14: Introduction
INTRODUCTION The iPIX is a unique gamma-ray imaging system that quickly locates and identifies sources of radioactivity This system's gamma imager includes a gamma-ray detector developed at the CERN, a visible camera and coded masks. Thanks to the so-called “mask/anti-mask” differentiation technique, better detection of background noise is possible. -
Page 15: Description
50m (54.6yd) and 80m (87.5yd) cables on a reel are also available as options. 6.1. IPIX BASIC KIT The details of the iPIX basic kit are described in § 4. Figure 2: iPIX basic kit iPIX imager... - Page 16 PoE power supply Ethernet cables 2 m et 10m (10.9 yd) Figure 4: iPIX basic kit carrying case without the upper foam block 96675_E.docx MIRION TECHNOLOGIES (Canberra) S.A.S 14 / 91 BP249, ZI de Vauzelles, 37602 Loches Cedex...
-
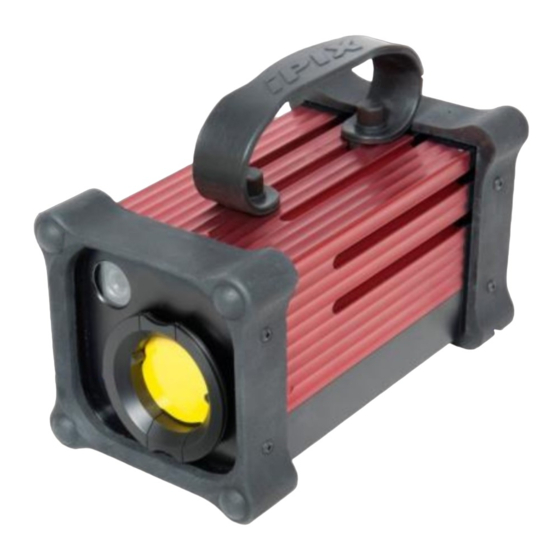
Page 17: Ipix Imager
6.1.1. iPIX imager The iPIX imager is equipped with anti-shock protection and a carrying handle. The visible camera and the mask mounted in front of the gamma-ray detector are located on the front. A removable leak-tight overcap covers the mask. -
Page 18: Ipix Masks
Identification label iPIX imager battery Figure 7: Bottom of the iPIX imager (without leak-tight overcap) 6.1.2. iPIX masks The gamma-ray detector masks can be changed without tools by applying manual pressure to the unlatching tabs. They can be identified by their colour: blue, yellow or red. - Page 19 3D image Figure 9: Locating of a source of Am241 with 1 µSv/h (0.1 mR/h) with an ambient background noise of < 1.8 µSv/h (0.18 mR/h) 96675_E.docx MIRION TECHNOLOGIES (Canberra) S.A.S 17 / 91 BP249, ZI de Vauzelles, 37602 Loches Cedex...
- Page 20 Super- imposed image 3D image Figure 10: Locating of a source of Am241 with 1 µSv/h (0.1 mR/h) with a background noise of Cs137 with 300 µSv/h (30 mR/h) located behind the iPIX Red mask Yellow mask Blue mask Super-...
- Page 21 Mask usage is based on energy and background noise is shown in the table below: Figure 12: Mask use table 96675_E.docx MIRION TECHNOLOGIES (Canberra) S.A.S 19 / 91 BP249, ZI de Vauzelles, 37602 Loches Cedex...
-
Page 22: Poe Power Supply
6.1.4. iPIX imager external power supply The iPIX imager external power supply has three removable CEE 7/16, BS 1363 and NEMA 1-15 (EU, UK and US) standard adapters. The user must be able to disconnect the external power supply at any time in order to remove the imager 's electrical power. -
Page 23: Ipix Imager Battery
The imager battery has an identification label and safety warning label on both side. A locating pin on the side permits proper battery installation. Connector Locating pin Figure 15: iPIX imager battery 6.1.6. Laptop computer The Laptop computer is a ruggedized PC equipped with a touchscreen, a carrying handle and protective corners. - Page 24 Figure 17: Tablet mode Stylus USB 2 connector Ethernet connector USB 3 connectors Power connector Figure 18: Laptop computer connectors side view 96675_E.docx MIRION TECHNOLOGIES (Canberra) S.A.S 22 / 91 BP249, ZI de Vauzelles, 37602 Loches Cedex...
-
Page 25: Ipix Optional Carrying Case
USER MANUAL IPIX 6.2. IPIX OPTIONAL CARRYING CASE The contents of the iPIX optional carrying case are described in § 4. Figure 19: iPIX optional carrying case Section being written 96675_E.docx MIRION TECHNOLOGIES (Canberra) S.A.S 23 / 91 BP249, ZI de Vauzelles, 37602 Loches Cedex... -
Page 26: Ipix-Nid Carrying Case
6.3. IPIX-NID CARRYING CASE The contents of the iPIX-NID carrying case are described in § 4. Figure 20: iPIX-NID carrying case NID module (optional) Figure 21: iPIX-GR1 carrying case contents 96675_E.docx MIRION TECHNOLOGIES (Canberra) S.A.S 24 / 91 BP249, ZI de Vauzelles, 37602 Loches Cedex... -
Page 27: Telescopic Tripod With Manual Ball Head
Manual ball head Adjustable 1/4” screw support support Locking/ Unlocking handle Panning and locking handle Telescopic leg Figure 22: Telescopic tripod with manual ball head 96675_E.docx MIRION TECHNOLOGIES (Canberra) S.A.S 25 / 91 BP249, ZI de Vauzelles, 37602 Loches Cedex... -
Page 28: Motorised Ball Head Option
6.3.3. Motorised ball head option Section being written 96675_E.docx MIRION TECHNOLOGIES (Canberra) S.A.S 26 / 91 BP249, ZI de Vauzelles, 37602 Loches Cedex... -
Page 29: Nid Option
The option is recommended for acquisitions in panoramic mode and allows the acquisition during a traditional measurement to be fully automated. Securing support Securing support with tools Lock without tools Detection optics Figure 24: Laser telemeter 96675_E.docx MIRION TECHNOLOGIES (Canberra) S.A.S 27 / 91 BP249, ZI de Vauzelles, 37602 Loches Cedex... -
Page 30: Torch And Rugged Handle Option
The reel is optionally equipped with a 50m (54.6 yd) or 80m (87.5yd) cable. iPIX imager Ethernet connector Ethernet connector Figure 26: Equipped cable reel 96675_E.docx MIRION TECHNOLOGIES (Canberra) S.A.S 28 / 91 BP249, ZI de Vauzelles, 37602 Loches Cedex... -
Page 31: Installation
USER MANUAL IPIX INSTALLATION Warning! The iPIX imager is shock proof and vibration resistant, but all unnecessary situations should be avoided as much as possible. 7.1. USAGE RESTRICTION Warning! The imager must not be moved during acquisition. This could result in an incorrect image. -
Page 32: Removing/Installing The Leak-Tight Overcap
1. Check the cleanliness around the mask and the proper condition of the O-ring on the leak- tight overcap. 2. Position the leak-tight overcap over the three centering devices, then turn it clockwise until completely locked. Centring pins Leak-tight overcap 96675_E.docx MIRION TECHNOLOGIES (Canberra) S.A.S 30 / 91 BP249, ZI de Vauzelles, 37602 Loches Cedex... -
Page 33: Installing/Removing The Mask
2. Push on the mask until the two tabs are completely locked. 3. Position the leak-tight overcap (see § 7.4.2). 96675_E.docx MIRION TECHNOLOGIES (Canberra) S.A.S 31 / 91 BP249, ZI de Vauzelles, 37602 Loches Cedex... -
Page 34: Installing The Ipix Imager
7.6. INSTALLING THE IPIX IMAGER 1. Position the tripod on a stable surface; adjust the length of the telescopic legs if necessary. 2. Properly space the legs so they remain stable. 3. Position the motorized ball head (§ 7.6.1) or the manual ball head (§ 7.6.2) based on the selected option. -
Page 35: Installing The Ipix Imager Onto The Manual Ball Head
USER MANUAL IPIX 7.6.1. Installing the iPIX imager onto the manual ball head 1. Screw the manual ball head onto the tripod's center support. 2. Check the tightness of the locking button and panning handle. 3. Attach the screw support onto the iPIX imager. -
Page 36: Installing The Ipix Imager On The Motorised Ball Head (Optional)
7.6.2. Installing the iPIX imager on the motorised ball head (optional) Section being written 96675_E.docx MIRION TECHNOLOGIES (Canberra) S.A.S 34 / 91 BP249, ZI de Vauzelles, 37602 Loches Cedex... -
Page 37: Installing The Nid Option
4. Disconnect the plug and connect the cable of the NID module (blue sleeve) to the base (blue ring) of the iPIX imager by aligning the red dot of the connector with the red line of the base. Red line Red dot 96675_E.docx... -
Page 38: Installing The Laser Telemeter Option
2. Insert the support on the rail of the options housing. 3. Check that it is locked by pulling and then releasing the lock. Options housing Lock 96675_E.docx MIRION TECHNOLOGIES (Canberra) S.A.S 36 / 91 BP249, ZI de Vauzelles, 37602 Loches Cedex... - Page 39 IPIX 4. Disconnect the plug and connect the cable of the laser telemeter (yellow sleeve) to the base (yellow ring) of the iPIX imager by aligning the red dot of the connector with the red line of the base. Red line Red dot 96675_E.docx...
-
Page 40: Installing The Rugged Handle Option
INSTALLING THE RUGGED HANDLE OPTION 7.9.1. Installing the options housing 1. Remove the standard handle of the iPIX imager. 2. Remove the rear anti-shock protection. 3. Slide the option housing onto the rails of the imager. 4. Lock the position of the options housing using the four cone-point set screws. -
Page 41: Installing The Rugged Handle
7.10. INSTALLING THE TORCH OPTION 1. Position the torch by inserting it into the enclosure, then tilting the flexible support backwards. Torch Flexible support Enclosure 96675_E.docx MIRION TECHNOLOGIES (Canberra) S.A.S 39 / 91 BP249, ZI de Vauzelles, 37602 Loches Cedex... -
Page 42: Connecting The Ipix Imager Cables
1. Remove the protective cap from the socket with the red ring. 2. Position the connector (with the red handle) by aligning the red dot on the connector with the red line on the iPIX imager's jack, then push until the connector locks. Red line Red dot 96675_E.docx... -
Page 43: Disconnecting The External Power Supply Cable
3. Re-attach the protective cap. 7.11.3. Connecting the PoE network cable 1. Position the network connector by lining up the locating pins with those on the iPIX imager jack, then push gently and turn the connector's ring until completely locked (1/4 turn). 7.11.4. -
Page 44: Installing The Laptop Computer
Charge light PC power supply connector Figure 30: Laptop computer 7.13. APPLYING POWER TO THE IPIX The iPIX can be powered by three connection modes: Battery connection PoE connection External power supply connection 96675_E.docx MIRION TECHNOLOGIES (Canberra) S.A.S... -
Page 45: Battery Connection
Laptop computer. Connect the 10m Ethernet cable or optional one provided on the reel (50m or 80m, 54.6yd or 87.5yd) between the output of the PoE power supply and the iPIX imager (see § Erreur ! Source du renvoi introuvable.). -
Page 46: External Power Supply Connection
7.13.3. External power supply connection In this configuration, the iPIX imager is powered by the external power supply and the imager 's internal battery charges. Note: This configuration requires a 230V AC or 110V AC jack near the imager. Connect the 10m Ethernet cable or the optional one on the reel (50m or 80m, 54.6yd or 87.5yd) between the PC and the iPIX imager (see §... -
Page 47: Using The Ipix
Note: If the iPIX imager is connected using the external power supply or the PoE power supply, start-up is automatic once powered up. The green LED of the symbol blinks whilst starting up. -
Page 48: Powering On The Motorised Ball Head (Option)
8.3. POWERING ON THE MOTORISED BALL HEAD (OPTION) Section being written 96675_E.docx MIRION TECHNOLOGIES (Canberra) S.A.S 46 / 91 BP249, ZI de Vauzelles, 37602 Loches Cedex... -
Page 49: Starting Up The Application
Do not remove or install a mask onto the imager during the phases below. A missing mask does not prevent the iPIX from operating. Note: The acquisition mode requires the connection of the iPIX imager. If the iPIX application is not started, click on the icon. The following screen is displayed, with a window for selecting the user mode: The usage window lets you choose between “Acquisition”... -
Page 50: Selecting The Acquisition Mode
Click on « OK », The message « Automatic mode» appears in the title of the window and the icon turns grey 96675_E.docx MIRION TECHNOLOGIES (Canberra) S.A.S 48 / 91 BP249, ZI de Vauzelles, 37602 Loches Cedex... -
Page 51: Acquisition
Power supply mode (Battery, mains or PoE) Mask identification The iPIX State pane shows the following status: Network, Visible Camera, Gamma Detector, Power, and the Mask ID. These icons are described in detailed in § 9.3. When in the Acquisition mode, the mask is identified to check its presence or absence and its type. -
Page 52: Identifying The Acquisition
Without the telemeter option, the measurement distance is set in the “Distance” field. Note: This value corresponds to the distance between the source and the iPIX imager. It is used to correct the parallax error between the gamma detector and the visible camera for superimposing the visible and gamma images. -
Page 53: Settings Of The Single Acquisition With The Telemeter Option
Note: This value corresponds to the distance between the source and the iPIX imager. It is used to correct the parallax of the gamma detector and the visible camera to display the superimposing of the visible and gamma images. -
Page 54: Saving Or Loading Software Parameters
At the bottom of the screen, the message “Optimising Measurement…” Note: During the optimisation process, the iPIX calculates the frame time (in other words the duration of each frame) and the total number of frames required to take a measurement based on the background noise and the activity of the source. - Page 55 (value out of 10) In manual mode, these values are completed by the quantification (in cps) and the uncertainty associated with this quantification as a (%) 96675_E.docx MIRION TECHNOLOGIES (Canberra) S.A.S 53 / 91 BP249, ZI de Vauzelles, 37602 Loches Cedex...
-
Page 56: Zoom And Colour Of The Image
Resets the image to its original size Moves the window down Moves the window up Moves the window left Moves the window right Black and white image Color image 96675_E.docx MIRION TECHNOLOGIES (Canberra) S.A.S 54 / 91 BP249, ZI de Vauzelles, 37602 Loches Cedex... -
Page 57: Level Of Transparency Of The Superimposed Image
Example of superimposed image at max opacity level Opacity to 25% Example of superimposed image with the decoded gamma image at an opacity level of 25% 96675_E.docx MIRION TECHNOLOGIES (Canberra) S.A.S 55 / 91 BP249, ZI de Vauzelles, 37602 Loches Cedex... -
Page 58: Superposition Level Of The Superimposed Image
Superposition scale of the decoded gamma image on the visible image Cursor at red level Cursor at green level Cursor at blue level 96675_E.docx MIRION TECHNOLOGIES (Canberra) S.A.S 56 / 91 BP249, ZI de Vauzelles, 37602 Loches Cedex... -
Page 59: Image Display Mode
The superimposed image (visible + decoded gamma with superposition threshold), by clicking on to view precisely the zone of the hot spot by enlarging and adjusting the transparency of the superimposed image using the cursor: 96675_E.docx MIRION TECHNOLOGIES (Canberra) S.A.S 57 / 91 BP249, ZI de Vauzelles, 37602 Loches Cedex... -
Page 60: Display In Thumbnail Mode
Image no. 1 Image no. 2 Example of the evolution of the decoded gamma image (icon Example of the evolution of the superimposed image (icon 96675_E.docx MIRION TECHNOLOGIES (Canberra) S.A.S 58 / 91 BP249, ZI de Vauzelles, 37602 Loches Cedex... -
Page 61: End Of The Acquisition
Note: Saving in GPX format is mandatory in order to be able to carry out reprocessing. Save the acquisition in SPE format, compatible with the MIRION TECHNOLOGIES SMI software, by clicking in the toolbar on Generate a report in PDF format by clicking in the toolbar on ... -
Page 62: Nid Acquisition
Note: The energy calibration cannot be modified in acquisition mode. To modify it, see § 8.9. In manual mode only, the edit button can be used to select a different library (see § 8.7). Automatic mode Manual mode 96675_E.docx MIRION TECHNOLOGIES (Canberra) S.A.S 60 / 91 BP249, ZI de Vauzelles, 37602 Loches Cedex... - Page 63 For the X axis, select the spectrum display mode (by Channel or in keV) For the Y axis, select the type of scale (linear, logarithmic) and the unit (count, cps) 96675_E.docx MIRION TECHNOLOGIES (Canberra) S.A.S 61 / 91 BP249, ZI de Vauzelles, 37602 Loches Cedex...
- Page 64 The spectrum is drawn with: Identification whether after replacement or not, then display of the mask installed on the iPIX imager in the “iPIX State” window, Results of the Position of measurement the cursor...
- Page 65 In manual mode, these values are completed by the quantification (in cps) and the uncertainty associated with this quantification as a (%) Automatic mode Manual mode 96675_E.docx MIRION TECHNOLOGIES (Canberra) S.A.S 63 / 91 BP249, ZI de Vauzelles, 37602 Loches Cedex...
- Page 66 Note: Saving in GPX format is mandatory in order to be able to reprocess a spectrum. Save the acquisition in SPE format, compatible with the MIRION TECHNOLOGIES SMI software, by clicking in the toolbar on Exit the application by clicking in the top-right of the screen on 96675_E.docx...
- Page 67 Calibrate the energy for the NID option (see § 8.9) Note: The reprocessing mode does not require the connection of the iPIX imager. If the application is started in acquisition mode, click on the icon of the toolbar. If the iPIX application is not started, click on the icon.
- Page 68 Select the saved file (extension .GPX or .gpx), the screen with the view of the visible camera of the save and the mask used during the acquisition are displayed: 96675_E.docx MIRION TECHNOLOGIES (Canberra) S.A.S 66 / 91 BP249, ZI de Vauzelles, 37602 Loches Cedex...
- Page 69 Select the “Imaging” tab: Modify the distance if necessary Note: The energy filtering can only be modified after an initial reprocessing (see § 8.8.7) 96675_E.docx MIRION TECHNOLOGIES (Canberra) S.A.S 67 / 91 BP249, ZI de Vauzelles, 37602 Loches Cedex...
- Page 70 In manual mode only, the edit button can be used to select a different library (see § 8.8.4). Automatic mode Manual mode If the NID option is not active, the message “iPIX NID was not connected” is displayed in the Note: tab.
- Page 71 During the reprocessing phase, the display zone successively shows the decoded gamma image, the superposition image and lastly the following 3D gamma image: 96675_E.docx MIRION TECHNOLOGIES (Canberra) S.A.S 69 / 91 BP249, ZI de Vauzelles, 37602 Loches Cedex...
- Page 72 Open a new .GPX saved file by clicking in the toolbar on , then run reprocessing again. Click on the icon to close the current measurement and start new processing. 96675_E.docx MIRION TECHNOLOGIES (Canberra) S.A.S 70 / 91 BP249, ZI de Vauzelles, 37602 Loches Cedex...
- Page 73 After selection of the filtering level, the reprocessing is carried out automatically. Example without filtering with source of Cs and Example of filtering of low energies with source of Cs and 96675_E.docx MIRION TECHNOLOGIES (Canberra) S.A.S 71 / 91 BP249, ZI de Vauzelles, 37602 Loches Cedex...
- Page 74 Example of filtering of medium energies with source of Cs and 96675_E.docx MIRION TECHNOLOGIES (Canberra) S.A.S 72 / 91 BP249, ZI de Vauzelles, 37602 Loches Cedex...
- Page 75 USER MANUAL IPIX 8.8.8. Measurement report Example of report of a Cs acquisition with NID option. 96675_E.docx MIRION TECHNOLOGIES (Canberra) S.A.S 73 / 91 BP249, ZI de Vauzelles, 37602 Loches Cedex...
- Page 76 96675_E.docx MIRION TECHNOLOGIES (Canberra) S.A.S 74 / 91 BP249, ZI de Vauzelles, 37602 Loches Cedex...
- Page 77 USER MANUAL IPIX 96675_E.docx MIRION TECHNOLOGIES (Canberra) S.A.S 75 / 91 BP249, ZI de Vauzelles, 37602 Loches Cedex...
- Page 78 96675_E.docx MIRION TECHNOLOGIES (Canberra) S.A.S 76 / 91 BP249, ZI de Vauzelles, 37602 Loches Cedex...
- Page 79 USER MANUAL IPIX 96675_E.docx MIRION TECHNOLOGIES (Canberra) S.A.S 77 / 91 BP249, ZI de Vauzelles, 37602 Loches Cedex...
- Page 80 Selection of the channel using the mouse To delete a calibration point already present, select it from the list, then click on the “Remove” button 96675_E.docx MIRION TECHNOLOGIES (Canberra) S.A.S 78 / 91 BP249, ZI de Vauzelles, 37602 Loches Cedex...
- Page 81 Click on the “Save” button Check the coherence of the values obtained for the gain and the offset: E (keV) = channel *gain (keV/channel) + offset (keV) 96675_E.docx MIRION TECHNOLOGIES (Canberra) S.A.S 79 / 91 BP249, ZI de Vauzelles, 37602 Loches Cedex...
- Page 82 8.11. CHARGING THE IPIX IMAGER BATTERY The battery of the iPIX imager is charged only when installed in the iPIX imager, with the external power supply (see § 6.1.4). Charging can be performed independently of the system. The iPIX imager will start automatically on powering on the external power supply.
- Page 83 IPIX 8.12. STOPPING THE PORTABLE PC Stop the PC tablet after exiting the iPIX application. Always use the operating system feature to stop the portable PC. See the manufacturer's documentation for details of how to carry out the procedure. 8.13.
- Page 84 Confirm by completing the “Re-enter your new password” field and then click on “OK”. 9.1.3. Help menu The “Help” menu is used to view: The software version and the icon. The user manual in PDF format. 96675_E.docx MIRION TECHNOLOGIES (Canberra) S.A.S 82 / 91 BP249, ZI de Vauzelles, 37602 Loches Cedex...
- Page 85 Command “Load a measurement” Used to load a GPX file of an acquisition. Command “Turn the imager using the motorized ball head”: Used to direct the iPIX imager when used with the motorised ball head. Acquisition ready to start Acquisition in progress ...
- Page 86 Display in single screen mode active, switch to thumbnail mode by clicking on the icon. Display of the iPIX software version. 96675_E.docx MIRION TECHNOLOGIES (Canberra) S.A.S 84 / 91 BP249, ZI de Vauzelles, 37602 Loches Cedex...
- Page 87 Battery status flat, charging PoE power supply connected without battery Mask not identified or absent In acquisition, red mask identified and present on the iPIX imager: “Mask R7-8” In reprocessing, indicates that the red mask has been used In acquisition, yellow mask identified and present on the iPIX imager: “Mask R7-4”...
- Page 88 FEATURES 10.1. MECHANICAL FEATURES AND ENVIRONMENT 10.1.1. Basic iPIX kit case Dimensions (H x L x W): 262mm x 670mm x 510mm (10.3in x 26.3in x 20in) Empty weight: 9.17kg (20.21lb). Full weight: 21,8kg (48lb). Operating temperatures: -10°C to +45°C (14°F to 113°F).
-
Page 89: Manual Ball Head
Voltage Rating: 3.75V DC Capacity: 5300mAh. Charge Time: Approximately 3 hours at 25°C (77°F) Run time: up to 5 hours 10.2.3. iPIX external power supply Supply voltage: 100-240V / 47-63Hz. Supply voltage: 0.8-0.4A. Output voltage: 5.0V DC 96675_E.docx MIRION TECHNOLOGIES (Canberra) S.A.S... -
Page 90: Poe Power Supply
Supply voltage: 24V DC 10.2.10. Motorized ball head (option) Section being writtenMotorised ball head battery (option) Section being writtenFlashlight (option) Supply voltage: 4 x Battery AAA 1,5V 96675_E.docx MIRION TECHNOLOGIES (Canberra) S.A.S 88 / 91 BP249, ZI de Vauzelles, 37602 Loches Cedex... -
Page 91: Physical And Performance Features
Detector: 256x256 pixels, TIMEPIX technology Sensitivity: The iPIX's sensitivity was experimentally evaluated for sources of Co and Minimum necessary time and frames to locate a source are displayed in the table below: Dose rate at Mask Minimum frames... -
Page 92: Nid Option
2 PC Card/ExpressCard/Smartcard compartments (not used) 1 x SD/SDHC/SDXC memory card reader (not used) 1 x battery compartment 1 x hard drive compartment 96675_E.docx MIRION TECHNOLOGIES (Canberra) S.A.S 90 / 91 BP249, ZI de Vauzelles, 37602 Loches Cedex... -
Page 93: Motorised Ball Head Option
Tripod height in high position: 1395mm. Tripod height in low position: 60mm Nominal load: 4kg. Max load: 5kg. 10.3.7. Manual ball head 3/8” socket Quick disconnect 1/4” screw support 96675_E.docx MIRION TECHNOLOGIES (Canberra) S.A.S 91 / 91 BP249, ZI de Vauzelles, 37602 Loches Cedex...
Need help?
Do you have a question about the iPIX and is the answer not in the manual?
Questions and answers