Table of Contents
Advertisement
Quick Links
Specifications:
Three bands, choose 3 - 40M, 30M, 20M or 17M.
80M possible, but filter parts not supplied.
Receiver:
MDS: ~0.2 uV
Small signal band width ~ 500 Hz
Audio output limited to ~ 1200 mv p-p
Headphone output, 16 ohms min recommended.
Minimum current (no signal) ~40 ma
Transmitter:
2.5 watts @ 9 volt supply typical
Spurs -50 dBc or better
Table of Contents
Assembly:......................................................................2
Check out and Calibration:...........................................13
adjustment:........................................................14
BFO adjustment: ..............................................14
Receiver input peaking:.....................................14
adjustment:........................................................14
Basic operation:...........................................................18
Turning the rig on and off:.......................................18
Band selection:.......................................................18
Volume control: ......................................................18
Input attenuator:......................................................18
Control switches:....................................................19
Frequency tuning: ..................................................19
Tuning limits: .....................................................19
RIT:.........................................................................19
MENU:....................................................................20
Quick selections: ....................................................20
DFE Mode: .......................................................20
Tune Mode: .......................................................20
1
The Mountain Topper
(revised 4-10-14)
A very small, very efficient, three band rig
KD1JV Designs
580 Durand Rd
Randolph, NH 03593
http://kd1jv.qrpradio.com
Tri-bander
By
steve.kd1jv@gmail.com
Battery Voltage:.................................................21
Fn switch only selected functions:..........................21
Frequency readout: ................................................21
S: Selecting Keyer code speed..........................21
M: Keyer Memory entry: ..................................21
Checking and storing the message:...................22
Sending messages: ..........................................22
Beacon Mode:...................................................22
P: Program user preferences.............................23
Straight key mode:..................................................23
Operating voltages: ................................................23
HIGH SWR CAUTION: .....................................23
Advertisement
Table of Contents

Related Manuals for KD1JV Designs Mountain Topper

Summary of Contents for KD1JV Designs Mountain Topper
-
Page 1: Table Of Contents
The Mountain Topper Tri-bander (revised 4-10-14) A very small, very efficient, three band rig KD1JV Designs 580 Durand Rd Randolph, NH 03593 http://kd1jv.qrpradio.com steve.kd1jv@gmail.com Specifications: Three bands, choose 3 - 40M, 30M, 20M or 17M. 80M possible, but filter parts not supplied. -
Page 2: Assembly
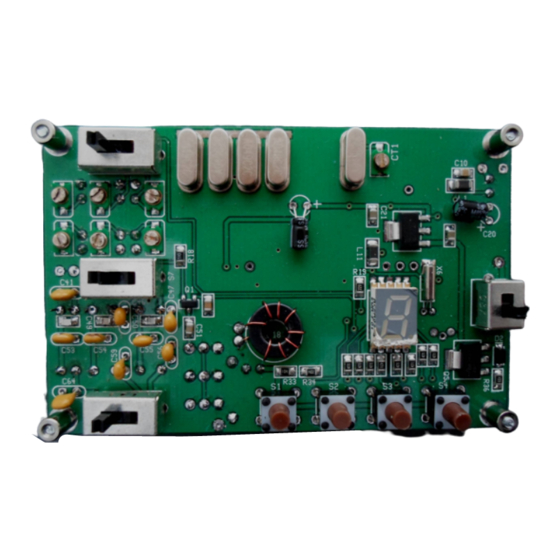
Assembly: ● Your work area should be reasonably clean and uncluttered. Good lighting is a must. Empty the packets containing the parts into small paper bowls. This will ensure that they do not get ● lost. Some people like to do the assembly over a cookie sheet as the lip around the edge helps to keep parts from going far. - Page 3 Using the parts placement guides: The parts placement guides on the following pages are color coded to show the location of the various types of parts. Parts to be installed are highlighted in various colors to help identify their locations. The guides are scaled so that the writing on them is easy to see on a computer monitor and come out crisper after the conversion to pdf.
- Page 4 Component location diagrams These diagrams show the overall part locations and values. This page can be printed out to help locate part locations. Color highlighting is used to help identify component type, not value. Blue = capacitors, Yellow = resistors, Red and orange = inductors, gray = semiconductors or through hole parts.
- Page 5 Parts list: QTY Part number Color code or location/description QTY Value Color code or value # value # 1 or The extra 51 or 270 resistor used to select 17M band SA612A U1, U4 MIXER option. LM4808M U3 AUDIO AMP 3 or 50-50 chance of getting the 51 or 270 resistor.
- Page 6 Semiconductor placement Finding Pin 1. Some of the ICs used in this kit have a dot or ● indentation at the Pin 1 corner of the chip. For others, the Pin 1 locations isn't as obvious. The manufactures logo is sometimes used (as is the case for U1 and U3) or sometimes there is a line along the Pin 1 end of the chip.
- Page 7 Bottom side semiconductors: LOCATION PART # PACKAGE AD9834 TSSOP-20 F2132 TSSOP-28 Red/702 SOT-23 Yellow /A7 SOT-23 U1/U4 SA612A SO-8 LM386 S0-8 LM4808 SO-8 74AC02 SO-14 -- W8 2 leads Blue/A5xx SOT23-5 ---- CC5x SOT-23-6 50.00 silver 2955 SOT-223 Remember, Q3 is in parts carrier, not loose NOTE: The lettering on U5 and U6 will be “up side down”...
- Page 8 Resistors : Bottom ● Since part designation numbers for most parts are not printed on the board, you will need to use the diagram to locate where the part goes. Pay careful attention to where the part is located to be sure it doesn't go where a cap will go later.
- Page 9 Capacitors : Bottom Capacitors are now numbered and color coded in a manor similar to through hole resistors so that their values are more easily identified. The “sprocket” side (the side with the holes) is the least significant digit. Therefore, a 0.1 ufd cap will be numbered “104”...
- Page 10 TOP RESISTORS: Value # places location R25 to R32 1402 Blue 2 (10 uH L1, L11 inductor) TOP CAPACITORS: Value Color code # places 102 (yellow) BRN/BLK/RED 1 103 (blue) BRN/BLK/ORG 1 104 (purple) BRN/BLK/YEL CT1-7 Green trimmer Note notched end of trimmer cap and match with outline on board.
- Page 11 Through hole parts: (use your normal solder {.02 or /.032} for most of these parts) When removing these parts from the plastic bag, keep a look out for the small watch crystal which could easily get lost. The threaded spacers are in with the hardware. ●...
- Page 12 Final board inspection: The board should now be fully populated with the parts. Before wiring up the board to the jacks for testing, do a close inspection of all the solder connections with a magnifying glass. A few minutes inspecting your work and fixing any problems now will save a lot of time later.
-
Page 13: Check Out And Calibration
Check out and Calibration: lean the board of any flux residue. This will help in inspecting all the solder connections. “Electrical Parts Cleaner”, available at most commercial electrical parts suppliers works well to remove flux. Denatured alcohol will also work. Avoid rubbing alcohol, as this leaves a white residue. -
Page 14: Local Oscillator Frequency Trim And Bfo Adjustment
5. Connect a frequency counter to DDS TP1. 6. Wait a minute or two for the oscillator to stabilize. 7. Using the tune up and tune down switches, adjust the frequency at TP1 to exactly 10.000,000 MHz. 8. Once the frequency is adjusted, click the Fn switch to store the new reference frequency. 9. - Page 15 Final steps: After testing and before you mount the board into the case and do the final wiring, poke holes in the black felt to line up with the PB switches and then trim the felt as shown to the left. This helps keep grit out of the case and makes it look a little better.
- Page 16 Troubleshooting: With careful assembly, the MTR should power up and work great the first time power is applied. But we all know that sometimes doesn't happen and you'll have to figure out why. In nearly all cases, any problem can be tracked down to soldering issues, usually missing connections. On occasion, the connection can look good as there is solder there, but it did not stick to the pad under the part.
- Page 17 Voltage charts: 1.4V RFIN 5.0V 2.5V 5.0V 1.4V RFIN 4.3V 2.5V 2.5V 4.9V 2.5V 2.5V 3.9V 3.9V 2.5V U1/U4 SA612 mixer oscillator U3 LM4808 audio amp gain gain 2.2V Audio in P6 3.5V Control 5.0V ST in 2.2V Audio out 2.5V U5 Analog SPDT switch U2 LM386 audio amp...
-
Page 18: Basic Operation
Operation: Basic operation: Turning the rig on and off: The slide switch to the right of the display turns the power on and off. There was suppose to be international on/off icons to label the switch, but somehow these got dropped from the silkscreen artwork and didn't get noticed. -
Page 19: Control Switches
Control switches: ● Four push button switches control the operation of the Mountain Topper. ● All switches have multiple functions. The primary function of each switch is labeled in BLACK in the switch function flow diagram shown to the right. ●... -
Page 20: Menu
Between 500 and 950Hz, the top or bottom segment will light. ● ● Above 1000 Hz, the upper right or bottom right segment will light. ● AT 1500 Hz, the tuning limit, a beep will sound in the side tone. Toggling between the RIT Rx frequency and the RX = Tx frequency: Momentarily pushing the <Fn>... -
Page 21: Battery Voltage
Exit Tune mode: Click Fn switch, “E” annunciated. ● Battery Voltage: This mode reads the input voltage to the board and then displays it on the LED display and annunciated in Morse. The letter “B” is sent before the digits during Morse annunciate. A dash [-] is used to indicate the decimal point since the display decimal point is always on as a power on indicator. -
Page 22: Checking And Storing The Message
Timing for determining letter and word spaces is automatic and is based on “ideal” timing. Since many of us have a hard time sending with ideal letter and word space timing, generally running letter groups and words together, segments on the LED will flash to let you know when a letter time out or word space time out has occurred. The upper left LED segment (f) will flash at the letter space interval and the upper right segment (b) will flash at the word space time out. -
Page 23: P: Program User Preferences
P: Program user preferences “P” on the display This mode stores the current state of the rig into Flash memory to use as the default values on power up. The current operating frequencies for each band will become the power up frequencies, along with the current code speed. - Page 24 Schematics Receiver section:...
- Page 25 CPU / TRANSMITTER Sections:...
- Page 26 Using the rig in the field: So, how the heck to you use a tiny radio while sitting on a rock on top of a mountain anyway? Here's an idea for a portable lap board to which the rig, tuner, paddle, batteries and notepaper mount to: A common clip board is used! With this set up you can sit on a rock or log with the clip board resting on your legs.
Need help?
Do you have a question about the Mountain Topper and is the answer not in the manual?
Questions and answers