Advertisement
Available languages
Available languages
Quick Links
Montage- und Bedienungsanleitung / Instructions de montage et
d'utilisation / Installation and Mounting Instructions / Montage-
en bedieningshandleiding / Instrucciones de montaje y de uso
Ref. 900380
DEUTSCH
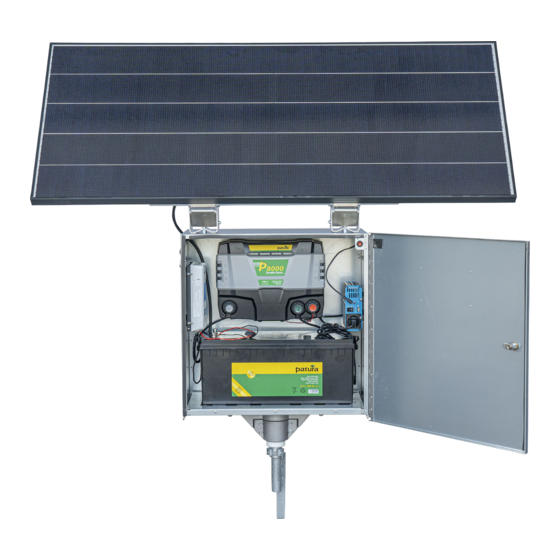
P 8000 mit Sicherheitsbox XL und Solarmodul 200 W
P 8000 dans le boîtier antivol XL avec module solaire 200 W / P 8000 with Safety Box XL and Solar panel 200 W /
P 8000 met Veiligheidsbox XL en Zonnepaneel 200 W / P 8000 en la caja antirrobo XL con módulo solar de 200 W
00 49 93 72
94 74 – 0
Für den Aufbau wird zusätzlich benötigt:
Aufbau mit 2 Personen in ca. 30 min
• Schraubenschlüssel-Satz
• Inbusschlüssel-Satz
• Bohrer 7 mm
• Bohrmaschine
Advertisement

Subscribe to Our Youtube Channel
Summary of Contents for patura P 8000
- Page 1 P 8000 mit Sicherheitsbox XL und Solarmodul 200 W P 8000 dans le boîtier antivol XL avec module solaire 200 W / P 8000 with Safety Box XL and Solar panel 200 W / P 8000 met Veiligheidsbox XL en Zonnepaneel 200 W / P 8000 en la caja antirrobo XL con módulo solar de 200 W 00 49 93 72 94 74 –...
- Page 2 Montage- und Bedienungsanleitung Lieferumfang: Stück Bezeichnung Sicherheitsbox XL mit Weidezaungerät P 8000, Laderegler und Wechselrichter Solarmodul 200 W, mit Anschlusskabel Halter für Solarmodul bestehend aus: Solarmodulhalter-Oberteil aus Aluminium Solarmodulhalter-Unterteil aus Aluminium Querstreben Erdstab Stabilisierungsfuß M6 x 30 M6 x 100...
- Page 3 Separat bestellen / Ersatzteile: Stück Bezeichnung Super-Vlies-Akku 12 V / 200 Ah (Ref. 133630) Erdstab (Ref. 161903) Stabilisierungsfuß (Ref. 161905) Distanzhülse Federring M6 Federring M8...
- Page 4 Montage- und Bedienungsanleitung Beschreibung In der Sicherheitsbox XL lassen sich die Elektrozaungeräte mit Impulsenergien von bis zu 15 J (P 8000) unterbringen. Sie eignet sich dadurch besonders für lange Zäune mit starkem Bewuchs. Mit den extra großen Solarmodulen und einem 200 Ah Akku ist ein wartungsfreier Betrieb von April bis Oktober möglich.
- Page 5 Montage der Sicherheitsbox XL Schlagen Sie den mitgelieferten Stabilisierungsfuß an der Stelle in den Boden ein, an der Sie auch den Erdstab positionieren möchten. Führen Sie den Erdstab durch die Hülse des Stabilisierungsfußes und schlagen Sie ihn komplett in den Boden ein. M10 x 60...
- Page 6 Montage- und Bedienungsanleitung Montieren Sie die Sicherheitsbox XL mit dem bereits vormontierten Weidezaungerät auf dem Erdstab Montage Solarmodul Montieren Sie die Querstreben mit den Senkkopfschrauben auf die Halter-Oberteile M6 x 20...
- Page 7 Legen Sie den Halter mit den Querstreben auf die Rückseite des Solarmoduls und befestigen Sie ihn. M8 x 30 Montage des Solarmoduls auf der Sicherheitsbox XL Bohren Sie die Löcher an den gekennzeichneten (angekörnten) Positionen an der Oberseite der Sicherheitsbox Rückseite Ansicht von oben 4x Bohren Ø...
- Page 8 Montage- und Bedienungsanleitung Montieren Sie die Unterteile des Solarmodulhalters auf den dafür vorgesehenen Bohrungen auf der Sicherheitsbox und schrauben Sie die Halter auf der Box fest. M6 x 30 Distanzhülse...
- Page 9 Montieren Sie das vorbereitete Solarmodul an den Haltern auf der Sicherheitsbox XL M6 x 100...
- Page 10 Montage- und Bedienungsanleitung Verbinden Sie die Steckverbinder miteinander und fixieren Sie die Kabel mit Hilfe von Kabelverbindern. Schließen Sie den Laderegler an den Akku an. Polarität beachten.
- Page 11 Verbinden Sie die Sicherheitsbox XL mit Ihrem Elektrozaun mittels dem mitgelieferten Zaunverbindungskabel.
- Page 12 Montage- und Bedienungsanleitung Inbetriebnahme Wechselrichter und P 8000 Unbedingt folgende Reihenfolge einhalten! Schalter des Wechselrichters auf Position „OFF“ stellen (grüne LED leuchtet nicht). Schuko-Stecker des P 8000 in den Wechselrichter einstecken.
- Page 13 Stecker des Türkontaktschalters in den Wechselrichter einstecken. Verschließen Sie die Box mit dem isolierten Schlüssel. Ab jetzt steht die Sicherheitsbox unter Spannung.
- Page 14 P 8000 ist in Betrieb und die Sicherheitsbox-XL steht unter Spannung Wenn der Schalter am Wechselrichter auf „ON“ geschaltet wird und der Stecker des P 8000 eingesteckt ist, ist das Gerät eingeschaltet. Sicherheitsbox XL und Zaun sind auch bei geöffneter Tür...
- Page 15 Bei geöffneter und geschlossener Tür: P 8000 ist ausgeschaltet und die Sicherheitsbox-XL steht nicht unter Spannung Wenn der Schalter am Wechselrichter auf „ON“ geschaltet wird und der Stecker des P 8000 eingesteckt ist, stehen Sicherheitsbox XL und Zaun auch bei geöffneter Tür unter Spannung.
- Page 16 / Instrucciones de montaje y de uso In der Sicherheitsbox XL lassen sich die Elektrozaungeräte mit Impulsenergien von bis zu 15 J (P 8000) unterbringen. Sie eignet sich dadurch besonders für lange Zäune mit starkem Bewuchs. Mit den extra großen Solarmodulen und einem 200 Ah Akku ist ein wartungsfreier Betrieb von April bis Oktober möglich.
- Page 17 P 8000 mit Sicherheitsbox XL und Solarmodul 200 W / P 8000 with Safety Box XL and Solar panel 200 W / P 8000 met Veiligheidsbox XL en Zonnepaneel 200 W / P 8000 en la caja antirrobo XL con módulo solar de 200 W 00 49 93 72 94 74 –243...
-
Page 18: Instructions De Montage Et D'utilisation
Contenu de la livraison : Pièce Désignation Boîtier antivol XL avec électrificateur P 8000, régulateur de charge et convertisseur de tension Module solaire 200 W avec câble de raccordement Support pour module solaire composé de : Partie supérieure en aluminium Partie inférieure en aluminium... - Page 19 A commander séparément / Pièces de rechange : Pièce Désignation Batterie AGM 12 V / 200 Ah (Ref. 133630) Piquet de terre (Ref. 161903) Pied stabilisateur (Ref. 161905) Douilles d‘espacement Rondelles élastique M6 Rondelles élastique M8...
-
Page 20: Conseils D'utilisation
Description Tous les électrificateurs atteignant une énergie d'impulsion jusqu'à 15 J (P 8000) peuvent être montés dans le boîtier antivol XL. Ce dernier est donc particulièrement adapté aux longues clôtures avec une végétation dense. Equipé du module solaire XL et d’une batterie de 200 Ah, un fonctionnement sans entretien sera possible d'avril à... - Page 21 Montage du boîtier antivol XL Enfoncez le pied stabilisateur fourni dans le sol, à l‘endroit où vous souhaitez également positionner le piquet de terre Insérez le piquet de terre dans la douille du pied stabilisateur et enfoncez-le complètement dans le sol. M10 x 60...
- Page 22 Instructions de montage et d‘utilisation Montez le boîtier antivol XL avec l‘électrificateur déjà prémonté sur le piquet de terre Montage du module solaire Montez les entretoises sur les parties supérieures du support à l‘aide des vis à tête fraisée. M6 x 20...
- Page 23 Placez le support avec les entretoises sur la face arrière du module solaire et fixez-le. M8 x 30 Fixation du module solaire sur le boîtier antivol XL Percez les trous aux endroits indiqués (gravés) sur la partie supérieure du boîtier antivol Face arrière Vue d‘en haut 4x Perçage Ø...
- Page 24 Instructions de montage et d‘utilisation Montez les parties inférieures du support du module solaire sur le boîtier antivol XL en tenant compte des perçages prévus à cet effet et vissez les supports sur le boîtier. M6 x 30 Douille d' e spacement...
- Page 25 Fixez le module solaire prémonté sur les supports du boîtier antivol XL M6 x 100...
- Page 26 Instructions de montage et d‘utilisation Reliez les connecteurs entre eux et fixez les câbles à l’aide des serre-câbles. Connectez le régulateur de charge à la batterie en respectant la polarité.
- Page 27 Connectez le boîtier antivol XL à votre clôture électrique à l‘aide du câble de connexion de clôture fourni.
- Page 28 Instructions de montage et d‘utilisation Mise en service du convertisseur et du P 8000 Veuillez respecter l’ordre suivant ! Positionnez l’interrupteur du convertisseur sur « OFF » (le voyant vert est éteint) Branchez la prise du P 8000 au convertisseur.
- Page 29 Branchez la fiche de l‘interrupteur de contact de la porte au convertisseur Refermez le boîtier à l’aide de la clé isolée. Le boîtier antivol est maintenant sous tension.
- Page 30 Lorsque la porte est fermée : Le P 8000 et le boîtier XL sont sous tension Lorsque l‘interrupteur du convertisseur est sur « ON » et que la prise du P 8000 est branchée, le boîtier et la clôture sont sous tension même lorsque la porte est ouverte.
- Page 31 Lorsque la porte est ouverte ou fermée : Le P 8000 est éteint et le boîtier antivol XL n’est pas sous tension Si l‘interrupteur du convertisseur est sur « ON » et que la prise du P 8000 est branchée, le boîtier...
- Page 32 / Instrucciones de montaje y de uso Tous les électrificateurs atteignant une énergie d'impulsion jusqu'à 15 J (P 8000) peuvent être montés dans le boîtier antivol XL. Ce dernier est donc particulièrement adapté aux longues clôtures avec une végétation dense. Equipé du module solaire XL et d’une batterie de 200 Ah, un fonctionnement sans entretien sera possible d'avril à...
- Page 33 P 8000 with Safety Box XL and Solar panel 200 W P 8000 mit Sicherheitsbox XL und Solarmodul 200 W / P 8000 dans le boîtier antivol XL avec module solaire 200 W / P 8000 met Veiligheidsbox XL en Zonnepaneel 200 W / P 8000 en la caja antirrobo XL con módulo solar de 200 W 00 49 93 72 94 74 –242...
-
Page 34: Installation And Mounting Instructions
Installation and Mounting Instructions Included in delivery: Description Safety Box XL with energiser P 8000, charge controller and inverter Solar Panel 200 W with connection cable Mounting bracket for Solar Panel: Mounting bracket, top part, made from aluminium Mounting bracket, bottom part, made from aluminium... - Page 35 Order seperately / Spare parts: Description Super Glass Mat Battery 12 V / 200 Ah (Ref. 133630) Earth Stake (Ref. 161903) Stabilisation stand (Ref. 161905) Spacer sleeve Spring washer M6 Spring washer M8...
-
Page 36: Application Information
Installation and Mounting Instructions Description When correctly sized, PATURA solar installations are designed to run an electric fence installation, maintenance-free, from spring through autumn. If the energiser is switched down to a lower power level, this maintenance-free operation can be continued throughout the winter. - Page 37 Mounting of Safety Box XL Drive in the supplied stabilisation stand at the desired position, where the earth stake should be positioned. Insert the earth stake through the sleeve of the stabilisation stand and drive it completely into the ground. M10 x 60...
- Page 38 Installation and Mounting Instructions Mount the Safety Box XL with the pre-assembled energiser on the earth stake Mounting Solar Panel Mount the cross braces with the countersunk screws to the mounting bracket top parts M6 x 20...
- Page 39 Attach the mounting bracket with the cross braces to the backside of the Solar Panel and fix it. M8 x 30 Mounting Solar Panel to the Safety Box XL Drill the holes at the marked (punch-marked) positions on the top side of the Safety Box Backside Top-down view Drill 4 times Ø...
- Page 40 Installation and Mounting Instructions Attach the mounting bracket bottom parts at the provided holes on the Safety Box XL and screw the mounting brackets to the box. M6 x 30 Spacer sleeve...
- Page 41 Attach the prepared Solar Panel at the mounting brackets of the Safety Box XL M6 x 100...
- Page 42 Installation and Mounting Instructions Connect the plug-in connectors together and fix them by using cable ties. Connect the charge controller and the energiser to the battery . Observe correct polarity.
- Page 43 Connect the Safety Box XL with the electric fence by using the supplied fence connecting cable.
- Page 44 Installation and Mounting Instructions Commissioning inverter and P 8000 It it important to observe the following sequence! Set the switch of the invertert to the „OFF“ position (green LED does not light-up). Insert the SCHUKO plug of the P 8000 into the inverter.
- Page 45 Insert the plug of the door contact switch into the inverter. Close the box with the insulated key. Now the safety box is under voltage.
- Page 46 With closed door: P8000 is in operation and the Safety Box XL is live If the switch of the inverter is on the „ON“ position and the plug of the P 8000 is inverted, the energiser is switched on. The Safety Box XL and the fence are live even when the door is open.
- Page 47 With opened and closed door: P 8000 is switched off and the Safety Box is not live If the switch of the inverter is on the „ON“ position and the plug of the P 8000 is inverted, the Safety Box XL and the fence are live even when the door is open.
- Page 48 An additional stabilisation stand ensures optimum support even on light soils. PATURA KG • Germany Tel. 00 49 93 72 94 74 – 0 www.patura.com Mainblick 1 • 63925 Laudenbach Fax 00 49 93 72 94 74 – 29...
- Page 49 P 8000 mit Sicherheitsbox XL und Solarmodul 200 W / P 8000 dans le boîtier antivol XL avec module solaire 200 W / P 8000 with Safety Box XL and Solar panel 200 W / P 8000 en la caja antirrobo XL con módulo solar de 200 W 00 49 93 72 94 74 –244...
- Page 50 Montage- en bedieningshandleiding Leveringsomvang: Stuk Omschrijving Veiligheidsbox XL met schrikdraadapparaat P 8000, laadregelaar en Omvormer Zonnepaneel 200 W, met aansluitkabel Houder voor zonnepaneel bestaande uit: Zonnepaneelhouder - bovenste deel aluminium Zonnepaneelhouder onderste deel aluminium Dwarsliggers Aardstaaf Stabilisatievoet M6 x 30...
- Page 51 Afzonderlijk bestellen / reserveonderdelen: Stuk Omschrijving Super vlies accu 12 V / 200 Ah (Ref. 133630) Aardstaaf (Ref. 161903) Stabilisatievoet (Ref. 161905) Afstandhouder Veerring M6 Veerring M8...
- Page 52 Montage- en bedieningshandleiding Beschrijving In de beveiligingsbox XL kunnen de schrikdraadapparaten met pulsenergieën tot 15 J (P 8000) worden ondergebracht. Dit maakt hem bijzonder geschikt voor lange afrasteringen met zware begroeiing. Met de extra grote zonnepanelen en een 200 Ah accu is een onderhoudsvrij bedrijf mogelijk van april tot oktober.
- Page 53 Montage van de veiligheidsbox XL Sla de meegeleverde stabilisatievoet in de grond op het punt waar je ook de aardstaaf wilt plaatsen. Steek de aardstaaf door de huls van de stabilisatievoet en sla deze helemaal in de grond. M10 x 60...
- Page 54 Montage- en bedieningshandleiding Monteer de veiligheidsbox XL met het reeds voorgemonteerde schrikdraadapparaat op de aardstaaf Montage zonnepaneel Monteer de dwarsliggers met de verzonken schroeven op de eindstukken van de houders M6 x 20...
- Page 55 Plaats de houder met de dwarsliggers op de achterkant van zonnepaneel en bevestig dit. M8 x 30 Montage van het zonnepaneel op de veiligheidsbox XL Boor de gaten op de gemarkeerde posities aan de bovenkant van de veiligheidsbox Achterkant Bovenaanzicht 4x boren Ø...
- Page 56 Montage- en bedieningshandleiding Monteer de onderste delen van de zonnepaneelhouder op de daarvoor bestemde boringen op de veiligheidsbox en schroef de houders op de box vast. M6 x 30 Afstandhouder...
- Page 57 Monteer het voorbereide zonnepaneel op de houders op de veiligheidsbox XL M6 x 100...
- Page 58 Montage- en bedieningshandleiding Verbind de connectoren met elkaar en bevestig de kabels met behulp van de kabelbinders. Sluit de laadregelaar en het schrikdraadapparaat aan op de accu . Let op de polariteit.
- Page 59 Verbind de veiligheidsbox XL met de elektrische afrastering door middel van de meegeleverde hekverbindingskabel.
- Page 60 Montage- en bedieningshandleiding Ingebruikname omvormer en P 8000 Absoluut de aangegeven volgorde aanhouden! Zet de schakelaar van de omvormer in de stand „OFF“ (groene LED brandt niet). Schuko stekker van de P 8000 in de omvormer steken.
- Page 61 Stekker van de deurcontactschakelaar in de omvormer steken. Sluit de box met de geïsoleerde sleutel. Vanaf nu staat de box onder spanning.
- Page 62 P 8000 is in werking en de veiligheidsbox-XL staat onder spanning Wordt de schakelaar van de omvormer op „ON“ gezet en is de stekker van de P 8000 ingestoken, dan wordt het apparaat ingeschakeld. De box en de afrastering staan onder spanning,...
- Page 63 P 8000 is uitgeschakeld en de veiligheidsbox-XL staat niet onder spanning Als de schakelaar van de omvormer op „ON“ wordt gezet en de stekker van de P 8000 is ingestoken, staan de box en het afrastering onder spanning, ook als de deur open is.
- Page 64 / Instrucciones de montaje y de uso In de beveiligingsbox XL kunnen de schrikdraadapparaten met pulsenergieën tot 15 J (P 8000) worden ondergebracht. Dit maakt hem bijzonder geschikt voor lange afrasteringen met zware begroeiing. Met de extra grote zonnepanelen en een 200 Ah accu is een onderhoudsvrij bedrijf mogelijk van april tot oktober.
- Page 65 P 8000 en la caja antirrobo XL con módulo solar de 200 W P 8000 mit Sicherheitsbox XL und Solarmodul 200 W / P 8000 dans le boîtier antivol XL avec module solaire 200 W / P 8000 with Safety Box XL and Solar panel 200 W / P 8000 met Veiligheidsbox XL en Zonnepaneel 200 W 00 49 93 72 94 74 –243...
-
Page 66: Volumen De Suministro
Instrucciones de montaje y de uso Volumen de suministro: Denominación Unidades Caja de protección antirrobo XL con energizador P 8000, controlador de carga e inversor Módulo solar de 200 W con cable de conexión Soporte para módulo solare compuesto por: Parte superior de aluminio... - Page 67 Pedir por separado / piezas de repuesto: Denominación Unidades Batería super seca 12 V / 200 Ah (Ref. 133630) Toma de tierra (Ref. 161903) Pie estabilizador (Ref. 161905) Casquillo espaciador Arandela elástica M6 Arandela elástica M8...
-
Page 68: Instrucciones De Uso
Descripción La caja de seguridad XL puede alojar unidades de cercado eléctrico con energías de impulso de hasta 15 J (P 8000). Es Por lo tanto, es especialmente adecuado para vallas largas con mucha vegetación. Con los módulos solares extra grandes y una batería de 200 Ah, es posible un funcionamiento sin mantenimiento desde abril hasta octubre. - Page 69 Montaje de la caja antirrobo XL Introduzca el pie estabilizador suministrado en el suelo en el punto en el que también desea colocar la toma de tierra Pase la toma de tierra por el manguito del pie estabilizador e introdúzcala completamente en el suelo. M10 x 60...
- Page 70 Instrucciones de montaje y de uso Monte la caja antirrobo XL con el energizador premontado en la toma de tierra Montaje del módulo solar Monte las barras transversales con los tornillos avellanados en las partes superiores del soporte M6 x 20...
- Page 71 Coloque el soporte con las barras transversales en la parte posterior del módulo solar y fíjelo. M8 x 30 Montaje del módulo solar en la caja antirrobo XL Perfore los agujeros en las posiciones marcadas (perforadas) en la parte superior de la caja antirrobo Parte posterior Vista superior 4x perforación Ø...
- Page 72 Instrucciones de montaje y de uso Monte las partes inferiores del soporte del módulo solar en los agujeros previstos en la caja antirrobo XL atornille los soportes en la caja. M6 x 30 Casquillo...
- Page 73 Monte el módulo solar preparado en los soportes de la caja antirrobo XL M6 x 100...
- Page 74 Instrucciones de montaje y de uso Conecta los conectores entre sí y fije los cables en su lugar utilizando conectores de cable. Conecte el controlador de carga a la batería , teniendo en cuenta la polaridad.
- Page 75 Conecte la caja antirrobo XL a su energizador mediante el cable de conexión suministrado.
- Page 76 Instrucciones de montaje y de uso Puesta en marcha del inversor y del P 8000 Es imprescindible que siga estos pasos. A Ponga el conmutador del inversor en posición OFF (el LED verde no se enciende). Introduzca el enchufe tipo Schuko del P 8000...
- Page 77 Introduzca el enchufe del interruptor de contacto de la puerta en el inversor. Cierre la caja con la llave aislada. La caja antirrobo está ahora alimentada...
- Page 78 Con la puerta abierta: El P 8000 está desconectado y la caja de seguridad XL no queda expuesta a la corriente Con la puerta cerrada: El P 8000 está conectado y la caja de seguridad XL queda expuesta a la corriente Cuando el interruptor del inversor se pone en ON y está...
- Page 79 P 8000 está desconectado y la caja de seguridad XL no queda expuesta a la corriente Cuando el interruptor del inversor se pone en ON y está introducido el enchufe de P 8000 tanto la caja como el cercado estarán expuestos a la corriente cuando la puerta esté abierta.
- Page 80 / Instrucciones de montaje y de uso La caja antirrobo XL puede alojar electrificadores con energías de impulso de hasta 15 J (P 8000). Por lo tanto, es especialmente adecuada para cercas largas con vegetación abundante. Con un módulo solar XL y una batería de 200 Ah, su funcionamiento es posible sin mantenimiento desde abril hasta octubre.
Need help?
Do you have a question about the P 8000 and is the answer not in the manual?
Questions and answers