Advertisement
Charging a Lipoly Battery
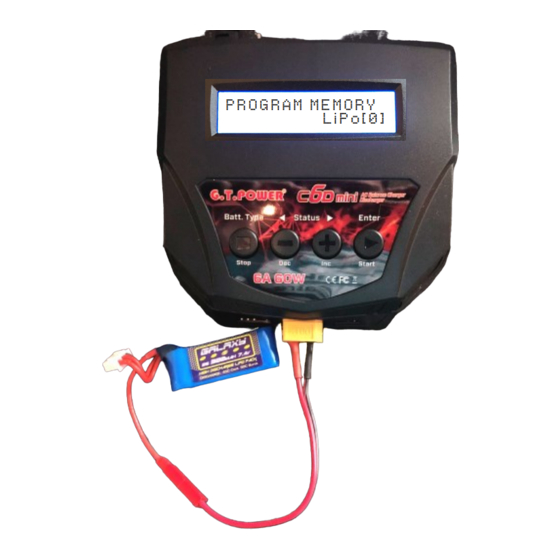
on the C6D Mini Charger
PROGRAM MEMORY
LiPo[0]
6. You will see the following screen which is asking you to confirm that the requested charge voltage
(S)
voltage
. A damaged battery might show one less cell, or say
7. If R and S match, press ENTER to begin charging. If not, investigate the mismatch.
Do not charge a damaged battery.
8. Your lipoly is now charging. When finished it will play a loud tone.
9. While charging you will see this screen updating:
Screen Description
Li2S
= 2S (2-cell, 7.4V) Lipoly pack
0.6A
= The amps being pushed into the battery. (You set this maximum earlier.) This will decrease as the pack nears full
capacity.
8.02V
= This shows the actual voltage of the battery. When the battery is full it will read as high as 8.4V (the fully charged
voltage of a 7.4V(2S) battery). Each cell can be safely charged up to 4.2V.
CHG
= Current is going into the pack. The C6D Mini Charger can also DIScharge packs, and BALance packs if you plug the pack's
balance connector to the side of the charger. It's good practice to balance a pack before each event.
000:30
= Elapsed time. At 2C, a pack can take up to 25 minutes to charge. The charger will stop itself after 120 minutes as a
precaution.
00005
= The amount of charge returned to the pack, in mAh. This is useful to know how much current your robot used in a
match. Sometimes you can go down a pack size. For example, from 300mAh down to 250mAh, if your robot only ever uses
200mAh. (You need to have a bit left in the pack to make sure it doesn't go below the minimum voltage—which is 3.3V per cell,
or 6.6V for a 2-cell / 2S pack.)
It is important to always keep an eye on a charging lipoly battery. There is always a chance something could go wrong, and if a pack
catches fire you want to be close by to take care of it. Some experts recommend placing the lipoly (or entire robot) into a fire-resistant "charge
sack". Others recommend charging in a fireproof location (i.e. cement floor, far from flammable things) so the fire can burn itself out without
needing to relocate it. If there is a fire, stop the charger and (if possible) move the battery somewhere safe to use a fire extinguisher, or put the
battery into a sand bucket and dump more sand on top. Always have a plan!
1. Power on the charger and plug in your battery as shown. (The Viper kit has a power
plug that you can plug into the charge connector instead, keeping the lipoly inside the
bot.)
2. Press the BATT TYPE button to scroll through battery types until
then press ENTER.
3. Press INC until
CHARGE
The pack charge settings will begin flashing.
4. Use the INC/DEC buttons to set the charge current to
DEC the pack voltage to
7.4V(2S)
▫ These are the settings for a 2-cell / 2S (7.4V) 300mAh lipoly battery as come
with our Viper kit (these settings are indicated in the manual).
▫ Most lipoly batteries can be charged at 2C. This means 2x the mAh rating of
the pack. So a 300mAh pack can be charged at 600mA, or 0.6A.
5. When the settings are right, press and hold the START button. It will play a tone.
Connection Break
shows then press ENTER.
. Press ENTER again.
.
LiPo[0]
shows
LiPo[0] CHARGE
0.6A
7.4V(2S)
0.6A
, press ENTER, then INC/
(R)
matches the measured
R: 2SER
S: 2SER
CONFIRM(STOP)
Li2S 0.6A 8.02V
CHG 000:30 00005
Advertisement
Table of Contents

Summary of Contents for Fingertech Robotics C6D
- Page 1 7.4V(2S) battery). Each cell can be safely charged up to 4.2V. = Current is going into the pack. The C6D Mini Charger can also DIScharge packs, and BALance packs if you plug the pack's balance connector to the side of the charger. It's good practice to balance a pack before each event.
- Page 2 Balancing Lipoly Packs ▪ Balancing the cells in a pack ensures they will give you optimal performance. Plug the lipoly’s white Balance Plug into the front of the charger as shown, along with Li2S 0.6A 7.93V BAL 000:07 00005 the main charge leads. ▪...
Need help?
Do you have a question about the C6D and is the answer not in the manual?
Questions and answers