Table of Contents
Advertisement
Quick Links
Advertisement
Table of Contents

Subscribe to Our Youtube Channel
Summary of Contents for Stairville WLS-DMX Pro G5
- Page 1 WLS-DMX Pro G5 Transceiver...
- Page 2 Thomann GmbH Hans-Thomann-Straße 1 96138 Burgebrach Germany Telephone: +49 (0) 9546 9223-0 Internet: www.thomann.de 01.06.2022, ID: 464173 (V3)
-
Page 3: Table Of Contents
1.3 Symbols and signal words....................... 7 Safety instructions............................. 9 Features............................... 12 Installation..............................13 Starting up..............................15 Connections and controls........................18 Operating..............................23 Technical specifications........................26 Plug and connection assignments....................28 Troubleshooting............................29 Protecting the environment......................32 WLS-DMX Pro G5 Transceiver... - Page 4 WLS-DMX Pro G5 Transceiver...
-
Page 5: General Information
Our products and user manuals are subject to a process of continuous development. We there‐ fore reserve the right to make changes without notice. Please refer to the latest version of the user manual which is ready for download under www.thomann.de. WLS-DMX Pro G5 Transceiver... -
Page 6: Further Information
Personal consultation For personal consultation please contact our technical hotline. If you have any problems with the device the customer service will Service gladly assist you. 1.2 Notational conventions This manual uses the following notational conventions: WLS-DMX Pro G5 Transceiver... -
Page 7: Symbols And Signal Words
ð Automatic operation is started. Switch off the device. 1.3 Symbols and signal words In this section you will find an overview of the meaning of symbols and signal words that are used in this manual. WLS-DMX Pro G5 Transceiver... - Page 8 This combination of symbol and signal word indicates a pos‐ sible dangerous situation that can result in material and environmental damage if it is not avoided. Warning signs Type of danger Warning – high-voltage. Warning – danger zone. WLS-DMX Pro G5 Transceiver...
-
Page 9: Safety Instructions
Within the device there are areas where high voltages may be present. Never remove any covers. There are no user-serviceable parts inside. Do not use the device if covers, protectors or optical components are missing or damaged. WLS-DMX Pro G5 Transceiver... - Page 10 NOTICE! Possible damage due to installation of a wrong fuse The use of different types of fuses can cause serious damage to the unit. Fire hazard! Only fuses of the same type may be used. WLS-DMX Pro G5 Transceiver...
- Page 11 The plasticiser contained in the rubber feet of this product may possibly react with the coating of your surface and after some time cause permanent dark stains. In case of doubt, do not put the rubber feet directly on the surface and use a suitable underlay if neces‐ sary, i.e. felt-pad floor protectors or similar. WLS-DMX Pro G5 Transceiver...
-
Page 12: Features
Key lock to protect against accidental change of operating mode Four LEDs for monitoring the operating status Lockable input socket (Power Twist TR1) for mains power supply Power cable included Fast mounting with omega brackets with quick-lock fasteners WLS-DMX Pro G5 Transceiver... -
Page 13: Installation
Possible data transmission errors For error-free operation make use of dedicated DMX cables and do not use ordi‐ nary microphone cables. Never connect the DMX input or output to audio devices such as mixers or ampli‐ fiers. WLS-DMX Pro G5 Transceiver... - Page 14 Make sure that transmitter and receiver are both tuned to the same channel. Never set multiple transmitters to the same channel. Make sure that there are no metal objects between the transmitter and receiver. Avoid interference from other radio or in-ear systems. WLS-DMX Pro G5 Transceiver...
-
Page 15: Starting Up
Starting up Starting up Create all connections while the device is off. Use the shortest possible high-quality cables for all connections. Take care when running the cables to prevent tripping hazards. WLS-DMX Pro G5 Transceiver... - Page 16 In this point-to-point configuration the DMX signal from one transmitter is sent to one receiver. 110 Ω, ¼ W DMX Out DMX In DMX Out WLS-DMX WLS-DMX DMX In DMX Out DMX In DMX Out (Tx) (Rx) WLS-DMX Pro G5 Transceiver...
- Page 17 Connect the output of the first DMX device to the input of the second one and so on, to form a series connection. Make sure that the output of the last DMX device in the chain is terminated by a resistor (110 Ω, ¼ W). WLS-DMX Pro G5 Transceiver...
-
Page 18: Connections And Controls
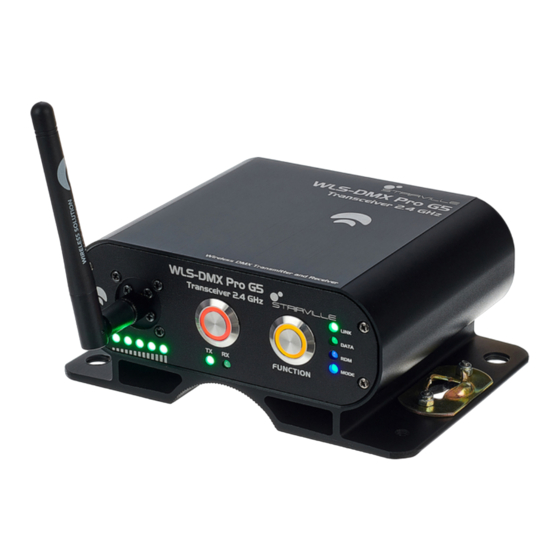
Connections and controls Connections and controls Front panel ö & WLS-DMX Pro G5 Transceiver... - Page 19 Meaning while device operates as Transmitter: Constant light: DMX signal is or was present. Off: No DMX signal present Meaning while device operates as Receiver: Constant light: DMX signal is being received. Off: No DMX signal is being received. WLS-DMX Pro G5 Transceiver...
- Page 20 4 Button to toggle Transmitter and Receiver / [TX]/[RX] and to enable or disable the key lock. The LED [TX] lights: The device operates as Transmitter. The LED [RX] lights: The device operates as Receiver. The button lights up red when key lock is activated. 5 Control LEDs Radio signal strength indicators. WLS-DMX Pro G5 Transceiver...
- Page 21 Connections and controls Rear panel PUSH WLS-DMX Pro G5 Transceiver...
- Page 22 7 Lockable input socket (Power Twist TR1) for mains power connection. 8 Fuse holder 9 [DMX IN] DMX input, designed as XLR panel plug, 3-pin 10 [DMX OUT] DMX output, designed as XLR panel socket, 3-pin WLS-DMX Pro G5 Transceiver...
-
Page 23: Operating
Press the button for switching transmitter and receiver for six seconds to activate the key lock. The LED ring of the button lights up red. To disable key lock, press the button again for six seconds. The LED ring turns off. WLS-DMX Pro G5 Transceiver... - Page 24 If the device operates as Transmitter: Press and hold [FUNCTION] for about four seconds. ð The LED [LINK] flashes slowly for about six seconds. The connection to the receiver is being interrupted. The LED [LINK] on receiver turns off. WLS-DMX Pro G5 Transceiver...
- Page 25 If the LED [MODE] lights up blue, the device is in G5 mode. Press and hold [FUNCTION] to confirm until the LEDs [LINK] and [DATA] do not flash alter‐ nately any more. The receivers must always be in the same mode or higher. WLS-DMX Pro G5 Transceiver...
-
Page 26: Technical Specifications
Mounting properties Omega bracket with Quick-Lock fasteners Dimensions (W × H × D) 145 mm × 60 mm × 120 mm Weight 1.0 kg Ambient conditions Temperature range 0 °C…40 °C Relative humidity 20 %…80 % (non-condensing) WLS-DMX Pro G5 Transceiver... - Page 27 Frequency 2.402 GHz … 2.479 GHz Max. transmission power 100 mW Bandwidth 1000 Hz Input impedance 50 Ω W-DMX Frequency range 2.402 GHz … 2.479 GHz Max. transmission power 20 dBm Range (outdoors) 600 m WLS-DMX Pro G5 Transceiver...
-
Page 28: Plug And Connection Assignments
The unit offers a 3-pin XLR socket for DMX output and a 3-pin XLR plug for DMX input. Please refer to the drawing and table below for the pin assignment of a suitable XLR plug. Configuration Ground, shielding Signal inverted (DMX–, ‘cold signal’) Signal (DMX+, ‘hot signal’) WLS-DMX Pro G5 Transceiver... -
Page 29: Troubleshooting
Never connect the DMX input or output to audio devices such as mixers or ampli‐ fiers. In the following we list a few common problems that may occur during operation. We give you some suggestions for easy troubleshooting: WLS-DMX Pro G5 Transceiver... - Page 30 3. Modify the orientation of the antennas. 4. If you use more than one wireless system at the same time, check the used frequencies and channels. 5. Interference can also be caused by other radio or in-ear systems. WLS-DMX Pro G5 Transceiver...
- Page 31 Troubleshooting If the procedures recommended above do not succeed, please contact our Service Center. You can find the contact information at www.thomann.de. WLS-DMX Pro G5 Transceiver...
-
Page 32: Protecting The Environment
Dispose of this device through an approved waste disposal firm or through your local waste facility. When discarding the device, comply with the rules and regulations that apply in your country. If in doubt, consult your local waste disposal facility. WLS-DMX Pro G5 Transceiver... - Page 33 Notes WLS-DMX Pro G5 Transceiver...
- Page 34 Notes WLS-DMX Pro G5 Transceiver...
- Page 36 Musikhaus Thomann · Hans-Thomann-Straße 1 · 96138 Burgebrach · Germany · www.thomann.de...
Need help?
Do you have a question about the WLS-DMX Pro G5 and is the answer not in the manual?
Questions and answers