Table of Contents
Advertisement
Quick Links
Advertisement
Table of Contents

Subscribe to Our Youtube Channel
Related Manuals for PRESONUS Central Station Plus

Summary of Contents for PRESONUS Central Station Plus
- Page 1 Central Station Plus Owner’s Manual ® www.presonus.com...
- Page 2 All PreSonus products in the USA should be serviced at the PreSonus factory in Baton Rouge, Louisiana. The lightning flash with arrowhead symbol within an equilateral triangle is If your product requires a repair, contact support@presonus.com to arrange for a...
-
Page 3: Table Of Contents
Troubleshooting — 23 4.0 Sample Hookup Specifications — 24 Diagrams — 13 Block Diagram — 27 Separate Control Room and Recording Room — 13 Remote DB15 Cable Pin-out — 28 Mixdown / Mastering Setup — 15 PRESONUS LIMITED WARRANTY — 29... -
Page 5: Introduction
We believe the best way to achieve our goal of constant product improvement is by listening to the real experts, our valued customers. We appreciate the support you have shown us through the purchase of this product. We are confident that you will enjoy your Central Station Plus! -
Page 6: Getting Started
PreSonus only supports the power supply that is shipped with your Central Station. If it does not meet your requirements, or you wish to purchase an additional power supply, please contact your local dealer or distributor. -
Page 7: Connecting Monitor Speakers
Station. Please note that the DB15 cable has a proprietary pin-out; it looks like a standard VGA cable but is wired differently. If you require a replacement cable, you will need to order it from www.PreSonus.com. 2. Press the Activate button on the back of your Central Station. When the CSR-1 is properly communcating with your Central Station, the Active light to the left of the Main Volume control on the CSR-1 will illuminate blue. -
Page 8: Using The Digital Input
Central Station Plus Getting Started Using the Digital Input 10. Power up your power amp or powered monitors and turn the level controls to 0 dB. 11. Press the Speaker Output A button. 12. Press the TRS 1 button in the Main Input Select section. -
Page 9: Using The Headphones And Talkback System
Owner’s Manual Owner’s Manual Getting Started Using the Headphones and Talkback System Using the Headphones and Talkback System 1. Turn the Phones and Mic levels fully counterclockwise. 2. Press the Phones 1 control knob so that the Cue light, rather than the Main light, is illuminated. 3. -
Page 10: Overview
Central Station Plus Overview What’s in the Box Overview What’s In the Box In addition to this manual, your Central Station package contains the following: • Central Station Studio Control Center • Central Station Power Supply • CSR-1 Central Station Remote •... -
Page 11: Features
Owner’s Manual Owner’s Manual Overview Features Features The Central Station features high-quality analog circuitry and digital conversion. Three sets of stereo analog inputs enable the Central Station to accept a wide variety of sources. Its S/PDIF coax and Toslink (optical) digital inputs provide up to 24-bit, 192 kHz digital-to-analog conversion, and the converters deliver over 115 dB of dynamic range. -
Page 12: Calibrating Your Central Station
Central Station Plus Calibration Calibrating the Meter Calibrating Your Central Station In order to create the most accurate mixing environment, it is important to calibrate each component in your system so that the metering and output levels match. Calibrating the Meter The meters on your Central Station can (and should) be calibrated to match the meters in your DAW or on your mixer. -
Page 13: Calibrating Speaker Levels
Owner’s Manual Calibration Calibrating Speaker Levels it is set at its optimum or maximum level. Instead, turn on your phono preamp (if necessary) and increase the Aux Input Level knob, starting from -80, until the red 0 dBVU meter just comes on (and no higher). 5. -
Page 14: Maximum Loudness Reference
Central Station Plus Calibration Calibrating Speaker Levels 3.3.1 Maximum Loudness Reference This method of speaker calibration references a 0 dBVU meter reading to the loudest level you want. This is the least technical, most subjective method and is good for environments where there is such a thing as “too loud”... -
Page 15: 85 Db Spl Standard Reference
Owner’s Manual Calibration Calibrating Speaker Levels 12. Test: Play audio through Speaker A only. Without adjusting any of the Central Station’s levels, toggle Speaker A off and Speaker B on. You may hear a slight tonal variance due to the different acoustic properties of the monitoring systems but the loudness should remain the same. - Page 16 Central Station Plus Central Station Plus Calibration Calibrating Speaker Levels 10. If you are calibrating a monitoring system with independent subwoofer level control (such as a 2.1 or 2-way speaker system), repeat steps 4 to 9 for the subwoofer level. Repeat steps 1 through 10 for the monitoring systems connected to Speaker Outputs B and C.
-
Page 17: Sample Hookup Diagrams
Owner’s Manual Owner’s Manual Sample Hookup Diagrams Separate Control Room and Recording Room Sample Hookup Diagrams The Central Station is an extremely flexible tool and can be used in all stages of the recording and music-production process. There are many ways to use and set up your Central Station. -
Page 18: Separate Control Room And Recording Room
Central Station Plus Sample Hookup Diagrams Separate Control Room and Recording Room (continued) Separate Control Room and Recording Room (continued) FIRESTUDIO PROJECT (Computer Interface) CSR-1 Optional SPDIF Digital Output CD Player Remote Control or Main L/R Analog Output RCA Analog... -
Page 19: Mixdown / Mastering Setup
Owner’s Manual Owner’s Manual Sample Hookup Diagrams Mixdown / Mastering Setup Mixdown / Mastering Setup Here is a typical mixdown or mastering setup in which the Central Station’s 24-bit, 192 kHz digital-to-analog converter is being used to compare the music being created (mixed or mastered) with a commercial CD. Headphones to check song FIRESTUDIO PROJECT (Computer Interface) -
Page 20: Part Ii: Reference
Central Station Plus Controls and Connections Front Panel Layout PART II: REFERENCE Controls and Connections Front Panel Layout 5.1.1 Talkback • Talkback microphone. The built-in talkback microphone is an electret condenser microphone and is positioned just below the Talkback Level knob. -
Page 21: Cue/Main Select
Owner’s Manual Controls and Connections Front Panel Layout 5.1.3 Cue/Main Select The Central Station comes equipped with separate Cue and Main signal paths. The Cue signal path includes the talkback-microphone signal and sends this signal to the recording artist via an external headphone amp or the two onboard headphone amps. -
Page 22: Passive Speaker Control
POWER This is the connection for the Central Station’s proprietary external power supply. Only this power supply should be used with your Central Station. Replacement power supplies can be purchased directly from PreSonus or from a musical-equipment retailer. 12-18VDC 10Watts... -
Page 23: Digital Inputs (24-Bit/192 Khz)
Owner’s Manual Controls and Connections Back Panel Layout 5.2.2 Digital Inputs (24-bit/192 kHz) Central Station automatically reads and locks to the sample rate of the incoming digital stream and can receive and lock to sample rates of 44.1, 48, 96, and 192 kHz. Both of these digital inputs are designed for the S/PDIF stereo digital format. -
Page 24: Analog Inputs
Central Station Plus Controls and Connections Back Panel Layout 5.2.5 Analog Inputs These inputs are for your audio sources (mixer, audio interface, CD player, etc.). Only balanced cables should be used when connecting the balanced TRS inputs of your Central Station to these devices. -
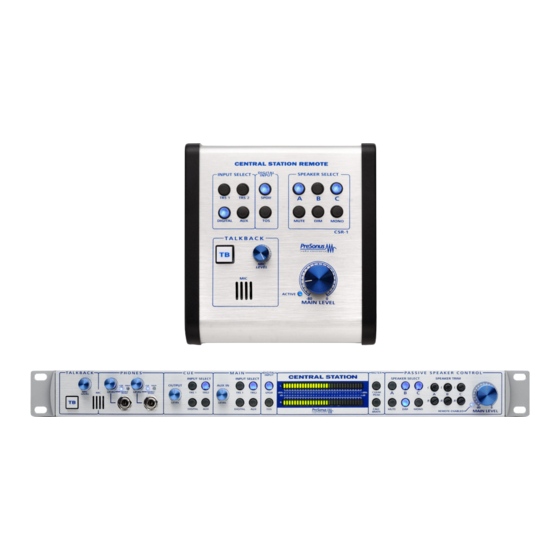
Page 25: Csr-1: Central Station Remote (Optional)
CSR-1: Central Station Remote The Central Station Remote Control (CSR-1) connects to the rear of the Central Station via a proprietary DB15 cable (included with the Central Station Plus) to control Volume, Talkback, Mute, Input Source Switching and Speaker Output Switching functions. -
Page 26: Technical Information
Central Station Plus Technical Information Frequently Asked Question Technical Information Frequently Asked Questions Why can’t I hear the talkback microphone? Only headphones with a Phones Source of “Cue” • can hear the talkback microphone. Connect and/or calibrate your talkback microphone according to Section 1.5. -
Page 27: Troubleshooting
If you experience any difficulty with your Central Station, please try the following before contacting PreSonus Customer Support: Check our Web site at www.presonus.com for answers to frequently asked • questions and for troubleshooting techniques specific to the Central Station. -
Page 28: Specifications
Central Station Plus Technical Information Specifications Specifications Audio Inputs TRS1 & TRS2 Type ¼” TRS Passive-Balanced Input Impedance 2-5Ω (depends on speaker load and trim) S/N Ratio >140 dB THD+N < 0.0005% (1 kHz @ 0 dBu) Frequency Response > 1 MHz... - Page 29 Owner’s Manual Technical Information Specifications Main Type ¼” TRS Active-Balanced Output Impedance 51Ω THD+N <0.0025% Frequency Response 10 Hz-50 kHz, -0.5 dB Type ¼” TRS Active-Impedance Balanced Output Impedance 51Ω THD+N < 0.003% (1 kHz @ 0 dBu) Frequency Response 10 Hz-50 kHz, -0.5 dB Gain Range -90 dB to 0 dB...
- Page 30 Package Type Dimensions 19 (W) X 1.75 (H) X 5.50 (D) inches Weight 5.0 lbs. As a commitment to constant improvement, PreSonus Audio Electronics, Inc., reserves the right to change any specification stated herein, at any time, without notification. 26 26...
-
Page 31: Block Diagram
Owner’s Manual Technical Information Block Diagram Block Diagram 27 27... -
Page 32: Remote Db15 Cable Pin-Out
Central Station Plus Technical Information Remote DB15 Cable Pin-out Remote DB15 Cable Pin-out P1 Pin P2 Pin Twisted Remote Function Number Number Pair Right-High Send Right-High Return Level Right-Low Send Right-Low Return Level Left-High Send Left-High Send Left-Low Send Left-Low Send... -
Page 33: Presonus Limited Warranty
PreSonus reserves the right to update any unit returned for repair. PreSonus reserves the right to change or improve the design of the product at any time without prior notice. This warranty does not cover claims for damage due... - Page 35 Serves 20 © 2012 PreSonus Audio Electronics, Inc. All Rights Reserved. AudioBox, DigiMax, FireStudio, Nimbit, PreSonus, QMix, StudioLive, and XMAX are trademarks or registered trademarks of PreSonus Audio Electronics, Inc. Capture, Impact, Mixverb Presence, RedLightDist, SampleOne, Studio One, and Tricomp are trademarks or registered trademarks of PreSonus Software Ltd.
- Page 36 • Consult the dealer or an experienced radio/TV technician for help. CAUTION: Changes or modifications to this device not expressly approved by PreSonus Audio Electronics could void the user’s authority to operate the equipment under FCC rules. This apparatus does not exceed the Class A/Class B (whichever is applicable) limits for radio noise emissions from digital apparatus as set out in the radio interference regulations of the Canadian Department of Communications.
Need help?
Do you have a question about the Central Station Plus and is the answer not in the manual?
Questions and answers