Table of Contents
Advertisement
Quick Links
Advertisement
Chapters
Table of Contents

Related Manuals for Marine Audio JHD40BT

Summary of Contents for Marine Audio JHD40BT
- Page 1 JHD40BT JHD40BT/JHD40BTBRP/434-1228-01 Installation and Operation Manual...
-
Page 2: Table Of Contents
CONTENTS Warnings and Compliance ......................1 Copyrights and Trademarks Introduction ..........................2 iPhone, iPod, iPod Classic, iPod Shuffle and iPod Touch are trademarks of Apple Inc., registered Installation ..........................3 in the U.S. and other countries. Wiring ............................4 Basic Operation ........................5 Tuner Operation........................ -
Page 3: Warnings And Compliance
WARNINGS AND COMPLIANCE Important Safety Instructions NOTE: Keep the volume level low enough to be aware of your surroundings. NOTE: USE THE PROPER POWER SUPPLY! This product is designed to operate with a 12 volt DC negative ground battery system. FCC Notes WARNING! Changes or modifications to this unit not expressly approved by the party responsible for compliance could void the user’s authority to operate the equipment. -
Page 4: Introduction
INTRODUCTION System Features Features of the audio system include: White LED Backlit LCD iPx6 Waterproof Low Battery Alarm AM/FM WORLD Tuner with 30 Presets (12 AM, 18 FM) Weatherband with Weather Alert Bluetooth (Supports A2DP and AVRCP) ... -
Page 5: Installation
INSTALLATION Before you Begin Before you begin, always disconnect the battery negative terminal. Important Notes Before final installation, test the wiring connections to make sure the unit is connected properly and the system works. Consult with your nearest dealer if installation requires the drilling of holes or other ... -
Page 6: Wiring
WIRING... -
Page 7: Basic Operation
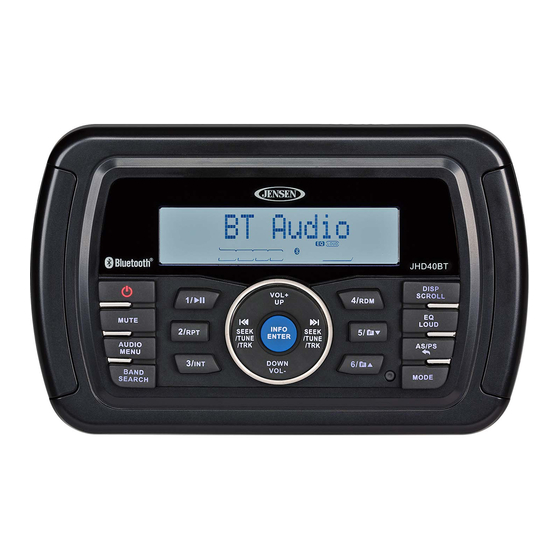
BASIC OPERATION NOTE: The key pad may vary slightly in shape depending on the model and revision Reset Power On/Off The reset button should be activated for the following reasons: Press the power button (1) on the front panel to turn the unit on or off. initial installation of the unit when all wiring is completed ... - Page 8 Use the VOL+ UP /▲ or DOWN VOL- / ▼ buttons to adjust the bass level range from “-6” to “+6”. NOTE: A locked Bluetooth device will not be overwritten from the list. Treble Use the VOL+ UP /▲ or DOWN VOL- / ▼ buttons to adjust the treble level range from “-6” to Battery Alarm Operation “+6”.
-
Page 9: Tuner Operation
TUNER OPERATION NOTE: The key pad may vary slightly in shape depending on the model and revision Select a Band Automatically Store / Preset Scan (AS/PS Press the BAND/SEARCH button (16) to change between three FM bands and two AM (MW) Automatically Store bands. -
Page 10: Weather Band Operation
WEATHER BAND OPERATION The Weather Alert function can be turned “on” or “off” by the Audio/Menu key, as described on page five. When “ON”, the weather tuner remains active, even when the radio is turned off (as Accessing the Weather Band long as the power is still applied to the radio). -
Page 11: Mp3/Wma Operation
MP3/WMA OPERATION NOTE: The key pad may vary slightly in shape depending on the model and revision MP3/WMA File Requirements Installing a USB Device This unit can play MP3 (MPEG1, 2, 2.5 Audio Layer 2/3) and WMA (version 7/8/9). Insert your USB drive into the USB connector routed from the rear of the radio. The unit will automatically search for MP3 and WMA files on the device and begin playback. - Page 12 Intro Scan (INT) Press the 3 INT / button (7) once to play the first 10 seconds of each file in the current device. When the desired file is reached, press 3 INT / again to end the scan and play the selected file.
-
Page 13: Ipod Operation
iPod OPERATION NOTE: The key pad may vary slightly in shape depending on the model and revision Turning the iPod On/Off This unit is equipped with an iPod ready function that will allow you to control your iPod (if compatible) using the control panel buttons. The following iPod versions are supported: The iPod power turns on automatically when an iPod is connected to the USB connector, as iPod Nano 5G, ... -
Page 14: Bluetooth Operation
Repeat Play BLUETOOTH OPERATION During playback, press the 2 RPT / button (6) to repeat the current song. “Repeat One” will The unit includes built-in Bluetooth technology that allows you to wirelessly connect this head appear on the LCD. Press 2 RPT / again to stop repeat playback. - Page 15 Bluetooth Audio (A2DP) Use SEEK/TUNE/TRK The A2DP music is available for Bluetooth enabled phones when the phone is connected. To access Bluetooth mode and play songs stored on your phone, press the MODE button (4). Press Press to navigate the List While in BT mode , the BT Audio icon ( ) illuminates on the LCD.
- Page 16 CARE AND MAINTENANCE TROUBLESHOOTING Keep the product dry. If it does get wet, wipe it dry immediately. Liquids might contain Symptom Cause Solution minerals that can corrode the electronic circuits. No power The vessel’s accessory If the power supply is properly Keep the product away from dust and dirt, which can cause premature wear of parts.
- Page 17 SPECIFICATIONS FM Radio Frequency Coverage (USA) ......... 87.5 to 107.9 MHz Frequency Coverage (Europe, China, Latin, Australia)..
- Page 18 JHD40BTBRP HEAVY DUTY AUDIO SYSTEM Installation and Operation Manual...
- Page 19 JHD40BTBRP CONTENTS Copyrights and Trademarks Warnings and Compliance ......................3 iPhone, iPod, iPod classic, iPod nano, iPod shuffle, and iPod touch are trademarks of Apple Inc., Introduction ............................4 registered in the U.S. and other countries. Installation ............................5 “Made for iPod” and “Made for iPhone” means that an electronic accessory has been designed Wiring ...............................
-
Page 20: Warnings And Compliance
JHD40BTBRP WARNINGS AND COMPLIANCE Important Safety Instructions NOTE: Keep the volume level low enough to be aware of your surroundings. NOTE: USE THE PROPER POWER SUPPLY! This product is designed to operate with a 12 volt DC negative ground battery system. FCC Notes WARNING! Changes or modifications to this unit not expressly approved by the party responsible for compliance could void the user’s authority to operate the equipment. -
Page 21: Introduction
JHD40BTBRP INTRODUCTION System Features Features of the Jensen JHD40BTBRP heavy duty audio system include: Amber LED Backlit LCD iPx6 Waterproof Low Battery Alarm AM/FM WORLD Tuner with 30 Presets (12 AM, 18 FM) Weatherband with Weather Alert ... -
Page 22: Installation
JHD40BTBRP INSTALLATION Secure the radio to the dashboard using #6 panhead screws (not provided). Replace the covers on either side of the radio. Test radio operation by referring to the operating instructions for the unit. Before you Begin Removing the Unit Before you begin, always disconnect the battery negative terminal. -
Page 23: Wiring
JHD40BTBRP WIRING WIRE INSERTION VIEW PIN NO. DESCRIPTION PIN NO. DESCRIPTION VOLUME + TUNE + VOLUME TUNE MUTE MODE GROUND GROUND WIRE CHART COLOR DESCRIPTION 50 ohm BLUETOOTH ANTENNA N / A N / A BLACK BLACK EXTERNAL ANT. BLACK AUX IN-RIGHT BLACK... -
Page 24: Basic Operation
JHD40BTBRP BASIC OPERATION Use a ball point pen or similar object to press the RESET button (19). This may be necessary should the unit display an error code. You can recover factory default settings using the RESET function located on the system menu. With “RESET To Defaults?”, press the INFO/ENTER button (18) to activate. - Page 25 JHD40BTBRP Bluetooth Device (Lock/Unlock, Disconnect/Connect, Delete): View, lock and delete from Liquid Crystal Display (LCD) a list of previously paired mobile phone device models. Bluetooth Pair <ENTER>: Choose INFO/ENTER to automatically pair a device. The current frequency and activated functions are shown on the LCD panel (20). ...
-
Page 26: Tuner Operation
JHD40BTBRP TUNER OPERATION Automatically Store / Preset Scan (AS/PS Automatically Store Select an AM or FM band. Press and hold the AS/PS button (15) for more than three seconds to automatically select strong stations and store them in all bands. The new stations will replace any stations previously stored in that band. -
Page 27: Weather Band Operation
JHD40BTBRP WEATHER BAND OPERATION The Weather Alert function can be turned “on” or “off” by the Audio/Menu key, as described on Accessing the Weather Band page five. When “ON”, the weather tuner remains active, even when the radio is turned off (as long as the power is still applied to the radio). -
Page 28: Mp3/Wma Operation
JHD40BTBRP MP3/WMA OPERATION automatically search for MP3 and WMA files on the device and begin playback. You can access USB mode from any other mode by pressing the MODE button (4). WARNING: Do not remove the USB device when USB PLAY mode is active. Press MODE (4) to change to another mode before removing the device. -
Page 29: Ipod ® Operation
JHD40BTBRP ® iPod OPERATION Turning the iPod On/Off The iPod power turns on automatically when an iPod is connected to the USB connector, as This unit is equipped with an iPod ready function that will allow you to control your iPod (if long as the vehicle ignition is turned on. -
Page 30: Bluetooth Operation
JHD40BTBRP BLUETOOTH OPERATION Use ◄◄/►► The JHD40BTBRP includes built-in Bluetooth technology that allows you to wirelessly connect to Navigate this head unit to Bluetooth devices for streaming audio playback. the List Press ENTER About Bluetooth Technology Press ENTER BT Device Device 1 Bluetooth is a short-range wireless radio technology. - Page 31 JHD40BTBRP Bluetooth Audio (A2DP) The A2DP music is available for Bluetooth enabled phones when the phone is connected. To access Bluetooth mode and play songs stored on your phone, press the MODE button (4). While in BT mode , the BT Audio icon ( ) illuminates on the LCD.
-
Page 32: Care And Maintenance
JHD40BTBRP CARE AND MAINTENANCE TROUBLESHOOTING Keep the product dry. If it does get wet, wipe it dry immediately. Liquids might contain Symptom Cause Solution minerals that can corrode the electronic circuits. No power The vessel’s accessory If the power supply is properly Keep the product away from dust and dirt, which can cause premature wear of parts. -
Page 33: Specifications
JHD40BTBRP SPECIFICATIONS FM Radio Frequency Coverage (USA) ......... 87.5 to 107.9 MHz Frequency Coverage (Europe, China, Latin, Australia).. - Page 34 MS40BT HEAVY DUTY AUDIO SYSTEM Installation and Operation Manual iPhone, iPod, iPod Classic, iPod Nano, iPod Shuffle, and iPod Touch are trademarks of Apple Inc., registered in the U.S. and other countries.
- Page 35 MS40BT CONTENTS Warnings and Compliance ......................1 Copyrights and Trademarks Introduction ..........................2 iPhone, iPod, iPod classic, iPod shuffle and iPod touch are trademarks of Apple Inc., registered Installation ..........................3 in the U.S. and other countries. Wiring ............................4 Basic Operation ........................
-
Page 36: Warnings And Compliance
MS40BT WARNINGS AND COMPLIANCE Important Safety Instructions NOTE: Keep the volume level low enough to be aware of your surroundings. NOTE: USE THE PROPER POWER SUPPLY! This product is designed to operate with a 12 volt DC negative ground battery system. FCC Notes WARNING! Changes or modifications to this unit not expressly approved by the party responsible for compliance could void the user’s authority to operate the equipment. -
Page 37: Introduction
MS40BT INTRODUCTION System Features Features of the Jensen MS40BT heavy duty audio system include: • White LED Backlit LCD • iPx6 Waterproof • Low Battery Alarm • AM/FM US/EURO Tuner with 30 Presets (12 AM, 18 FM) • Weatherband with Weather Alert •... -
Page 38: Installation
MS40BT Secure the radio to the dashboard using #6 stainless steel pan head screws (not INSTALLATION provided). Replace the covers on either side of the radio. Before you Begin Test radio operation by referring to the operating instructions for the unit. Before you begin, always disconnect the negative battery terminal. -
Page 39: Wiring
MS40BT WIRING... -
Page 40: Basic Operation
MS40BT should the unit display an error code. BASIC OPERATION You can recover factory default settings using the RESET function located in the system menu. With “Reset to Defaults?” flashing, press the INFO/ENTER button (18) to activate. Audio Menu Press the AUDIO/MENU button (3) on the control panel to access the audio menu. You can navigate through the audio menu items by pressing the AUDIO/MENU button repeatedly. - Page 41 MS40BT a list of previously paired mobile phone device models. NOTE: LCD panels may take longer to respond when subjected to cold temperatures for • Bluetooth Pair (On/Off): Choose “INFO/ENTER” to automatically pair a device. an extended period of time. In addition, the visibility of the numbers on the LCD may •...
-
Page 42: Tuner Operation
MS40BT TUNER OPERATION Automatically Store / Preset Scan (AS/PS Automatically Store Select an AM or FM band. Press and hold the AS/PS button (15) for more than two seconds to automatically select strong stations and store them in all bands. The new stations replace any stations already stored in that band. -
Page 43: Weather Band Operation
MS40BT The Weather Alert function can be turned “on” or “off” by the Audio/Menu key, as described on WEATHER BAND OPERATION page three. When set to “ON”, the weather tuner remains active in the background, even when the radio is turned off (as long as the power is still applied to the radio). If a weather alert is Accessing the Weather Band issued, the radio will turn on and play the announcement, then turn back off and revert to Press the MODE button (4) to access the weather band mode. -
Page 44: Mp3/Wma Operation
MS40BT ID3 Support MP3/WMA OPERATION This unit supports ID3 tag versions 1.0, 1.1, 2.0 and 2.3 (Max 32 bytes). Installing a USB Device Insert your USB thumb drive into the USB connector routed from the rear of the radio. The unit will automatically search for MP3 and WMA files on the device and begin playback. - Page 45 MS40BT MP3/WMA Directory Search Press the BAND/SEARCH button (16) to enter directory search mode. The LCD will display the folder list for the current directory. Press the BAND/SEARCH button to view the folder directory list. Navigate the folder list by pressing the VOL +/- buttons (2). Press the INFO/ENTER button to select a folder.
-
Page 46: Ipod Operation
MS40BT iPod OPERATION Turning the iPod On/Off The iPod power turns on automatically when an iPod is connected to the USB connector, as This unit is equipped with an iPod ready function that will allow you to control your iPod (if long as the vehicle ignition is turned on. - Page 47 MS40BT When search mode is selected, press the INFO/ENTER button (18) to confirm selection. Use the VOL +/- buttons (2) to navigate through various list selections. Press INFO/ENTER (18) to make your final selection. Use the AS/PS button (15) to reverse navigate the list.
-
Page 48: Bluetooth Operation
MS40BT BLUETOOTH OPERATION Use SEEK/TUNE/TRK The MS40BT includes built-in Bluetooth technology that allows you to wirelessly connect to Navigate Bluetooth devices to this head unit for streaming audio playback. the List About Bluetooth Technology Press ENTER Press ENTER BT Device Device 1 Bluetooth is a short-range wireless radio technology. - Page 49 MS40BT Bluetooth Audio (A2DP) The A2DP music is available for Bluetooth enabled phones when the phone is connected. To access Bluetooth mode and play songs stored on your phone, press the MODE button (4). While in BT mode , the BT Audio icon ( ) illuminates on the LCD. Selecting Tracks During playback, press SEEK/TUNE/TRK button (13, 14) to play the previous or next track.
-
Page 50: Care And Maintenance
MS40BT CARE AND MAINTENANCE • Keep the product dry. If it does get wet, wipe it dry immediately. Liquids might contain TROUBLESHOOTING minerals that can corrode the electronic circuits. • Keep the product away from dust and dirt, which can cause premature wear of parts. Symptom Cause Solution... -
Page 51: Specifications
MS40BT SPECIFICATIONS FM Radio Frequency Coverage (USA) ......... 87.5 to 107.9 MHz Frequency Coverage (Europe) . - Page 52 MA300 MARINE AUDIO SYSTEM Installation and Operation Manual...
- Page 53 MA300 CONTENTS Warnings and Compliance ......................1 Introduction ..........................2 Installation ..........................3 Wiring ............................4 Basic Operation ........................5 Tuner Operation........................7 Weather Band Operation ......................8 MP3/USB Operation ......................... 9 Bluetooth Operation ........................ 10 APP Operation ......................... 11 Care and Maintenance ......................
-
Page 54: Warnings And Compliance
MA300 WARNINGS AND COMPLIANCE Important Safety Instructions NOTE: Keep the volume level low enough to be aware of your surroundings. NOTE: USE THE PROPER POWER SUPPLY! This product is designed to operate with a 12 volt DC negative ground battery system. FCC Notes WARNING! Changes or modifications to this unit not expressly approved by the party responsible for compliance could void the user’s authority to operate the equipment. -
Page 55: Introduction
MA300 INTRODUCTION System Features Features of the Marine Audio MA300 include: White LED Backlit LCD iPx6 Waterproof Low Battery Alarm AM/FM US/EURO Tuner with 30 Presets (12 AM, 18 FM) Weatherband with Weather Alert Bluetooth (Supports A2DP and AVRCP) ... -
Page 56: Installation
MA300 INSTALLATION achieved, turn the accessory switch off and proceed with final mounting of the chassis. Carefully slide the radio into the opening, making sure it is right-side-up. Secure the radio to the dashboard using #6 stainless steel pan head screws (not Before you Begin provided). -
Page 57: Wiring
MA300 WIRING WIRE COLOR DESCRIPTION BLUE AMP REMOTE (+12VDC 500MA) +12V SWITCHED GRAY FRONT RIGHT SPEAKER (+) WHITE FRONT LEFT SPEAKER (+) PURPLE REAR RIGHT SPEAKER (+) GREEN REAR LEFT SPEAKER (+) BLACK GROUND PURPLE/BLACK REAR RIGHT SPEAKER (-) WHITE/BLACK FRONT LEFT SPEAKER (-) GRAY/BLACK FRONT RIGHT SPEAKER (-) -
Page 58: Basic Operation
MA300 BASIC OPERATION should the unit display an error code. You can recover factory default settings using the RESET function located in the system menu. With “Reset to Defaults?” flashing, press the INFO/ENTER button (18) to activate. Audio Menu Press the AUDIO/MENU button (3) on the control panel to access the audio menu. You can navigate through the audio menu items by pressing the AUDIO/MENU button repeatedly. - Page 59 MA300 Bluetooth Pair (On/Off): Choose “INFO/ENTER” to automatically pair a device. Liquid Crystal Display (LCD) Bluetooth (On/Off): Choose “Bluetooth On” or “Bluetooth Off”. Volume Preset (1/40 – 40/40): Select an automatic turn-on volume. The current frequency and activated functions are shown on the LCD panel (20). Reset to Defaults <ENTER>: Return the EEPROM to factory default set up values.
-
Page 60: Tuner Operation
MA300 TUNER OPERATION Automatically Store / Preset Scan (AS/PS Automatically Store Select an AM or FM band. Press and hold the AS/PS button (15) for more than two seconds to automatically select strong stations and store them in all bands. The new stations replace any stations already stored in that band. -
Page 61: Weather Band Operation
MA300 WEATHER BAND OPERATION alert is issued, the radio will turn on and play the announcement, then turn back off and revert to weather alert monitor mode. Accessing the Weather Band The radio will not respond to any weather alerts when it is off and will not automatically switch to Press the MODE button (4) to access the weather band mode. -
Page 62: Mp3/Usb Operation
MA300 MP3/USB OPERATION NOTE: After loading a USB device, files and folders are accessed in the order in which they were written to the device. Therefore, the playing order may not be the same as the order in which they are expected to be played. Controlling Playback Pause/Play Press the 1 || button (5) to suspend playback. -
Page 63: Bluetooth Operation
MA300 BLUETOOTH OPERATION Use ◄◄ / ►► The MA300 includes built-in Bluetooth technology that allows you to wirelessly connect to Navigate Bluetooth devices to this head unit for streaming audio playback. Press Press the List About Bluetooth Technology INFO/ENTER INFO/ENTER BT Device Device 1 Bluetooth is a short-range wireless radio technology. -
Page 64: App Operation
While in BT mode , the BT Audio icon ( ) illuminates on the LCD. primary functions of your MARINE AUDIO stereo right from your phone or tablet by transforming Selecting Tracks your mobile device into a functional stereo remote control! During playback, press the ◄◄... -
Page 65: Care And Maintenance
MA300 CARE AND MAINTENANCE TROUBLESHOOTING Keep the product dry. If it does get wet, wipe it dry immediately. Liquids might contain Symptom Cause Solution minerals that can corrode the electronic circuits. No power The vessel’s accessory If the power supply is properly Keep the product away from dust and dirt, which can cause premature wear of parts. -
Page 66: Specifications
MA300 SPECIFICATIONS FM Radio Frequency Coverage (USA) ......... 87.5 to 107.9 MHz Frequency Coverage (Europe) .
Need help?
Do you have a question about the JHD40BT and is the answer not in the manual?
Questions and answers