Advertisement
Available languages
Available languages
Quick Links
Geti GWD wireless doorbells
Pre-installation information
The signal range of the doorbell can be affected by interference from other elec-
tronics, metal, walls, concrete ceilings or other building materials. The doorbells
of Geti GWD series can reach distance of 150 - 300 m (depending on the type) in
an open area.
• Before setting and installation, test the range of the doorbell at the required
locations.
• Select a socket to connect the doorbell to and take the bell button to the area
where it will be set up.
• Select the desired ringtone. See "Set up procedure" below for instructions.
The doorbell is preset to default Ding Dong melody.
• Place the doorbell as far as possible from induction cookers, TVs or other elec-
tronic devices that produce magnetic fields or interfere with signals.
• Do not install the buttons on metallic materials such as doorframes. Metal
significantly reduces the range of the signal. However, if this is the only option,
we recommend that you first test the bell's functionality at the desired
distance.
• When the battery´s capacity is low, the operating range of the button trans-
mitter is also reduced. If the battery is completely discharged, the LED indica-
tor on the button will not work either. The button is powered by a 12V alkaline
battery type 23A.
• Replace the battery as described in Section 8. "Replacing the Battery".
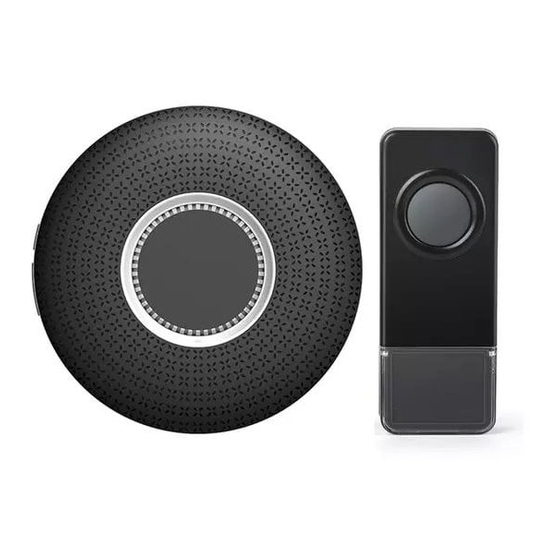
Product description
Doorbell (fig. No. 1)
AC 230V/50Hz plug
Speaker
Bell button (fig. No. 2)
Battery compartment
Button with LED indicator
Name tag
Adjusting the volume
There are 5 volume levels. The volume button
the doorbell.
Selecting ringtones
There are 58 types of ringtones, including bird songs, dog barking, alarm clock,
piano melodies and classic chimes. Select the desired melody using the ◀◀ (back)
and ▶▶ (forward) buttons on the side of the doorbell. To save the required melody
please continue to point 3 (a-c)
Pairing and melody change
a) Select your favorite melody by pressing the ◀◀ (back) or ▶▶ (forward) button
repeatedly. This melody will now be playing.
b) Set the doorbell to pairing mode by pressing and holding the button
the Ding Dong alert tone sounds and the LED flashes. You have approximately
5 sec. to complete the pairing. After this time, the mode will automatically end.
c) To pair button with a doorbell or to confirm the selected melody, press the bell
button 1x. If the pairing was successful, the doorbell will play selected melody.
d) If the pairing mode ends automatically before pairing up (the light on the bell
stops flashing or the bell does not play your selected melody), repeat steps a-c.
e) To change melody repeat steps a-c
Adjustiing the volume
Melody back ◀◀
Melody forward ▶▶
Mounting rail (fig. No. 3)
Holes for mounting using screws
can be found on the side of
Pairing more doorbells and buttons
Repeat above steps 3. (a-c). to pair additional bells or buttons. You can pair up to 50
devices. You can choose different melody for each doorbell.
All GETI GWD bells can be paired with each other.
Before final installation, test the operating range to make sure that the location
where you want to install the bell button is within reach of the doorbell itself.
Installing the button using double-sided adhesive pad
a) Make sure the base where the button is being installed is leveled, free of dust,
dirt, dry and degreased.
b) Remove the protective film from one side of the adhesive pad and stick it to the
underside of the button mounting rail.
c) Remove the protective film from the other side of the adhesive pad and press
the mounting rail to the desired location and hold for about 10 seconds.
d) Fix the button into the mounting rail. Installation is complete.
Installing the button using screws
a) Place the mounting rail of bell button to your required spot and make marks
on the base through the screw holes (Fig. 3).
b) Using a drill with a diameter corresponding to the dowels supplied, drill two
holes at the marked points. (Before drilling, make sure there are no pipes,
electrical wires or other objects in the area.)
c) Insert the supplied dowels into the pre-drilled holes.
d) Screw on the mounting rail with provided screws.
e) Fix the button into the mounting rail. Installation is complete.
Installation of the doorbell
a) Plug the doorbell into the standard AC 230V / 50 Hz socket in the room of your
choice. Now press the bell button to verify that the installed kit is working.
Replacing the battery in the button
a) Remove the front part of the bell button, by pushing the tab at the point shown
in Fig. 2, with the included screwdriver.
b) Remove the old battery and replace it with a new one of the same type 23A.
c) Check the polarity (+/-). The correct polarity is indicated inside the bell button
below the battery. (Failure to observe the polarity may damage the button.)
d) Place the front part of the bell button in its original position and press it down.
Troubleshooting
1) The doorbell does not make any sound.
• Check the battery in the bell button, replace it if necessary.
• The bell is not inserted in the socket correctly.
• The doorbell may be out of range of the doorbell button.
• The doorbell is not paired with the bell button.
• Check the volume setting.
Specifications
Doorbell power supply:
Button power supply:
Power consumption of doorbell:
IP protection of button:
IP protection of doorbell:
Signal range, depending on type:
Number of melodies:
Volume:
Frequency:
Working temperature:
Declaration of Conformity
Tipa, spol. s r.o. declares that all doorbells from series GWD are in compliance with
the basic requirements and other relevant provisions of Directive 2014/53/EU. The
device can be freely operated in the EU. The Declaration of Conformity can be found
at www.tipa.eu
Attention
Do not dispose of the product at the end of its useful life together with
municipal waste. Bring it to a collection point for recycling of electrical
and electronic equipment. Information on the correct disposal method
until
is given by the symbol on the product, in the operating instructions or
on the packaging. Recycle materials according to their designation. Recycling
materials or other forms of reuse of old appliances makes a significant contribution
to protecting the environment. For information on authorized recycling centers,
contact your local authority.
AC 230V / 50Hz
DC 12V 23A baterie
<0,5 W
IP55
IP20
150 – 300 m in open air
58
5 levels, 25 – 110 dB
433.92 MHz
-20°C to +50°C
Advertisement

Summary of Contents for Geti GWD
- Page 1 Before final installation, test the operating range to make sure that the location of Geti GWD series can reach distance of 150 - 300 m (depending on the type) in where you want to install the bell button is within reach of the doorbell itself.
- Page 2 Všechny zvonky série GETI GWD je možné mezi sebou navzájem párovat. niky, kovem, stěnami, betonovými stropy nebo jinými stavebními materiály. Zvonky série Geti GWD pracují dle typu na vzdálenost 150 – 300 m v otevřeném a nerušeném Před finální instalací otestujte provozní dosah, abyste se ujistili, že místo, ve kterém prostředí.
- Page 3 TIPA spol. s r. o. prehlasuje, že typ rádiového zariadenia pri všetkých zvončekov sé- a) Vyberte obľúbenú melódiu stláčaním ◀◀ (vzad) alebo ▶▶ (vpred). Touto rie GWD je v súlade so smernicou 2014/53 / EÚ. Úplné znenie vyhlásenia o zhode EÚ melódií potom bude zvonček zvoniť.
Need help?
Do you have a question about the GWD and is the answer not in the manual?
Questions and answers