Advertisement
Quick Links
Advertisement

Summary of Contents for iDeck iDecKing EasyClick system
- Page 1 EasyClick system...
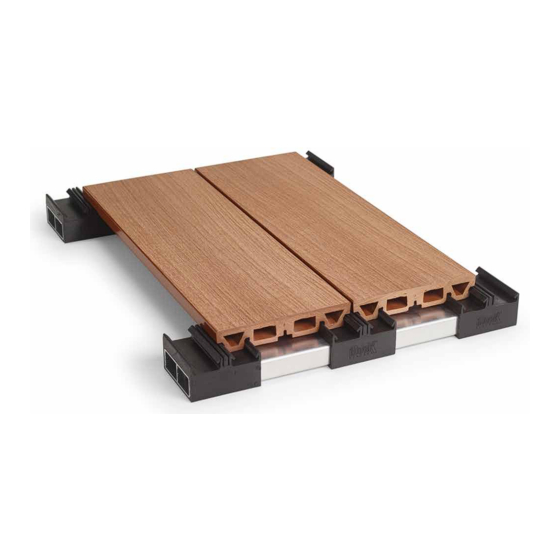
- Page 2 components EASYCLICK SYSTEM UNDERSTRUCTURE IDECKING REVOLUTION BOARDS - DETAILS Duro boards are made from circa 50% RICE HUSK and 50% virgin PVC and Minerals in order to deliver a product with as natural a look and feel as possible. As it happens for wood, Duro composite material can encounter a slight chromatic change due to UV rays.
- Page 3 technical data on the system EasyClick board standard width 140mm + 4 mm gap Total Height of DURO Boards + EasyClick Understructure: 53 mm Total Height of ETHERNO boards + EasyClick Understructure: 47 mm...
- Page 4 Before the installation Dos and Donts Duro is a non porous material so water will stand on the deck for longer than timber decking boards. According to the principles of constructive wood preservation, boards must always be installed with sufficient gradient. (1-2%).
- Page 5 Installation: EasyClick system Before Starting you will need to determine the most suitable installation scenario: • Scenario A : Installations on concrete or existing paving using rubber pads or adjustable pedestals bonded or fixed to understructure. • Scenario B : Installations on sensitive roofing membranes where mechanical fixings are not possi- ble using double aluminium rails on pedestals.
- Page 6 Installation: EasyClick system posa del sistema EasyClick ATTENTION: - in case you need to pull your deck close to a fix point (ie. house, wall) you will have cut half of the first clip as shown in CASE 1 - page 13 Laying the first board ●...
- Page 7 Installation: EasyClick system posa del sistema EasyClick Scenario B: EasyClick system installation on Jack Supports (adjustable risers) installations on sensitive roofing membranes where fixing down of iDecking is not possible, an additional “blank rail” is required for this method of installation ●...
- Page 8 Installation: EasyClick system posa del sistema EasyClick SCENARIO C : Installations over bare earth, use a primary frame with posts concreted into the ground ● Build a bearer framework in the chosen area with posts concreted into the ground. ● For best results use Galvanised steel frame with bearers positioned at intervals of 600mm for domestic applications and 500mm for public areas Placing the iDecking Rails...
- Page 9 Installation: EasyClick system Installation with a Primary Understructure necessary when it’s impossible to fix the rails on the ground - Place the Primary Aluminum Rails with an interval range of 65/70 cm one from the other. The section of the Aluminum rails used for Primary Understructure is: 30 x 50 x 3 mm.
- Page 10 Modules: EasyClick system EasyClick MODULES deck building The Clip B lets you pre-build the modules of your future deck. This solution is even quicker in installation time and it is highly suggested in case of big areas to cover or temporary decks that will have to be removed and re- installed.
- Page 11 frames and finishes EasyClick system posa del sistema EasyClick Installation of EasyClick STEP PROFILE EasyClick system allows a clickable framing/nosing profile called Step Profile, to be easily and quickly installed. Installation parallel to boards direction Installation perpendicular to boards direction - Click the Step Profile onto the remaining - Use the Clip B understructure at the end half clip at the end of each “A”...
- Page 12 frames and finishings EasyClick system posa del sistema EasyClick Diagonal cuts - Cut the final part of the understructures following the desired angle. - Add portions of understructure “A” among the principal ones, to ensure correct support for the boards to click to. Complete the deck - Cut the boards according to the desired size and complete the deck.
- Page 13 frames and finishings EasyClick system posa del sistema EasyClick Rounded cuts - placing the understructure - Cut the final part of the understructures following the desired angle. - Add portions of understructure among the principal ones, otherwise the boards would not be supported in the final part - Cut the boards according to the desired size and complete the deck.
- Page 14 frames and finishes EasyClick system posa del sistema EasyClick How to pull the boards close to a wall CASE 1: cutting the clip - Cut the final part of the clip as shown in the picture. CASE 2: cutting the board - Cut the board according to the needed size - put a rubber riser as shown (in red) in the picture to ensure the board is properly supported underneath.
- Page 15 Optionals EasyClick iJack: expansion control bracket iJack was developed to overcome one of the issues of composite decking expansion & contraction by locking the ends of each board together to the gap stays constant. - Duro Excellence boards are already drilled on the underside in preparation of taking the iJack - Turn the Duro board and click the iJack into the pre-drilled hole, pay attention to leave the flat sides of the iJack out.
- Page 18 Professional Deck builders will be extremely happy to know that iDecking EasyClick system won’t force them on their knees all day long and will also drastically reduce installation time! Say good bye to wasting your time aligning each decking board since ourEasyClicksystemautomaticallyalignsitforyou! EasyClick understructure “rails”...
- Page 19 www.idecksystems.com...