Table of Contents
Advertisement
Quick Links
Pointmaker
Live Streaming Annotation System
w/ Audio Extraction, Volume Control, iPad Control, Scaling,
CPN-5800
®
Capture, Print, and Networking Features
User Guide
The CPN-5800 is a dynamic product,
with features added on a regular basis. The
latest version of this manual will be posted
for download at pointmaker.com, on it's
product page.
Rel. Date: 03/22/2016
Advertisement
Table of Contents

Related Manuals for Pointmaker CPN-5800


Summary of Contents for Pointmaker CPN-5800
- Page 1 Audio Extraction, Volume Control, iPad Control, Scaling, Capture, Print, and Networking Features User Guide The CPN-5800 is a dynamic product, with features added on a regular basis. The latest version of this manual will be posted for download at pointmaker.com, on it’s product page.
- Page 2 Pointmaker LLC Pointmaker® is a registered trademark of Pointmaker LLC, of Tucson, Arizona. All other trademarks are the property of their respective companies.
-
Page 3: Table Of Contents
Setting the Destination for Saved Files ......................49 Setting the Verify Option ..........................49 Calibrating CPN-5800 Controllers ......................50 Serial Port Settings ............................53 Setting the Tablet Template ..........................60 Network Features ............................61 Printer Setup ..............................63 Multipoint ..............................64 Pointmaker LLC Pointmaker CPN-5800 Live Streaming Annotation System - Page iii... - Page 4 (CPF) Freeze ..............................112 (CPI) Read Specific Image From USB ......................112 (CPN) Read Specific Image From TFTP ....................113 (CPP) Print Current Image ........................113 (CPRD) Read Current Image from USB ....................113 Page iv - Pointmaker CPN-5800 Live Streaming Annotation System Pointmaker LLC...
- Page 5 Quick Reference for Keyboard ........................143 Quick Reference for Touch Screens and Whiteboards .................144 Quick Reference for Other Mouse Devices....................144 Symbol Font Chart ........................147 Map Font Chart ..........................149 RS-232 (COMM Port) Pinout ......................151 Pointmaker LLC Pointmaker CPN-5800 Live Streaming Annotation System - Page v...
- Page 6 Glossary ............................153 Outside copyright information for software included with the CPN-5800........157 Page vi - Pointmaker CPN-5800 Live Streaming Annotation System Pointmaker LLC...
-
Page 7: Section One
eCtion ettinG tarted... -
Page 9: Introduction
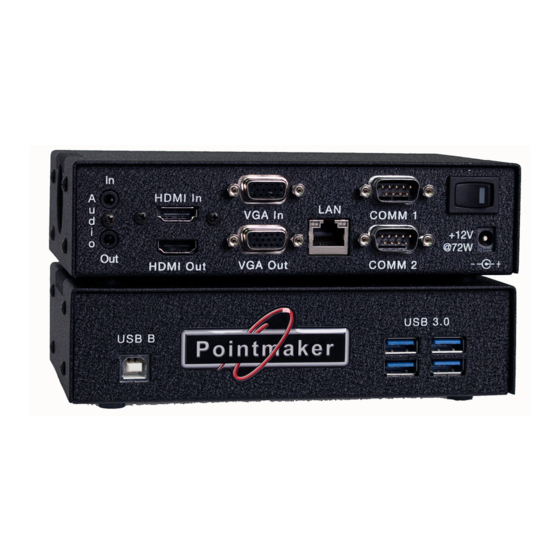
Live Streaming Annotation System with iPad Control, Capture, Print and Network Capabilities The CPN-5800 gives the user the ability to capture, print and share annotated images directly from the Pointmaker unit. An annotated image may be “cap tured” by saving it to a USB storage device, like a flash drive. You can print annotated images to a color PostScript printer. - Page 10 Figure 1-1: Front and Back Panels iPad Server Options The CPN-5800 contains an iPad server which supports remote control of certain features within the unit, along with annotation, all through an iPad app. Opera- tion of iPad app features is featured within the app’s Help area. For more informa- tion, please see our website at www.pointmaker.com/servers for further informa-...
-
Page 11: Features
• On an optional digitizing tablet, an additional 3 highlight colors can be used to create a see-through colored overlay, just like “Highlighters” on paper. • A drop shadow effect may be selected to further optimize the display of drawn lines. Pointmaker LLC Pointmaker CPN-5800 Live Streaming Annotation System - Page 5... - Page 12 • A solid white chalkboard can be selected for drawing when the video image is no longer needed. • Sync generation allows the Pointmaker to automatically select the sync if no live video is desired. In the event that sync from a poor video source is lost, the Pointmaker will automatically switch to chalkboard mode if auto-chalkboard is enabled.
- Page 13 Section One:Getting Started Introduction Figure 1-2: Marking example over an image of a spreadsheet Pointmaker LLC Pointmaker CPN-5800 Live Streaming Annotation System - Page 7...
- Page 14 Introduction Section One:Getting Started Page 8 - Pointmaker CPN-5800 Live Streaming Annotation System Pointmaker LLC.
-
Page 15: Controllers/Markers Overview
This section introduces you to the most common devices you might use with the CPN-5800. The CPN-5800 supports up to two RS-232 devices and up to 10 USB devices through the addition of powered USB hubs. IMPORTANT: Be sure to power down the Pointmaker before connecting or disconnecting any controllers. -
Page 16: Kb-30 Keyboard
The following are general definitions for keyboard functions. More details on each key’s functions can be found in the Appendix (see Activating the Menu, on page 29). Page 10 - Pointmaker CPN-5800 Live Streaming Annotation System Pointmaker LLC. - Page 17 Marker and Cursor Movement When operating the Pointmaker with the keyboard controller, you can position active markers using the arrow keys (referred to as Positioning Keys). These keys are located to the right of the Enter key. For fine movement, press the Ctrl key along with one of the Positioning keys.
-
Page 18: Touch Screens And Whiteboards
Controllers/Markers Overview Section One:Getting Started Touch Screens and Whiteboards The Pointmaker CPN-5800 is engineered for use with many touch screens or interactive whiteboards sold by other manufacturers. Contact Pointmaker LLC for compatibility information. In general, you use the touch screen to draw, position pointers, or make menu selections. -
Page 19: Mouse Devices
Mouse Devices There are numerous other compatible devices for use with the CPN-5800. They are mostly based on PC-compatible mouse controllers with two buttons. Since Pointnaker LLC does not manufacture these devices, you will need to test the compatibility of any particular unit. - Page 20 Marker and Cursor Movement When operating the Pointmaker with a mouse device, you can move the cursor or active pointer anywhere on the screen by moving the mouse’s track ball. The active pointer or cursor will move respectively.
-
Page 21: Section Two
eCtion nstallation... - Page 22 Section Two:Installation Page 16 - Pointmaker CPN-5800 Live Streaming Annotation System Pointmaker LLC...
-
Page 23: General Installation
Section Two:Installation Connecting Audio/Video Sources and Outputs eneral nstallation Installation of the Pointmaker CPN-5800 can be divided into the following four areas: • Connect Audio/Video Sources and Outputs • Connect Controllers • Connect LAN • Power Up (leaving the CPN-5800 to last) Connecting Audio/Video Sources and Outputs Analog audio input and output ports are supplied for stereo mini plugs (3.5mm). - Page 24 Connecting Audio/Video Sources and Outputs Section Two:Installation Figure 2-2: VGA-Video Connectors 2. VGA Output: If desired, use a VGA video cable to connect the Pointmaker VGA OUTPUT connector to a VGA display device. HDMI Connectors If connecting HDMI video: 1. HDMI Input: Using a HDMI video cable, connect the Pointmaker HDMI INPUT connector to a HDMI output connector on a HDMI video source. Figure 2-3: HDMI Video Connectors 2. HDMI output: Using a HDMI video cable, connect the Pointmaker HDMI OUTPUT connector to a HDMI output connector on a HDMI video source. HDMI IN and HDMI OUT are HDCP compliant. Page 18 - Pointmaker CPN-5800 Live Streaming Annotation System Pointmaker LLC...
-
Page 25: Connecting Controllers
• iPads Here are some guidelines for setting up these devices. IMPORTANT: Be sure to power down the Pointmaker before connecting or disconnecting any controllers. The Pointmaker will automatically detect the installed controllers upon power up. If you change controllers or add a new... - Page 26 Pre-Installation Recommendations: Cabling: If you desire to have the touch screen farther from the CPN-5800 than the length of the touch screen’s RS-232 cable, you may need to install a line driver. The touch screen and Pointmaker will not func tion properly if the signal strength is too weak or encounters interfer ence.
- Page 27 DTX-DRV extension” on page 22). The DTX-DRV specification allows for distances up to 450 feet. For USB Touch Screens: Pointmaker LLC offers a USB line driver and extension hardware. Many third party line drivers are also available (call Pointmaker LLC for compatibility). NOTE: Make all connections before applying power.
-
Page 28: Videoconferencing
Connecting a Mouse Device 1. Connect the mouse device to a COMM port on the back of the Point- maker. If you add a controller at a later time, be sure to power down the Pointmaker, install the new device, then power up. Videoconferencing The CPN-5800 supports videoconferencing (see Multipoint, on page 64). - Page 29 Section Two:Installation Power Up NOTE: In order for the Pointmaker to properly sync with the video signals, the sources should be turned on first. After a moment, a Pointmaker splash screen will appear, followed by the initializing of the ports, and ending with a copyright message.
- Page 30 Power Up Section Two:Installation Page 24 - Pointmaker CPN-5800 Live Streaming Annotation System Pointmaker LLC...
-
Page 31: Section Three: Cpn-5800 Menu System
Cpn-5800 M ysteM... -
Page 33: Overview
Section Three: CPN-5800 Menu System verview This chapter covers the menu system built into the CPN-5800. It includes many settings you may want to make before a presentation. In general, they are made from the menu system, although some control devices can also access a few of the settings directly. - Page 34 Section Three: CPN-5800 Menu System Page 28 - Pointmaker CPN-5800 Live Streaming Annotation System Pointmaker LLC.
-
Page 35: Using The Cpn-5800 Menu System
Button, then press the Tip Button into the drawing area. Keep both pressed for at least 5 seconds. NOTE: Press the tip button soon after the barrel button, or the CPN-5800 may interpret the barrel button press as a “clear” command. - Page 36 A selection from the Main Menu causes a submenu to appear alongside it. A selection from the submenu sometimes dis plays a second submenu of choices based on the selection you make. Page 30 - Pointmaker CPN-5800 Live Streaming Annotation System Pointmaker LLC.
- Page 37 Figure 3-2: Sample Submenu Exiting Menus Exit a submenu by selecting any option in the Main Menu. Exit the menu system by selecting EXIT. Pointmaker LLC Pointmaker CPN-5800 Live Streamimg Annotation System - Page 31...
- Page 38 Menu Basics Section Three: CPN-5800 Menu System Page 32 - Pointmaker CPN-5800 Live Streaming Annotation System Pointmaker LLC.
-
Page 39: Preparing The Cpn-5800 For Use
Color Palette allows you to pre-select which of the CPN-5800’s seven marking colors you wish to use during a pre sentation. It also makes it easy to select colors that work well with the images you are presenting. - Page 40 Figure 3-4: Color Palette with all colors selected except white and red. The Color Palette Menu next to the Main Menu. 4. Select the color or colors that you would like to have available during the presentation. Page 34 - Pointmaker CPN-5800 Live Streaming Annotation System Pointmaker LLC.
-
Page 41: Selecting A Brightness Level
You can select a brightness level for all markers on an overlay. This adjust ment aids in creating optimum contrast between CPN-5800 graphics and the video image. The brightness selection is only applied to the current overlay, so it is possible to display a different brightness level for each of the overlays. - Page 42 The Set Brightness dialog appears in place of the Main Menu, featuring a transparent background that allows you to adjust brightness in accordance with your image. 4. Select the level of brightness you desire. Page 36 - Pointmaker CPN-5800 Live Streaming Annotation System Pointmaker LLC.
-
Page 43: Changing Pen Proximity
5. Exit the dialog by activating the OK button. Changing Pen Proximity The CPN-5800 with optional digitizing tablet may have Pen Proximity on or off. When Pen Proximity is enabled, the active pointer disappears as you move the pen tip away from the tablet. When Pen Proximity is disabled, the active pointer remains on-screen even when you pull the pen away from the tablet or moni tor. - Page 44 Section Three: CPN-5800 Menu System You can override the default selection by choosing a different video mode. If there is an output, but no input, the CPN-5800 will display the chalkboard (see Activating the Chalkboard, on page 89). You can select a video mode from the tablet, keyboard, or menu system. The menu system offers additional adjustments for brightness, contrast, saturation and hue.
- Page 45 Figure 3-7: Video Source dialog The Video Source dialog appears next to the Main Menu. 4. Select the desired video source. 5. Select Default if you have no video input. Pointmaker LLC Pointmaker CPN-5800 Live Streamimg Annotation System - Page 39...
-
Page 46: Setting Video Output
Setting Video Output The CPN-5800 gives you a wide range of video parameters for fine tuning your video output. 1. Activate the menu system (see Activating the Menu, on page 29). -
Page 47: Zap Icon Toggle
HDCP sources will remain HDCP no matter what the setting. 1. Activate the menu system (see Activating the Menu, on page 29). Pointmaker LLC Pointmaker CPN-5800 Live Streamimg Annotation System - Page 41... -
Page 48: Audio Select
The Main Menu appears (see Figure 3-1: Main Menu, on page 30). 2. Select DISPLAY. The Display menu appears (see Figure 3-6: Display Menu, on page 39). 3. Select AUDIO SELECT. The Audio Select dialog appears. Page 42 - Pointmaker CPN-5800 Live Streaming Annotation System Pointmaker LLC. - Page 49 Audio Select Figure 3-11: CPN-5800 Audio Select dialog The dialog for the CPN-5800 allows you to select audio input analog or digital audio sources. Whatever input you select can be routed to any, all or none of the audio outputs.
-
Page 50: Background Options
The Background menu allows you to select between your current Source Video or the Chalkboard background. It also has an Auto Chalkboard selection which causes the CPN-5800 to automatically switch to the Chalkboard if no viedo signal is present at the selected Source Video. -
Page 51: Touch Screen Command Areas
The Display menu appears (see Figure 3-6: Display Menu, on page 39). 3. Select TOUCH SCREEN AREAS. Figure 3-14: Touch Screen Corners dialog The Touch Screen Corners dialog appears. 4. Select one of the areas. Pointmaker LLC Pointmaker CPN-5800 Live Streamimg Annotation System - Page 45... -
Page 52: System Info
The Main Menu appears (see Figure 3-1: Main Menu, on page 30). 2. Select DISPLAY. The Display menu appears (see Figure 3-6: Display Menu, on page 39). 3. Select SYSTEM INFO. Page 46 - Pointmaker CPN-5800 Live Streaming Annotation System Pointmaker LLC. -
Page 53: Capture Options
1. Activate the menu system (see Activating the Menu, on page 29). The Main Menu appears (see Figure 3-1: Main Menu, on page 30). 2. Select CAPTURE. Figure 3-17: Capture dialog Pointmaker LLC Pointmaker CPN-5800 Live Streamimg Annotation System - Page 47... - Page 54 6. In the INDEX field, enter the number to start numbering from. Each time an image is saved, the number will increment. The default is 1. The num bering is remembered by the CPN-5800, even through cycling of power. Given the example shown, filenames will start with img1.bmp, then incre- ment to img2.bmp, img3.bmp and so on.
-
Page 55: Setting The Destination For Saved Files
The Capture dialog appears (see Figure 3-17: Capture dialog, on page 47). 3. Select the Destination as USB, TFTP or SMB. The CPN-5800 will use your selection whenever you activate the Save command from either the digitizing tablet or the touch screen. -
Page 56: Calibrating Cpn-5800 Controllers
NOTE: The calibration described in this section is the most accurate calibra- tion for each touch screen connected to the CPN-5800. How ever, it is usually necessary upon first power-up to do a rough calibra tion during the start-up process. - Page 57 The Calibration dialog for the selected controller appears. 5. Follow the calibration instructions displayed. After you perform final calibration procedures, the Calibration dialog automatically disappears, and you return to the menu system. Pointmaker LLC Pointmaker CPN-5800 Live Streamimg Annotation System - Page 51...
- Page 58 If there was a calibration previously stored in the location you select, it will be overwritten. Note: You will probably want to make a written record of which cali brations you have stored in each location since the CPN-5800 keeps only the location number. Select a Calibration When you are ready to use a calibration you have previously stored, choose Select Calibration from the Calibration menu.
-
Page 59: Serial Port Settings
Using the settings available in the Serial Ports menu, it is possible for you to limit the initialization process for a designated port so that the CPN-5800 looks for only the device type you specify. This speeds up the initialization process consider- ably. - Page 60 Figure 3-24: Serial Ports Dialog The Serial Ports dialog appears. NOTE: All the serial ports installed on your CPN-5800 are listed by port number, with the device type displayed to the right of each num ber. If the device type is in blue, it has been assigned through the autodetect procedure at startup.
- Page 61 Section Three: CPN-5800 Menu System Serial Port Settings CPN-5800 with Other Systems, on page 53), there are two ways to change it. The next two steps describe how. 5. (optional) Select the arrow to the right of the device type you wish to change.
- Page 62 If you are assigning a port for communicating with another system(see Integrating the CPN-5800 with Other Systems, on page 51), you must select either Control Port or PVI to PVI as your device type. The CPN-5800 sup ports assigning only one port for each type.
- Page 63 NOTE: Factory settings are 9600 baud, no parity, 1 stop bit. Data bits, which cannot be manually set, are 8 data bits. 3. Exit the menu system and cycle the power on the CPN-5800. The CPN-5800 implements the new settings.
- Page 64 Figure 3-27: USB Devices Dialog 4. Select INPUT DEVICES Figure 3-28: USB Devices Dialog The USB Devices dialog appears. Up to 10 USB devices can be connected through the use of hubs. Page 58 - Pointmaker CPN-5800 Live Streaming Annotation System Pointmaker LLC.
- Page 65 Section Three: CPN-5800 Menu System Serial Port Settings NOTE: All the USB devices installed on your CPN-5800 are listed by port number, with the device type displayed to the right of each number. If the device type is in blue, it has been assigned through the autodetect procedure at startup.
-
Page 66: Setting The Tablet Template
Section Three: CPN-5800 Menu System This dialog presents a scrolling list of all device types currently supported by the CPN-5800 in alphabetical order. The Page Up and Page Down buttons allow you to quickly scroll through the names until you find the device type you desire. -
Page 67: Network Features
You can now use the corresponding paper template in the tablet. Network Features The networking capabilities built into the CPN-5800 support various func tions on a TCP/IP network. Currently, you can print to a color Postscript printer, and share images with other Pointmaker Video Markers using our Multipoint software. - Page 68 Figure 3-32: Network Setup dialog w/sample data The Network 1 Setup dialog appears. This dialog prepares the CPN-5800 for communicating on your network. The Network 1 and Network 2 dialogs are identical except for setting the Nameserver, which is only found in this dialog. They correspond to the two network ports at the back of the unit.
-
Page 69: Printer Setup
Section Three: CPN-5800 Menu System Printer Setup Printer Setup The CPN-5800 can print to a color Postscript printer over a TCP/IP network. This section shows you how to set it up. 1. Activate the menu system (see Activating the Menu, on page 29). -
Page 70: Multipoint
PVI-Server Requirements A computer running the PVI-Server software is required to coordinate meet ings with multiple Pointmaker units. A copy of the server software is available on request. As an alternative, you are also welcome to use a Pointmaker LLC sponsored server, which is set up on the internet. - Page 71 6. Continue to the next section. Create, Join or Exit a Multipoint Meeting Once all the previous steps have been accomplished, the Pointmaker unit is ready to support the Multipoint features. These steps explain how you can cre ate a Multipoint meeting that other Multipoint enabled Pointmakers can join.
- Page 72 There is a free TFTP server available from solarwinds.com which has been tested successfully with the CPN-5800. You will need the IP address of the server where TFTP is installed. It’s also important to make sure your firewall does not block it.
- Page 73 6. Exit this dialog by selecting Previous Menu. Configure Windows Share (SMB) Settings The Pointmaker Windows Share (SMB) feature gives you the ability to save and retrieve images using the SMB protocol. To save a file using SMB, you must first activate a Share on a server with the SMB protocol running.
- Page 74 7. Select the Connect Share button to connect the Pointmaker to the Windows Share. The Pointmaker will indicate if it is able to connect to your Share. If it fails, check your settings. 8. Exit this dialog by selecting Previous Menu.
-
Page 75: Section Four
eCtion sinG arkers... -
Page 77: Overview
It is assumed that you have made setup selections sometime before your presentation (see Preparing the CPN-5800 for Use, on page 33). The Pointmaker features a variety of graphics, called markers, which you place over a video image to draw attention to or explain details of the image. The markers available include freehand drawing and a variety of pointers. - Page 78 Overview Section Four: Using Markers Page 72 - Pointmaker CPN-5800 Color Video Marker Pointmaker LLC...
-
Page 79: Assigning Marker Appearance
How ever, you can erase or undo the drawing and begin again (see Erasing Markers, on page 86). Pointmaker LLC Pointmaker CPN-5800 Color Video Marker - Page 73... -
Page 80: Assigning Line Styles
Change Color key on the keyboard, after you select a highlight line in the popup. 3. The pop-up disappears. All lines drawn from this point on will appear in the newly selected line width and style. From the Keyboard 1. Activate the Line Style command. Page 74 - Pointmaker CPN-5800 Color Video Marker Pointmaker LLC... - Page 81 The Main Menu appears (see Figure 3-1, Main Menu, on page 30). 2. Select the ANNOTATION option The Annotation menu appears (see Figure 3-3, Annotation Menu, on page 34). 3. Select the LINE STYLE option. Figure 4-2: Line Style Menu The Line Style Menu appears. 4. Select the fine, medium, or bold line, with or without a drop shadow. 5. The active option displays a white fill. Pointmaker LLC Pointmaker CPN-5800 Color Video Marker - Page 75...
-
Page 82: Selecting Pointers
1. Activate the menu system (see Activating the Menu, on page 29). The Main Menu appears (see Figure 3-1, Main Menu, on page 30). 2. Select the ANNOTATION option The Annotation menu appears (see Figure 3-3, Annotation Menu, on page 34). 3. Select the POINTERS option. Page 76 - Pointmaker CPN-5800 Color Video Marker Pointmaker LLC... -
Page 83: Turning The Active Pointer On/Off
When active, this feature causes the active pointer to disappear each time you remove your drawing device from proximity of the tablet or screen drawing surface (see Changing Pen Proximity, on page 37). 1. Press the Pointer On/Off icon on the tablet Menu Strip. Pointmaker LLC Pointmaker CPN-5800 Color Video Marker - Page 77... - Page 84 Active Marker On/Off command. From the Menu System Pointers are turned off in the same dialog where they are selected (see PTurn- ing the Active Pointer On/Off, on page 77. Page 78 - Pointmaker CPN-5800 Color Video Marker Pointmaker LLC...
-
Page 85: Marking
• Stamping the Date/Time Entering the Marking Mode The Pointmaker is in the marking mode by default. The only time it is not in marking mode is when a menu is displayed. In the Marking mode, the image from the video source is displayed along with any stored markers. An active pointer is also displayed, unless it was disabled during setup(see Pointer Toggle, on page 38). -
Page 86: Drawing
4. Repeat any of these steps as often as desired. Drawing You can draw on the Pointmaker overlay simply by beginning to draw. The drawing feature allows you to circle important parts of the image, write on the image, or underscore particular parts of text. You can draw freehand curves or straight lines. -
Page 87: Typing Text Labels
You can scroll backwards through the font options, by activating the Reverse Toggle command. 4. Select a font size by repeatedly activating the Font Size command until the correct size appears on screen. You can scroll backwards through the size options, by activating the Reverse Toggle command. Pointmaker LLC Pointmaker CPN-5800 Color Video Marker - Page 81... -
Page 88: Sizing And Anchoring Frames
7. Exit text typing mode by pressing any other function key. Sizing and Anchoring Frames This feature works only using the keyboard. The Pointmaker features four frame types: box frame, circle frame, solid box frame, and solid circle frame. Frames remain active (sizable and positionable) until you anchor them. -
Page 89: Stamping The Date/Time
1. Activate the Show Date/Time command. A date/time icon appears. 2. Position the date/time icon anywhere on the video image. 3. To select a solid or transparent label background, activate the Text Background On/Off command. 4. Anchor the date/time label. The current date/time label appears. A date/time cursor also appears on screen, ready for the next action. Pointmaker LLC Pointmaker CPN-5800 Color Video Marker - Page 83... - Page 90 Marking Section Four: Using Markers Page 84 - Pointmaker CPN-5800 Color Video Marker Pointmaker LLC...
-
Page 91: Clearing Markers
Follow these instructions to undo a marker, beginning with the most recently anchored marker or line segment. You can repeat this command as often as needed until the screen is clear of markers. Pointmaker LLC Pointmaker CPN-5800 Color Video Marker - Page 85... -
Page 92: Erasing Markers
1. Activate the menu system (see Activating the Menu, on page 29). The Main Menu appears (see Figure 3-1, Main Menu, on page 30). 2. Select the ANNOTATION option The Annotation menu appears (see Figure 3-3, Annotation Menu, on page 34). 3. Select ERASE METHOD. Page 86 - Pointmaker CPN-5800 Color Video Marker Pointmaker LLC... - Page 93 SmartBoard pen tray and touch it any where on the board, the Pointmak er overlay will clear. If you would prefer to erase the Pointmaker overlay in the same way that you would erase dry erase markers, please use the following pro cedure:...
- Page 94 2. Activate the Draw command, and drag the eraser over the markers The markers disappear as you wipe. When you lift the drawing device (that is, your finger or stylus), the Pointmaker closes the eraser function, and enters Marking Mode. If you need to erase again, repeat steps 13. Page 88 - Pointmaker CPN-5800 Color Video Marker...
-
Page 95: Using The Chalkboard
The video source returns, along with any markers you may have anchored on the chalkboard. From the Menu System 1. Activate the menu system (see Activating the Menu, on page 29). The Main Menu appears (see Figure 3-1, Main Menu, on page 30). Pointmaker LLC Pointmaker CPN-5800 Color Video Marker - Page 89... -
Page 96: Displaying Different Overlays
With the keyboard installed, you can display one of 10 stored marker overlays. Also, you can temporarily turn off the marker overlay, without affecting the markers you store there. This section covers the following overlay functions: • Paging Through Overlays (in sequence or out-of-sequence) • Turning an overlay Off/On Page 90 - Pointmaker CPN-5800 Color Video Marker Pointmaker LLC... -
Page 97: Paging Through Overlays
Turning Off the Marker Overlay When the keyboard is installed, you can turn off the Pointmaker overlay to view the video image without any markers. When you turn the overlay on again, the markers you anchored on that overlay will reappear. You can only activate this command from the keyboard. - Page 98 Using The Chalkboard Section Four: Using Markers Page 92 - Pointmaker CPN-5800 Color Video Marker Pointmaker LLC...
-
Page 99: Section Five
eCtion MaGe oBility... -
Page 101: Overview
Section Five:Image Mobility Overview verview The Pointmaker CPN-5800 makes it easy to move annotated or captured images in and out of the unit. This gives you newfound flexibility in the cre ation and sharing of your presentations. It is now easy to capture images, with or without annotations, by either saving or printing them. - Page 102 Overview Section Five:Image Mobility Page 96 - Pointmaker CPN-5800 Color Video Marker Pointmaker LLC...
-
Page 103: Image Manipulation
Freezing Video If video files are being shown as part of a presentation, the CPN-5800 can freeze it at any point so you can draw attention to a particular frame’s contents. - Page 104 To save a file using TFTP, you must first install a TFTP server on the computer which will receive the file(s). There is a free TFTP server available from solarwinds.com which has been tested successfully with the CPN-5800. You will need the IP address of the server where TFTP is installed(see Configure TFTP Settings, on page 64).
- Page 105 When the counter reaches 100, it disappears. The system is then ready to save another image. NOTE: Operation of the CPN-5800 will slow down during the saving process. The name of the file is determined by the settings in the File Defaults dialog (see Figure 3-14: File Defaults dialog, on page 46).
-
Page 106: Retrieving Images
Image Manipulation Section Five:Image Mobility NOTE: Operation of the CPN-5800 will slow down during the saving process. The name of the file is determined by the settings in the File Defaults dialog (see Figure 3-14: File Defaults dialog, on page 48). - Page 107 The file extension must be “bmp”. The image is displayed on the screen. To retrieve an image using Windows Share (SMB) 1. Retrieve an image in one of the following ways: a) (touch screen) Touch the appropriate area if you assigned this com- mand. b) (digital tablet) Activate the “Get” button. c) (keyboard) Type “Alt-F3”. Pointmaker LLC Pointmaker CPN-5800 Color Video Marker - Page 101...
-
Page 108: Printing Images
The image is displayed on the screen. Printing Images The CPN-5800 allows you to print to a color Postscript printer either directly or over a TCP/IP network. If you print directly, the configuration requires a USB to Centronics cable. Contact Boeckeler Instruments if you want to use a direct connection. -
Page 109: Sending Images
Section Five:Image Mobility Image Manipulation Sending Images The CPN-5800 allows you to send images to other CPN-5800’s over a TCP/IP network. All units must be currently active in the same Multipoint meeting (see Multipoint, on page 64) To send an image 1. Send an image in one of the following ways:... - Page 110 Image Manipulation Section Five:Image Mobility Page 104 - Pointmaker CPN-5800 Color Video Marker Pointmaker LLC...
-
Page 111: Section Six
eCtion rs-232 C sinG oMMands... -
Page 112: Using Rs-232 Commands
Section Six:Using RS-232 Commands Page 106 - Pointmaker CPN-5600, CPN-6000 Color Video Markers Pointmaker LLC... -
Page 113: Overview
Use following commands to program A/V programmable remote control sys tems so that each Pointmaker CPN-5600 model can be operated from a remote device. Note: The RS-232 commands listed here are a complete list for all products. Not all commands apply to the CPN-5600. -
Page 114: X-Y Coordinate Grid
(2Ø47,ØØØØ) <--- X axis ---> (ØØØØ,2Ø47) (2Ø47,2Ø47) Figure 6-1: Screen Grid (A) Autodetect Video Input The “A” command tells the Pointmaker whether to automatically detect what video input to switch to. <Esc>(A1 Enables Autodetect <Esc>(AØ Disables Autodetect NOTE: The Autodetect command is overridden by the Video Input Type (M) command. -
Page 115: (Ai) Audio Input
Audio output for HDMI port 3 is disabled. <Esc>(AO31 Audio output for HDMI port 3 is enabled. <Esc>(AO3T Audio output for HDMI port 3 is toggled between on and off. Pointmaker LLC Pointmaker CPN-5600, CPN-6000 Color Video Markers - Page 109... -
Page 116: (Aov) Audio Volume
Sets 2 HDMI audio output <ESC>(AOV3nnn Sets 3 HDMI audio output <ESC>(AOVAnnz Sets analog audio output <ESC>(AOVUnnn Sets USB audio output (B) Background The “B” command tells the Pointmaker which background to use. <Esc>(BV Video Background <Esc>(BC Chalkboard Background <Esc>(BT Video/Chalkboard Toggle <Esc>(BL1 Display Text Background (on text and date/time labels) <Esc>(BLØ... -
Page 117: (Cd) Calibration Types
Enable Yellow Highlight <Esc>(CEHYØ Disable Yellow Highlight <Esc>(CEP1 Enable Pink <Esc>(CEPØ Disable Pink <Esc>(CER1 Enable Red <Esc>(CERØ Disable Red <Esc>(CEW1 Enable White <Esc>(CEWØ Disable White <Esc>(CEY1 Enable Yellow <Esc>(CEYØ Disable Yellow Pointmaker LLC Pointmaker CPN-5600, CPN-6000 Color Video Markers - Page 111... -
Page 118: (Cl) Clear
(See “Capture Options” on page 46). <Esc>(CPInnnnn Read the requested image from the USB location nnnnn is the index number of the image Page 112 - Pointmaker CPN-5600, CPN-6000 Color Video Markers Pointmaker LLC... -
Page 119: (Cpn) Read Specific Image From Tftp
The “CPRS” command reads the current image from the SMB location based on the current file Capture settings (See “Capture Options” on page 46). <Esc>(CPRS Read the current image from the SMB location Pointmaker LLC Pointmaker CPN-5600, CPN-6000 Color Video Markers - Page 113... -
Page 120: (Cprt) Read Current Image From Tftp
(CPST) Store Current Image to TFTP The “CPST” command stores the current image to the current TFTP destination (See “Capture Options” on page 46). <Esc>(CPST Store the current image to the TFTP location Page 114 - Pointmaker CPN-5600, CPN-6000 Color Video Markers Pointmaker LLC... -
Page 121: (Cpw) Read Specific Image From Smb
Toggle between color modes <Esc>(CSN Select Next get next available color (see “(CE) Color Enable” on p.101). <Esc>(CSP Select Pink <Esc>(CSR Select Red <Esc>(CSW Select White <Esc>(CSY Select Yellow Pointmaker LLC Pointmaker CPN-5600, CPN-6000 Color Video Markers - Page 115... -
Page 122: (Dct/Dca) Device Type Comm
(DCT/DCA) Device Type COMM The “DCT” and “DCA” commands help you control the recognition of device types connected to Pointmaker COMM ports. Normally, at startup, the initializa- tion setting(autodetect) for each COMM port causes the Pointmaker to run through a list of procedures until it can determine the device type con nected to each one. -
Page 123: (Dl) Draw Line
Grid” on page 97). The first coordinate series XXXXYYYY is the beginning point of the drawn line, and the second series XXXXYYYY repre sents the end point of the drawn line. <Esc>(DLXXXXYYYYXXXXYYYY Draw a Line Pointmaker LLC Pointmaker CPN-5600, CPN-6000 Color Video Markers - Page 117... -
Page 124: (Dp) Drop Marker
USB port. Normally, when you plug something into the USB port, the Pointmaker reads the vendor and product ID from the devices. Then it scans its list of device types for that vendor and product ID. If it finds it in the list, it initializes the port for that device type. - Page 125 SCSI MSD SCSI Mass Storage Device Egalax Egalax touch controller NextWindow NextWindow touch controller NextWin Ctrl NextWindow touch controller – control interface Bamboo 4x6 Wacom Bamboo 4x6 digitizing tablet Pointmaker LLC Pointmaker CPN-5600, CPN-6000 Color Video Markers - Page 119...
-
Page 126: (E) Echo
Quanta 2 Quanta 2 Computer Panasonic Panasonic Electronic Pen (E) Echo The “E” command tells the Pointmaker to echo the input over the RS-232 link, in full, in part or not at all. <Esc>(EA Echo all input <Esc>(EC Echo all except commands <Esc>(EN... -
Page 127: (Esp, Esa) Video Streaming (Cpn-6000)
XXXX = a numeric value for the horizontal dimension. YYYY = a numeric value for the vertical dimension. Units range from ØØØ1 to 2Ø48. (FT) Frame Type The “FT” command tells the Pointmaker which type of frame to display on- screen. <Esc>(FTBØ Box Frame <Esc>(FTB1... -
Page 128: (Hi) Hdcp Input Setting For Each Hdmi Input Port
The “IFD” command sets the directory for the image file to be saved. <Esc>(IFDccc... Set the file directory. ccc... is no more than 16 characters, terminated with a carriage return. Page 122 - Pointmaker CPN-5600, CPN-6000 Color Video Markers Pointmaker LLC... -
Page 129: (Ifi) Set Image File Index
Assigns Priority User Mode. <Esc>(IMCXX Sets COMM port for Priority User. XX = the COMM port (01-10) The port selected should be con nected to a digitizing tablet or touch screen. Pointmaker LLC Pointmaker CPN-5600, CPN-6000 Color Video Markers - Page 123... -
Page 130: (L) Line Style
The “K” command allows for common keyboard actions. <Esc>(Knn where nn is a two-digit hexadecimal number Some commonly used examples: <Esc>(KC8 up arrow <Esc>(KCB left arrow <Esc>(KCD right arrow <Esc>(KDØ down arrow <Esc>(KØD Enter Page 124 - Pointmaker CPN-5600, CPN-6000 Color Video Markers Pointmaker LLC... -
Page 131: (M) Video Input Type
Overview (M) Video Input Type The “M” commands tell the Pointmaker which type of video input is being used or switched to, so that the proper signal is output from the Pointmaker. All “M” com- mands override “A” (autodetect) commands. -
Page 132: (Pa) Pass-Through
Toggle pointer on/off. <Esc>(PTT5 Display next pointer selects next pointer in the sequence. <Esc>(PTTØ Disable pointer toggle. <Esc>(PTUL Display Up Left Arrow <Esc>(PTUØ Display Up Arrow <Esc>(PTUR Display Up Right Arrow Page 126 - Pointmaker CPN-5600, CPN-6000 Color Video Markers Pointmaker LLC... -
Page 133: (Px) Proximity On/Off
Turn proximity off. <Esc>(PXT Toggle proximity. (R) Restart Pointmaker The “R” command restarts the Pointmaker. Options include saving current set tings and markers in memory (a soft boot), or clearing memory of all settings and markers (a hard boot). <Esc>(RS Restart saving current settings and markers in memory. -
Page 134: (Sco) Scaler Output Format
1280 x 800 @ 60 Hz 1440 x 900 @ 60 Hz 1680 x 1050 @ 60 Hz 1400 x 1050 @ 50 Hz 1400 x 1050 @ 60 Hz Page 128 - Pointmaker CPN-5600, CPN-6000 Color Video Markers Pointmaker LLC... -
Page 135: (Sum) Menu System
Font size commands can be assigned to the active text label after it is visible on the screen: <Esc>(TSØ Small works with: TI Roman, Helvetica, TI Dom Casual, Fargo, Symbol, Pointmaker LLC Pointmaker CPN-5600, CPN-6000 Color Video Markers - Page 129... -
Page 136: (Ta) Template Change
Broadcaster template. <Esc>(TA2 PC template. (TC) Touch Screen Corner Control The “TC” commands tell the Pointmaker to enable or disable the corner func tion areas on a touch screen (see “Function Areas” on page 10). <Esc>(TCØ Disable corner function areas <Esc>(TC1... -
Page 137: (Tca) Touch Screen Function Areas
Section Six:Using RS-232 Commands Overview (TCA) Touch Screen Function Areas The “TCA” commands tell the Pointmaker which commands are assigned to the seven touch screen function areas (see “Function Areas” on page 10). <Esc>(TCAnnxx Setting “nn” is the numeric value taken from the table... -
Page 138: (Tr) Touch Screen Right Click Emulation
(TR) Touch Screen Right Click Emulation The “TR” commands tell the Pointmaker to enable or disable the right click emulation. <Esc>(TRØ Disable touchscreen right click emulation <Esc>(TR1 Enable touchscreen right click emulation <Esc>(TRT... -
Page 139: (V) Select An Overlay
Display previous overlay. NOTE: To hide the overlay, see the Pass-through (PA) command. (VCD) Display Change of Video Input The “VCD” command tells the Pointmaker whether to display a change of video input on the monitor. <Esc>(VCDØ Do not display a change in the video input <Esc>(VCD1... -
Page 140: (Vih) Enable Or Disable Hdcp Input
The “VIH” is a master switch for handling HDCP Input throughout the Point- maker. If it is turned off, no HDCP content can pass through the Pointmaker. If it is turned on, HDCP sources are handled according to your current “HI” settings. -
Page 141: Appendix
ppendix... -
Page 143: Troubleshooting Guide
The following table describes common problems and their solutions. If, after refer ring to this table, a problem still exists, call Pointmaker LLC., at (800) 552-2262 or (520) 745-0001 and ask for technical assistance. There are no user serviceable parts in the Pointmaker. - Page 144 4. Check to be sure that the video in and out connectors on the Pointmaker are secure. 5. If there is no RGB or RGB H/V input to the Pointmaker (that is, there is output only), the Pointmaker will automatically assume that a 15.75 kHz signal output is desired.
-
Page 145: Updating The Cpn-5800
Updating the CPN-5800 Cpn-5800 pdatinG the The CPN-5800 firmware can be updated through USB or TFTP to provide new features, improved functionality or bug fixes. Before activating the Update command, the update file (A002476.BIN) must be copied into a directory called BIIUPG. Create this directory directly under the Root directory. - Page 146 Updating the CPN-5800 Appendix Page 140 - Pointmaker CPN-5800 Color Video Marker Pointmaker LLC...
-
Page 147: Quick Reference For Devices
Quick Reference for Digitizing Tablet The commands in the table following this sample template are for the DTU-30 digitizing tablet when used with the Pointmaker CPN-5800. The template design is updated periodically. Yours may not look exactly the same. If a function you want is not listed in this table, then you must select that function in the menu system. - Page 148 A counter will appear in the bottom right corner of the screen, indicating the percent age of the image currently sent to the location. You must wait until the counter disappears before starting a new send. Page 142 - Pointmaker CPN-5800 Color Video Marker Pointmaker LLC...
-
Page 149: Quick Reference For Keyboard
Positioning Marker, Fine Control Ctrl + Posit. Key Previous Overlay [Page Up] Print Image Alt + F4 Ctrl + Alt + Page Down(on Num Pad) Recall Settings: at boot-up copyright screen: Pointmaker LLC Pointmaker CPN-5800 Color Video Marker - Page 143... -
Page 150: Quick Reference For Touch Screens And Whiteboards
The commands in this table are for a compatible touch screen or whiteboard, when used with the Pointmaker CPN-5800. If a function you want is not listed in this table, then you must select that function on the digitizing tablet or in the menu system. - Page 151 5 seconds. Undo/Erase a Marker Click Right (Second) Button. If Erase Mode is activated in the menu system, this command activates Erase Mode instead of undoing a marker. Pointmaker LLC Pointmaker CPN-5800 Color Video Marker - Page 145...
- Page 152 Quick Reference for Devices Appendix Page 146 - Pointmaker CPN-5800 Color Video Marker Pointmaker LLC...
-
Page 153: Symbol Font Chart
Appendix Symbol Font Chart yMBol hart Pointmaker LLC Pointmaker CPN-5800 Color Video Marker - Page 147... - Page 154 Symbol Font Chart Appendix Page 148 - Pointmaker CPN-5800 Color Video Marker Pointmaker LLC...
-
Page 155: Map Font Chart
Appendix Map Font Chart hart Pointmaker LLC Pointmaker CPN-5800 Color Video Marker - Page 149... - Page 156 Map Font Chart Appendix Page 150 - Pointmaker CPN-5800 Color Video Marker Pointmaker LLC...
-
Page 157: Rs-232 (Comm Port) Pinout
Receive Data Signal Pin 1 Data Data Term Rdy Ground Pin 8 Pin 7 Pin 6 Pin 9 Clear Request to Send to Send Figure 7-2: RS-232 COMM Port Pinout Pointmaker LLC Pointmaker CPN-5800 Color Video Marker - Page 151... - Page 158 RS-232 (COMM Port) Pinout Appendix Page 152 - Pointmaker CPN-5800 Color Video Marker Pointmaker LLC...
- Page 159 BUTTON/ICON, TABLET -- the square or rectangular zone on the tablet Menu Strip that represents a Pointmaker function. When this zone is clicked on with the pen tip, that func tion is engaged. CHALKBOARD -- the solid area behind the Pointmaker markers when in the Chalkboard mode.
- Page 160 Pointmaker overlay. Some other compatible controllers are most touch screens and certain mouse devices. DRAW -- the Pointmaker feature which allows presenters to freehand draw or write over a video or computer image. DROP SHADOW -- the Pointmaker option which allows presenters to attribute a shadow to drawing lines, frames or straight lines for the purpose of creating a line that stands out from the video image.
- Page 161 (as opposed to a click of the button). PROXIMITY -- a feature of the CPN-5800 that affects the digitizing tablet. When proximity is activated, the active pointer automatically disappears each time the pen is lifted from the drawing area.
- Page 162 Glossary Appendix Page 156 - Pointmaker CPN-5800 Color Video Marker Pointmaker LLC...
- Page 163 Appendix Outside copyright information for software included with the CPN-5800. Cpn-5800. utside CopyriGht inForMation For soFtware inCluded with the (1) University of California, Berkeley [1a] Copyright (c) 1990 The Regents of the University of California. All rights reserved. Redistribution and use in source and binary forms are permitted...
- Page 164 Outside copyright information for software included with the CPN-5800. Appendix ARE DISCLAIMED. IN NO EVENT SHALL THE REGENTS OR CONTRIBUTORS BE LIABLE FOR ANY DIRECT, INDIRECT, INCIDENTAL, SPECIAL, EXEMPLARY, OR CONSEQUENTIAL DAMAGES (INCLUDING, BUT NOT LIMITED TO, PROCUREMENT OF SUBSTITUTE GOODS OR SERVICES;...
- Page 165 Appendix Outside copyright information for software included with the CPN-5800. THIS SOFTWARE IS PROVIDED BY THE REGENTS AND CONTRIBUTORS ``AS IS’’ AND ANY EXPRESS OR IMPLIED WARRANTIES, INCLUDING, BUT NOT LIMITED TO, THE IMPLIED WARRANTIES OF MERCHANTABILITY AND FITNESS FOR A PARTICULAR PURPOSE ARE DISCLAIMED.
- Page 166 Outside copyright information for software included with the CPN-5800. Appendix notice, this list of conditions and the following disclaimer in the documentation and/or other materials provided with the distribution. 3. The name of the author may not be used to endorse or promote products derived from this software without specific prior written permission.
- Page 167 Appendix Outside copyright information for software included with the CPN-5800. 2. Redistributions in binary form must reproduce the above copyright notice, this list of conditions and the following disclaimer in the documentation and/or other materials provided with the distribution. THIS SOFTWARE IS PROVIDED BY THE AUTHOR AND CONTRIBUTORS ``AS IS’’ AND...
- Page 168 Outside copyright information for software included with the CPN-5800. Appendix ARE DISCLAIMED. IN NO EVENT SHALL THE AUTHOR OR CONTRIBUTORS BE LIABLE FOR ANY DIRECT, INDIRECT, INCIDENTAL, SPECIAL, EXEMPLARY, OR CONSEQUENTIAL DAMAGES (INCLUDING, BUT NOT LIMITED TO, PROCUREMENT OF SUBSTITUTE GOODS OR SERVICES;...
- Page 169 are met: 1. Redistributions of source code must retain the above copyright notice, this list of conditions and the following disclaimer. 2. Redistributions in binary form must reproduce the above copyright notice, this list of conditions and the following disclaimer in the documentation and/or other materials provided with the distribution.
- Page 170 Redistributions of source code must retain the above copyright notice, this list of conditions and the following disclaimer. Redistributions in binary form must reproduce the above copyright notice, this list of conditions and the following disclaimer in the documentation and/or other materials provided with the distribution. The name of Red Hat Incorporated may not be used to endorse or promote products derived from this software without specific prior written permission.
Need help?
Do you have a question about the CPN-5800 and is the answer not in the manual?
Questions and answers