Table of Contents
Advertisement
Advertisement
Table of Contents

Summary of Contents for The Handy HDR 500
- Page 1 Q/HD 14.73-08-SM V1.1...
- Page 3 Preface Dear users: Thank you for using Handy Medical’s Digital Dental X-Ray Imaging System HDR-500/600 and the trust to Handy Medical’s products. We will provide our best to ensure the satisfaction when you using the Digital Dental X-Ray Imaging System HDR-500/600 . The Digital Dental X-Ray Imaging System HDR-500/600 is operated through the software HandyDentist.
-
Page 4: Table Of Contents
Content 1. Notice............................1 1.1 Indication of Use......................1 1.2 Brief Introduction of this Manual................1 1.3 Manufacturer......................1 1.4.Packing........................1 1.5 Symbols........................1 2. Safety issue..........................2 2.1 Check Sensor and controller before using them............2 2.2 Protect Sensor from Potential ESD Damage...............2 2.3 Do Not Touch Exposed Connectors on Non-Medical Equipment and the Patient at the Same Time........................ - Page 5 4.4 Sharing the Sensor Between Rooms ................. 5 4.5 Using the different Positioning Systems Attentions............5 4.6 Attentions........................6 5. Imaging Software General Introduction..................6 5.1 Computer System Requirements................6 5.2 Imaging Software....................... 6 6. Working Sketch......................... 7 7. Driver Installation........................8 8.
-
Page 6: Notice
1. Notice 1.1 Indication Use The Digital Dental X-ray Imaging System is intended to be used and operated by professionals like dentists, radiographers or other specific staffs in hospitals or dental clinics to make use of the converted signals as shown by x-ray images in the computer for reading, storing or transferring for daily dental practice uses. -
Page 7: Safety Issue
Label Location The following Figure indicates the label locations of The HDR-500/600 Systems. Figure 1 HDR-500/600 Label Locations 2. Safety issue 2.1 Check Sensor and controller before using them Before each usage, check the outer surface of the Sensor and controller for any signs of physical damage or defect. -
Page 8: Waste Electrical And Electronic Equipment
Air pressure : 860hPa~1060hPa; 3. Waste Electrical and Electronic Equipment 3.1 Background The European Union’s Waste Electrical and Electronic Equipment (WEEE) Directive (6002/96/EC) has been implemented in member states as of August 13, 6005. This directive, which seeks to reduce the waste of electrical and electronic equipment through re-use, recycling, and recovery, imposes several requirements on producers. -
Page 9: Hygiene And Claaned Instruction
After an earthquake, ensure that the device is operating satisfactorily before using it again. Failure to observe patients to hazards. DO NOT place any objects within the field of operation of the device. Connect this equipment ONLY to a mains power supply with protective ground to avoid ... -
Page 10: Technical Specifications
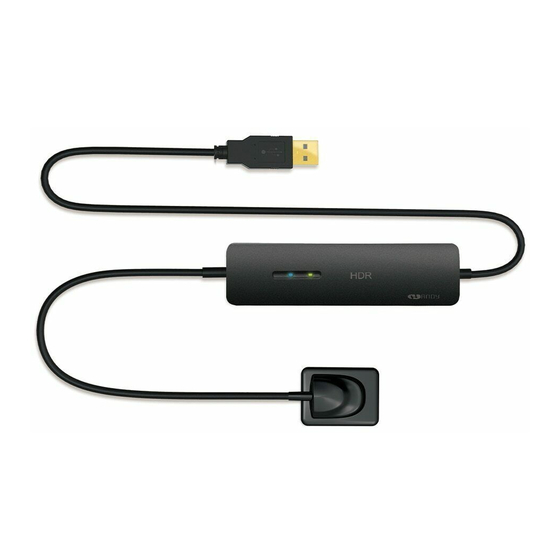
Size1, universal sensor---Use for regular procedures, both for children and adult . Size2 sensor---Use for bitewings procedures. The sensor non-reactive to X-Rays surface, contains the cable attachment. Figure 2 HDR Sensor 1 Sensor non-reactive to X-Rays surface 2 Sensor active surface 4.3 Technical Specifications Model HDR-500... -
Page 11: Attentions
The requirement form above is the suggested minimum configuration for the computer and the product performance might be affected if those above are not reached. 5.2 Imaging Software The Handy HDR-500/600 dental imaging system operates with the following software: HandyDentist V3 HandyServer for sharing information between workstations. ... -
Page 12: Working Sketch
Connect the computer to the local area network (router/switch) with an ethernet cable. If necessary, consult a network administrator to establish a local area network. The computer can automatically obtain an IP address (DHCP) or set it manually (static IP). Notice :... -
Page 13: Driver Installation
indicator flash green light. Working Sketch map HDR-500/600 7. Driver Installation We provide a USB flash disk together with the sensor in package. Please plug the USB flash disk into your computer to start installation. 7.1.Open the USB flash disk and find the Driver icon HDR Sensor Driver 2.x.x.x(xxxxxxxxxx) (The Driver name might change with update version, please refer to the actual using name) 7.2. -
Page 14: Software Installation
the sensor will be detected, and green blinking in shooting window shows it is ready to work. You can check its right drive name in Device Manager. 8. Software Installation 8.1 HandyDentist 1 Find HandyDentist software icon HandyDentist_3.xx.xx(xxxxxxxxxx) (The Driver name might change with update version, please refer to the actual using name) 2. - Page 15 5.Click → to continuing,after that,click to complete HandyDentist software installation 8.2 HandyServer When users need sharing the sensor between rooms, please follow up below installation and operation Software Installation(The server version is optional. The server version needs to be purchased separately.
-
Page 16: Registry & Activation
3. Click → → → to continuing, after that, click to complete Handyserver software installation 4. Settings Click ,select ‘Tools’ - ‘Options’ – ‘Database’ (Remark:Refer to 11 Software Operation) Input the IP address in ‘Server IP’ according to that of HandyServer software(For example: 192.168.56.1)... - Page 17 3)Click button after the user information is be finished, save it on your computer desktop, a file suffixed with ‘.req’ will be generated, then send this request file to your local distributor or directly to our after-sales support:support@handycreate.com;. 4)We will reply you an activation file suffixed with ‘.act’ ,to activate your software by import this file into registration window directly (No need to open this file);...
-
Page 18: Calibration File Installation
Please follow the below steps: 1)Run the software ,click button; 2)Fill in the blank of the user information: Company/Email/Address/Phone,in which the Company and Email information is required; 3)Click button after the user information is be finished, save it on your computer desktop, a file suffixed with ‘HandyServer.req’... - Page 19 10.2 Manual Installation If the on-line automatic installation fails, the prompt box will disappear. Meanwhile, an alarm message display in title bar to remind the absence of calibration file, that means need to be installed manually. Click ‘Calibrations’ button to bring up the interface for manual installation. Choose ‘Install from file’...
-
Page 20: Software Operation
11 Software Operation User interface Double click the icon to run the software Default name: Admin Password: empty(on need put-in any character, click ‘Login’ directly) Then you can click the ‘Menu bar’ - ‘Tools’ - ‘Options’ - ‘General’ to modify Example Screen: 1.System menu of the program windows 2.Menu bar... - Page 21 3.Tool bar 4.Recent Cases list 5.Teeth chart 6.Target frame 7.Image information Menu Bar Each option contains a drop-down menu that for you directly to chose certain functions. Language Choice Click Tools(T) button on the menu bar and select Option(O). Click Display button, select the language you’d like Click , it will show...
- Page 22 Select “New Patient” option to create a new patient record, fill in the patient information, select picture series you’d like, also it’s available to write study comments in the bottom blank, then click ‘OK’ button. Target frame (18 pcs) Take 18 pcs as an example, if this account is full (Maximum 20 images),please click ‘New Patient’...
- Page 23 notification window Chose “Yes” button, this patient will be deleted Search a patient case Click this icon to search registered patient by use its ID, last name or first name. An accurate searching is based on the examination date. Double click the target patient, ‘Searching’ window will be closed automatically, and back to home screen, this patient will display and be chosen in the ‘Recent Cases List’...
- Page 24 Press the “ESC” key to exit Play Click this icon to view image one by one The default time is 3 seconds and can be changed depend on your requirement Press “ESC” key to exit. Edit Image Select an image then click this icon to bring up “ Handy Image” window, which can also be opened by double-click the image.
- Page 25 Print one image: Left-click to select a target frame,then choose this icon directly Print more images: Press and hold down “Ctrl” key,left-click to select several pictures at the same time,then choose this icon Before using, please choose the correct icon first : This icon is for Intraoral Camera or Film Reader.
- Page 26 Before contrast After contrast Before Sharpen After sharpen Inverts the gray shades of the image-negative images appear as positive, and positive images as negative. Before Negative After Negative click the colorize button, you’ll notice the significant color contrast between different elements of the image.Because some differences can be easier to distinguish in color, colorizing provides antother means to identify potential problems areas during examnations.
- Page 27 Before Embossment After Embossment Show better structures and improve underexpose or overexpose images’ quality. Before Normalize After Normalize Removes fixed pattern noise from an image. Before Denoise After Denoise Make the images smoother Before Soft After Soft Simulation Diagnosis In order dentist have a better dental practice and more easy to diagnose for particular dentition. Saprodontia, Root Canal, Periodontal, Crown and Diagnosis, four different enhanced image make easier to check.
-
Page 28: Image Acquisition
And With one button of Dignosis, you will see four different enhanced image. Handy Image Window Toolbar Reload: Click to bring back original image. Undo: Click to withdraw the previous operation. Redo: Click to repeat previous operation. Partition:Click to choose the display mode you want,drag a image from left list into black square for comparison. -
Page 29: Image Acquisition Preparation
Notice: To prevent cross-infection, please use a new hygienic sleeve for each patient 12.2 Image Acquisition Preparation 1)Run software, establish the patient record. 2)Click directly or select ‘HDR USB Series’ in drop-down menu by right-click a null frame,to bring up the shooting window. On the second use,simply double-click a null frame to quickly bring up the shooing window. - Page 30 If you find out that some images need do some imaging process to enhance the image quality, you can use Advanced Settings And you can slide these buttons one the left to adjust to what you expect on the right side, and next time you will take the image just exactly you want to enhance without any other action.
-
Page 31: Cleaning And Maintenance
Working Sketch map (1) (2) (3) (4) (5) Descriptions: (1) x-ray source (2) Tooth (3) Digital x-ray sensor (4) Connect to computer via USB cable (5) Show the image in software 13. Cleaning and maintenance The product can’t be dipped in liquids, and the disinfectants and cleaning agents should not be used. -
Page 32: Cable Care
lights and indicator area in software are in normal. 14.3. Cable Care Improper coiling of a sensor's cable is the most common cause of the sensor failure. The following instruction is important to be followed for preventing cable damage. • Once unpacked, never coil the sensor cable, repeated coiling may cause kinks and irreversible damage. - Page 33 Fault Solution Try another USB port and re-install the Computer can’t recognize the sensor driver program Re-set the required x-ray parameters.Try to No response after x-ray emission plug into the back USB port of computer case, and re-install the driver program ‘HDR USB Series’...
-
Page 34: Annex A. Emc Table
Annex A. EMC table The following tables provide HDR compliance information to electromagnetic compatibility (EMC) and electromagnetic immunity (EMI) standards. To ensure conformance, the customer or user must use the HDR in environments that are consistent with these standards. USB cables used with HDR Interfaces must also comply with the same standards. Table 1. - Page 35 Power frequency (50/60 30A/m 30A/m Power frequency magnetic fields Hz) magnetic field should be at levels characteristic EN 61000-4-8 of a typical location in a typical commercial hospital environment. NOTE UTis the a.c. mains voltage prior to application of the test level. Table 3:Electromagnetic Immunity 2 Guidance and manufacturer’s declaration - Electromagnetic immunity The Equipemnt is intended for use in the electromagnetic environment specified below .The customer or the user of the...
- Page 36 Table 4. Recommended Separation Distance between Portable and Mobile RF Communications Equipment and HDR PLEASE NOTE: HDR is intended for use in an electromagnetic environment in which radiated RF disturbances are controlled. The customer or user of HDR can help prevent electromagnetic interference by maintaining a minimum distance between portable and mobile RF communications equipment (transmitters) and HDR as recommended below, according to the maximum output power of the communications equipment.
- Page 38 SHANGHAI HANDY MEDICAL EQUIPMENT CO.,LTD ADD:Floor 2, Building No.11, Lane 177, Fulian Er Road, Baoshan District, Shanghai 201906, P. R. China TEL: 0086-21-56766108 FAX:0086-21-56766308 After Sales Service: Skype: handysupports E-Mail: support@handycreate.com Website: www.handydental.cn European Representative: Shanghai International Holding Corp.GmBH ADD: Eiffestrasse 80, 20537 Hamburg, Germany...
Need help?
Do you have a question about the HDR 500 and is the answer not in the manual?
Questions and answers