
Related Manuals for Divus CIRCLE

Summary of Contents for Divus CIRCLE
- Page 1 DIVUS CIRCLE user manual . DIVUS CIRCLE DIVUS CIRCLE small DIVUS CIRCLE small+ DIVUS CIRCLE small C* DIVUS SQUARE small C* User manual Version 2.8.0 REV02-2023-04-13...
-
Page 2: General Information
DIVUS CIRCLE user manual . GENERAL INFORMATION DIVUS GmbH Pillhof 51 I-39057 Eppan (BZ) - Italy Operating instructions, manuals and software are protected by copyright. All rights are reserved. Copying, multiplication, translation and conversion, either partially or as a whole, is not permitted. You are allowed to make a single copy for backup purposes. -
Page 3: Safety Instructions
DIVUS CIRCLE user manual . SAFETY INSTRUCTIONS The present operating instructions contain those safety instructions that are required to safely operate the ma- chine. All persons working with the machine must heed the present operating instructions, especially the safety in- structions. -
Page 4: Standards
DIVUS CIRCLE user manual . STANDARDS The DIVUS TOUCHZONE meets the following guidelines and standards: Low Voltage Directive 2014/35/EU (ex 73/23/CEE – 93/68/CEE – 06/95/CE) Standard to which conformity is declared: EN 62368-1:2014/A11:2017 Safety EMC Directive 2014/30/EU (ex 89/336/CEE – 92/31/CEE – 93/68/CEE – 04/108/CE) Standard(s) to which conformity is declared: Conducted &... -
Page 5: Table Of Contents
DIVUS CIRCLE user manual . INDEX GENERAL INFORMATION __________________________________________________________________________ 2 CONVENTIONS ___________________________________________________________________________________ 2 SAFETY INSTRUCTIONS ___________________________________________________________________________ 3 STANDARDS _____________________________________________________________________________________ 4 INDEX ___________________________________________________________________________________________ 5 INTRODUCTION ________________________________________________________________________________ 9 GENERAL INFORMATION _____________________________________________________________________ 9 VERSIONS AND MODELS ____________________________________________________________________ 9 WIZARD _____________________________________________________________________________________ 11 FIRST ACCESS _____________________________________________________________________________ 11 STEP 1 –... - Page 6 3.2.13 SETTINGS – DISPLAY (DIVUS CIRCLE ONLY) _____________________________________________ 33 3.2.14 SETTINGS – LANGUAGE _______________________________________________________________ 33 3.2.15 SETTINGS – VOLUME __________________________________________________________________ 33 3.2.16 SETTINGS – DOOR LOCK RELAY (DIVUS CIRCLE V.2 ONLY) _______________________________ 34 3.2.17 SETTINGS – PHOTO EVENTS ___________________________________________________________ 35 3.2.18 APPEARANCE (PREVIOUSLY CIRCLE SETTINGS) __________________________________________ 35 3.2.19 LOGOUT _____________________________________________________________________________ 35...
- Page 7 USING AN ACCESS CODE ON THE KEYPAD (ON DIVUS CIRCLE) ___________________________ 51 4.2.5 USING AN ACCESS CODE ON THE KEYPAD (ON DIVUS CIRCLE SMALL +)___________________ 51 4.2.6 USING AN NFC TAG (REQUIRES THE OPTIONAL NFC MODULE – SEE CHAPTER 5.1) _________ 52...
- Page 8 DIVUS CIRCLE SMALL / SMALL + - QUICK START GUIDE _______________________________________ 78 DIVUS CIRCLE – MOUNTING INSTRUCTIONS (MOUNTING BOX) _________________________________ 90 DIVUS CIRCLE SMALL / SMALL + - MOUNTING INSTRUCTIONS (MOUNTING BOX) ________________ 91 DIVUS CIRCLE - DATA SHEET _______________________________________________________________ 92...
-
Page 9: Introduction
DIVUS CIRCLE user manual . Introduction GENERAL INFORMATION Thank you for having bought a DIVUS CIRCLE! This manual will help you to set up your smart intercom device in the optimal way. The main features of your new DIVUS CIRCLE are: •... - Page 10 DIVUS CIRCLE user manual . CIRCLE/SQUARE FUNCTIONALITY CIRCLE CIRCLE small + CIRCLE small small C+ CAPACITIVE RING BUTTON ENTRY PER KEY CODE ENTY PER NFC (OPTIONAL) INTEGRATED RELAY DASHBOARD WITH DESIGN OPTIONS LED-RING FOR WALL ILLUMINATION FISHEYE- HD-CAMERA APPROACH SENSORS...
-
Page 11: Wizard
Wizard FOREWORD This chapter describes the wizard that is displayed when you connect to your new DIVUS CIRCLE for the first time. The prerequisite is, of course, that the DIVUS CIRCLE is already supplied with power and has completed the boot process. -
Page 12: First Access
FIRST ACCESS Now you can connect to the DIVUS CIRCLE by entering the network name of the unit in the URL bar of your web browser. This consists of the abbreviation "sn" followed by the serial number of the unit, which can be found on the label on the back of the unit or on the box, e.g.:... -
Page 13: Step 1 - Start
If you have a previous backup which you want to restore, you can click the link Restore from backup. This will interrupt the wizard and you will be able to login to the CIRCLE with the restored configuration. Otherwise, read... -
Page 14: Step 2 - License Agreement
DIVUS CIRCLE user manual . STEP 2 – LICENSE AGREEMENT Read and accept the license terms checking the checkbox in step 2:... -
Page 15: Step 3 - System Integrator Details
DIVUS CIRCLE user manual . STEP 3 – SYSTEM INTEGRATOR DETAILS Fill in at least the fields with a * about the system integrator, but we recommend taking the time to fill out all the fields to have complete and clear reports thereafter. -
Page 16: Step 4 - Customer Details
DIVUS CIRCLE user manual . STEP 4 – CUSTOMER DETAILS Again, fill in at least the fields with a * about the customer (again we recommend to fill out all the fields) -
Page 17: Step 5 - Date/Time
DIVUS CIRCLE user manual . STEP 5 – DATE/TIME If your device will have internet access, you can choose the time zone, enable the synching and choose two NTP servers:... - Page 18 DIVUS CIRCLE user manual . If the device will have no internet access, disable the NTP synching and enter date and time manually:...
-
Page 19: Step 6 - Sip Local Settings
STANDALONE MODE In Standalone mode, the Circle (any model) will be automatically assigned the VoIP ID 901 (used as client ID on its own VOIP server). Moreover, it will have these other IDs available for devices participating to the communication... - Page 20 If the device is set to Standalone mode and should be reachable also remotely, please fill in the fields External IP/DynDNS and External Port. Please note that the new solution for remote access over the DIVUS Cloud is preferrable for new installations. See step 7.
-
Page 21: External Mode
DIVUS CIRCLE user manual . 2.8.2 EXTERNAL MODE These are the settings when configuring an external SIP server: Insert the SIP/VoIP server address and port and the username and password of the device’s account. STEP 7 – SIP CLOUD SETTINGS Here, the new cloud functionality can be activated and configured, if desired. -
Page 22: Step 8 - Network Setup
DIVUS CIRCLE user manual . 2.10 STEP 8 – NETWORK SETUP Set the network according to your needs here:... -
Page 23: Step 9 - Summary / Last Step
DIVUS CIRCLE user manual . 2.11 STEP 9 – SUMMARY / LAST STEP This last step shows the access data and the most important settings to be confirmed pushing the APPLY button. Please note that you have to remember these settings to access the web interface from here on! After pushing the APPLY button, the system will reload to apply all the settings and you will be asked for username and password to access the web interface. -
Page 24: Web Interface
ACCESSING THE WEB INTERFACE Once you configured the DIVUS CIRCLE’s basic settings, you need to authenticate to access its web interface. At this time, the system integrator and the customer accounts will have access to different parts of the web GUI. -
Page 25: System - Upgrade
SYSTEM – UPGRADE If the DIVUS CIRCLE has access to the internet, it will check whether there are new software versions available online when you use the button on this page. If so, you will be informed and may start the upgrade procedure by pushing the UPGRADE button. - Page 26 DIVUS CIRCLE user manual . After confirmation, the download and upgrade will start… …and the upgrade will be processed. This might take several minutes. Please wait. After the upgrade, you’ll be prompted to reboot. Confirm the reboot and wait for the device to be up and running again. That might take several minutes.
-
Page 27: System - Backup & Restore
DIVUS CIRCLE user manual . 3.2.3 SYSTEM – BACKUP & RESTORE This page has buttons to backup or restore the device using an existing backup, or to go back to factory settings. 3.2.3.1 Backup procedure To create a backup, just hit the Backup button. -
Page 28: Restore Procedure
DIVUS CIRCLE user manual . You’ll be asked for a path to store the backup file – or it will be downloaded directly depending on your browser’s settings. 3.2.3.2 Restore procedure Drag and drop a backup file onto the “Click or drag your backup here” or click on it to choose it from your PC... -
Page 29: Factory Reset
DIVUS CIRCLE user manual . Then hit the Restore button as suggested and confirm: The restore procedure may take up to 5 minutes. Please wait and do not power off the device! Depending on the information contained in the backup, refresh the page if the IP address is still the same or use the IP address stored in the backup to load the web interface of the restored system after that: 3.2.3.3 Factory reset... - Page 30 To start the procedure, click the red Factory reset button! Please note that a factory reset will cause the DIVUS CIRCLE to switch back to its original IP address. Go to chapter 2.1 to find out what address that is, depending on the CIRCLE model.
-
Page 31: System - Reboot
SUPPORT This page allows to enable or disable the DIVUS support. This function is meant to give access to the DIVUS technicians using a VPN connection for issues which can’t be solved by the user. It is disabled as default and... -
Page 32: Settings - System Integrator
3.2.10 SETTINGS – SIP CLOUD Here you will find the settings to enable/disable the SIP CLOUD on the device and connect to a DIVUS CLOUD account. For more details, please refer to the DIVUS VIDEOPHONE MOBILE manual. -
Page 33: Settings - Display (Divus Circle Only)
SETTINGS – DISPLAY (DIVUS CIRCLE ONLY) • On this page you can configure the brightness of the DIVUS Circle display. The auto setting will switch between a brightness for day and another for night automatically. The manual setting allows to choose a value between 0 and 100 (%). -
Page 34: Settings - Door Lock Relay (Divus Circle V.2 Only)
SETTINGS – DOOR LOCK RELAY (DIVUS CIRCLE V.2 ONLY) DIVUS Circle V.2 (all models) have a built-in relay to e.g. open a door. If you use it, here you can activate it and set the duration of the impulse (i.e. for how long it will close the circuit when activated). -
Page 35: Settings - Photo Events
DIVUS Circle. The customer has access to these settings only, with his account. See chapter 3.3 for further details about all the appearance settings. -
Page 36: Address & Names
Insert the address and house number. Then, for each available unit, insert name and SIP number to be called. This page presents a different set of options on a DIVUS CIRCLE if it is configured to use the Tower module:... - Page 37 Delete all the current units • Import a units’ file or export the current units as csv. These options make it easy to configure the CIRCLE to work with any number of units and, if needed, to transfer units to another CIRCLE.
-
Page 38: Profiles (Divus Circle Only)
3.3.3 PROFILES (DIVUS CIRCLE ONLY) Profiles can be used to configure the appearance of the DIVUS Circle differently for different situations. There are three templates, namely Friendly, Angry and Sceptical. In general, they may be used to configure different representations for different situations (e.g., at night or while you’re on holiday). Choose one of them to reach the first configuration screen of that profile. -
Page 39: Avatar Configuration
3.3.3.1 Avatar Configuration An Avatar is an image representing the DIVUS Circle or your smart home – if you prefer. It is used in the very first step of activation, when the device notices a presence with its radar sensor and awakes its screen. It will be shown for 2 seconds. -
Page 40: Dashboard Configuration
When you click on a colour, you’ll see a preview of the result on the Circle shown on the right. Then again, choose the right arrow to move on. 3.3.3.2 Dashboard Configuration The dashboard is the main screen of the DIVUS Circle – the one you see when you start to interact with it. You can choose •... -
Page 41: Day & Night
Hint: All the changes will be stored at the end, clicking the white check mark icon (see above) 3.3.4 DAY & NIGHT The DIVUS Circle can be configured to use a different appearance and behaviour depending on the time of the day. To achieve that, you can choose •... -
Page 42: Holiday (Divus Circle)
LED ring when they appear. The Illumination settings define whether the LED ring should be on during the night when the DIVUS Circle is in its standby status i.e. there is no detected movement in front of it and no call ongoing. -
Page 43: Access Control
DIVUS CIRCLE user manual . 3.3.7 ACCESS CONTROL On this page you manage the users of the DIVUS Circle – seen as access control device. Please note that this function is available with certain models and optional features only. See the following table: CIRCLE... - Page 44 Further details (like weekdays etc.) are defined later on. Only for DIVUS CIRCLE or CIRCLE S+. May need an additional I/O module. DIVUS CIRCLE/SQUARE (any model) with optional NFC module required.
-
Page 45: Deleting Users
To remove a user, just click the trash bin icon in the table’s row corresponding to that user. To remove all the users of your DIVUS CIRCLE, click the x Delete all users button and confirm the alert. Please consider that a user deletion can’t be undone. -
Page 46: Importing And Exporting Users
So, it is very easy to create also larger lists in your favourite spreadsheet program and then import them into your DIVUS CIRCLE. Even a pure text editor may be used. In that case, the same file looks like this - using semicolons... -
Page 47: Importing And Exporting Schedules
You may add rows keeping the shown structure and syntax, then saving and importing the file into your DIVUS CIRCLE. As already explained before, make sure that all the users you mention in the schedules are present in your system before you import the schedules, otherwise the import will fail. -
Page 48: Access Log
To see the access log, push the button on top of the Access Control page. It will show all the interactions of your DIVUS CIRCLE with users – whether they used the access code or the NFC tag associated with their account and whether the access was granted or denied. -
Page 49: User Interaction
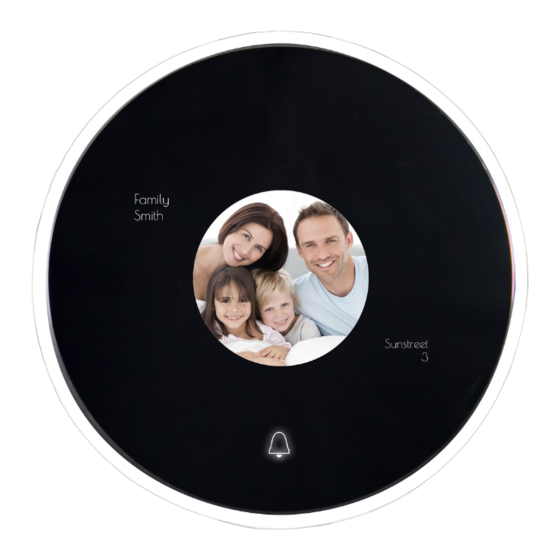
USING THE BELL ICON On all the models of DIVUS CIRCLE, the main and most intuitive action is pushing the bell icon to start a call. The icon will disappear for the time it is pushed as feedback to the finger’s action and the configured call will start. -
Page 50: Using The Screen (Divus Circle Only)
The display of the DIVUS CIRCLE small+ is normally switched off. It is activated by the motion sensor or direct touch and remains active for 5 minutes after use before it switches off again. On a CIRCLE small + configured for multiple units, first make sure the name of the desired callee is shown (or move there using the shown arrows) and then click on the name to start the call. -
Page 51: Using An Access Code On The Keypad (On Divus Circle)
The access code, which you assign to a user (see chapter 3.3.7) can be used to open the door. The keycode for the DIVUS CIRCLE small + is limited to the digits 1, 2, 3 and 4. Therefore the assigned code must be a number of at least 5 digits composed with only those digits. -
Page 52: Using An Nfc Tag (Requires The Optional Nfc Module - See Chapter 5.1)
All the models of DIVUS CIRCLE can be equipped with the NFC module. To open the door, you hold the NFC tag near to the DIVUS CIRCLE and the tag is read. If it is associated with a user and that user is allowed to enter according to the schedule, the DIVUS CIRCLE will give a green feedback (meaning access granted) and the configured action will be executed (most probably opening a door or gate). -
Page 53: Visual Feedback
NFC tag. VISUAL FEEDBACK 4.5.1 CIRCLE small AND CIRCLE small +, CIRCLE / SQUARE small C* The bell icon has different colours to signal different states on these DIVUS CIRCLE models: BELL OR LED MEANING COLOUR White Default colour. -
Page 54: Circle
DIVUS CIRCLE user manual . 4.5.2 CIRCLE The DIVUS CIRCLE uses different elements to give visual feedback in different situations: • The bell icon • The screen • The RGB LED ring STATUS/EVENT BELL ICON SCREEN LED RING COLOUR Normal status White colour. - Page 55 DIVUS CIRCLE user manual . Access denied “Lock” icon shown Programming mode (NFC) NFC card icon shown, Light blue, pulsating small NFC icon pulsating Call button pressed (ringing) Black while pressed Shows white circles Rotating animation or hidden animation Call ongoing (answered)
- Page 56 DIVUS CIRCLE user manual . Screen cleaning Screen cleaning animation...
-
Page 57: Optional Modules
NFC MODULE The NFC module adds the possibility to use NFC tags to open a door or gate. It requires a DIVUS I/O module which can execute the opening command(s) in many different ways. See chapter 6 for further details. Version 2 of CIRCLE (any models) can use the built-in relay directly –... - Page 58 DIVUS CIRCLE user manual . From version 2 of the CIRCLE firmware, there are two new graphic templates for the Tower module. They make it possible to call the desired apartment/office unit directly via a numeric keypad. One additionally allows a picture...
-
Page 59: O Modules
DIVUS CIRCLE user manual . I/O Modules I/O modules are hardware devices you can use to command any type of electrical device from the DIVUS Circle. The DIVUS I/O module is connected to the DIVUS CIRCLE directly by cable (RS485 connectors). - Page 60 DIVUS CIRCLE user manual . If the scan was successful, you will see a result like above. To edit the functionality of the I/O module, click the pencil icon on the right. These are the options: Description Use this field to add a description/name to the I/O module.
-
Page 61: I/O Module Output Function Configuration
DIVUS CIRCLE user manual . Choose one of the available events as trigger for an output. These assignments are then available when configuring the single output functions of the I/O module. The choices are: • Event 1 -4 Access 1 •... -
Page 62: Timer Descriptions
DIVUS CIRCLE user manual . Choose one or more options of what should trigger this output function. Of course, it may be any of the inputs, but you can also choose between other events the DIVUS CIRCLE: • Access 1 (when the user answering from inside pushes the door opener, or a valid NFC card or key code is used) •... - Page 63 DIVUS CIRCLE user manual . TOFF The output signal goes high and the timeout starts when the input signal goes high, the output signal goes down when the timeout expires. The timeout restarts every time the input signal goes high.
-
Page 64: Commanding Relays
Version 1.11 introduced the possibility to command two relays from the answering device during an intercom call from DIVUS CIRCLE. You can check the current version of your CIRCLE software by logging in to the web GUI as system integrator:... - Page 65 So, to further explain the table: the only fixed relation is between ACCESS 1 and the ACCESS GRANTED event which is triggered by several different user interactions. If you have an I/O module connected to the CIRCLE (any model and version), you can freely configure the two relays to...
-
Page 66: Technical Data
DIVUS CIRCLE user manual . Technical Data DIVUS CIRCLE - QUICK START GUIDE... - Page 67 DIVUS CIRCLE user manual .
- Page 68 DIVUS CIRCLE user manual .
- Page 69 DIVUS CIRCLE user manual . Version 1:...
- Page 70 DIVUS CIRCLE user manual . Version 2:...
- Page 71 DIVUS CIRCLE user manual .
- Page 72 DIVUS CIRCLE user manual .
- Page 73 DIVUS CIRCLE user manual .
- Page 74 DIVUS CIRCLE user manual .
- Page 75 DIVUS CIRCLE user manual .
- Page 76 DIVUS CIRCLE user manual .
- Page 77 DIVUS CIRCLE user manual .
-
Page 78: Divus Circle Small / Small + - Quick Start Guide
DIVUS CIRCLE user manual . DIVUS CIRCLE small / small + - QUICK START GUIDE... - Page 79 DIVUS CIRCLE user manual .
- Page 80 DIVUS CIRCLE user manual .
- Page 81 DIVUS CIRCLE user manual . Version 1:...
- Page 82 DIVUS CIRCLE user manual . Version 2:...
- Page 83 DIVUS CIRCLE user manual .
- Page 84 DIVUS CIRCLE user manual .
- Page 85 DIVUS CIRCLE user manual .
- Page 86 DIVUS CIRCLE user manual .
- Page 87 DIVUS CIRCLE user manual .
- Page 88 DIVUS CIRCLE user manual .
- Page 89 DIVUS CIRCLE user manual .
-
Page 90: Divus Circle - Mounting Instructions (Mounting Box)
DIVUS CIRCLE user manual . DIVUS CIRCLE – MOUNTING INSTRUCTIONS (MOUNTING BOX) -
Page 91: Divus Circle Small / Small + - Mounting Instructions (Mounting Box)
DIVUS CIRCLE user manual . DIVUS CIRCLE small / small + - MOUNTING INSTRUCTIONS (MOUNTING BOX) -
Page 92: Divus Circle - Data Sheet
DIVUS CIRCLE user manual . DIVUS CIRCLE - DATA SHEET... - Page 93 DIVUS CIRCLE user manual .
- Page 94 DIVUS CIRCLE user manual . Version 1:...
- Page 95 DIVUS CIRCLE user manual . Version 2:...
- Page 96 DIVUS CIRCLE user manual .
- Page 97 DIVUS CIRCLE user manual .
- Page 98 DIVUS CIRCLE user manual .
-
Page 99: Divus Circle Small / Small + - Data Sheet
DIVUS CIRCLE user manual . DIVUS CIRCLE small / small + - DATA SHEET... - Page 100 DIVUS CIRCLE user manual .
- Page 101 DIVUS CIRCLE user manual . Version 1:...
- Page 102 DIVUS CIRCLE user manual . Version 2:...
- Page 103 DIVUS CIRCLE user manual .
- Page 104 DIVUS CIRCLE user manual .
-
Page 105: Notes
DIVUS CIRCLE user manual . NOTES... - Page 106 DIVUS CIRCLE user manual .
Need help?
Do you have a question about the CIRCLE and is the answer not in the manual?
Questions and answers