iOttie Velox User Manual
Magnetic wireless cooling charger pro dash & windshield mount
Hide thumbs
Also See for Velox:
- User manual (25 pages) ,
- Quick start manual (2 pages) ,
- User manual (7 pages)

Related Manuals for iOttie Velox


Summary of Contents for iOttie Velox
- Page 1 Velox Magnetic Wireless Cooling Charger Pro Dash & Windshield Mount User Manual...
- Page 2 Velox Magnetic Wireless Cooling Charger Pro Dash & Windshield Mount User Manual English French Italian German Spanish...
-
Page 3: Product Information
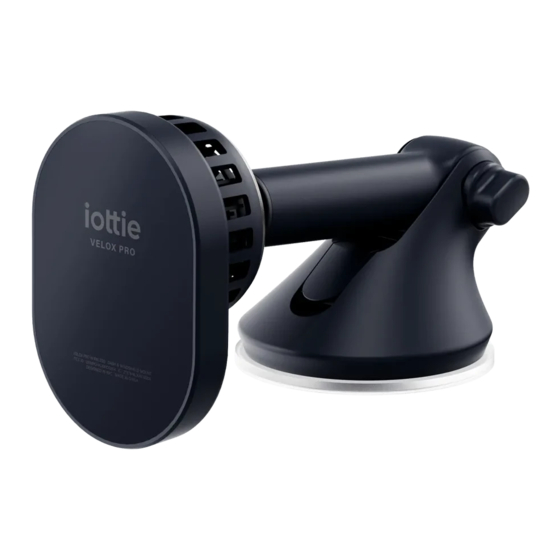
For optimal mounting and charging, please follow At a Glance the detailed instructions within this manual when Magnetic Mounting Face using the Velox Pro Dash & Windshield Mount. CryoFlow Cooling System iOttie is not liable for possible damages due to Rotating Ball Joint product misuse. - Page 4 CryoFlow Cooling System MagSafe Charging Semiconductor Polycarbonate Module CryoChip Aluminum Heat Sink Glass Mounting Precision Temperature Face Magnets Control System...
-
Page 5: Device Compatibility
Device Compatibility Product Specifications Velox products are designed for use with Item Specification MagSafe compatible iPhones and MagSafe compatible cases. Compatible devices include DC 5V-3A Total Input the iPhone series 12 and later. DC 9V-2A Wireless Charger 7.5 W Output... -
Page 6: Installation
02 Installation 2. Remove the plastic cover from the suction cup and Attaching the Dash Mount firmly press the mount onto Choose an installation method: dashboard/flat the dashboard pad. surface (A) or windshield (B). 3. Push down the locking lever Option A to engage suction. -
Page 7: Connecting To Power
2. Push down the locking *The Velox Pro does not have an on/off switch. lever to engage suction. Once the cable is plugged in and the vehicle is turned on, the mount will stay on. - Page 8 4 in 7 in 6 in Using the CryoFlow Technology Once your phone is attached to the Velox Pro Mount, the CryoFlow technology will automatically turn on and begin cooling. You are now ready to start driving. 14 EN...
-
Page 9: Informations Du Produit
Pour un montage optimal, veuillez suivre les Aperçu instructions détaillées de ce manuel lorsque Face de fixation magnétique vous utilisez l’Velox Pro. iOttie n’est pas Système de refroidissement CryoFlow responsable des dommages éventuels causés Joint à rotule rotatif par une mauvaise utilisation du produit. - Page 10 Système de refroidissement CryoFlow Module de charge Semi-conducteur Polycarbonate MagSafe CryoChip Ventilateur Aluminium Dissipateur de chaleur Montage sur verre Précision Température Affronter Aimants Système de contrôle 18 FR...
- Page 11 Compatibilité Caractéristiques du produit Ce produits Velox est uniquement compatible Article Caractéristique avec les iPhones et les étuis de la série MagSafe. Les iPhones compatibles MagSafe DC 5V-3A Entrée totale comprennent la série iPhone 12 et versions DC 9V-2A ultérieures.
- Page 12 02 Installation 2. Retirez le film protecteur de la ventouse puis appuyez- Fixation du support la fermement sur la surface Choisissez une méthode d’installation : tableau plane dutableau de bord. de bord/surface plane (A) ou pare-brise (B). 3. Enclenchez le levier de Option A verrouillage vers le bas pour mettre en œuvre la succion.
-
Page 13: Connexion À L'alimentation
1. Décollez le film protecteur de la ventouse et appuyez fermement sur le pare-brise. *Le support de tableau de bord Velox n’a pas l’interrupteur marche/arrêt. Une fois le câble branché 2. Abaissez le levier de et le véhicule allumé, le support restera allumé. -
Page 14: Installation De Votre Téléphone
10 cm 18 cm 15 cm Utilisation de la technologie CryoFlow Une fois votre téléphone connecté au Velox Pro, la technologie de CryoFlow s’allume automatiquement et commence à refroidir. Vous êtes maintenant prêt(e) à conduire. 26 FR... - Page 15 Per un montaggio ottimale, si prega di seguire Sommario le istruzioni dettagliate all’interno di questo Lato montatura magnetica manuale cuando si usa ii Velox Pro. iOttie non è Sistema di raffreddamento CryoFlow responsabile per eventuali danni causati da un Glunto rotativo uso improprio del prodotto.
- Page 16 Sistema di raffreddamento CryoFlow Modulo di ricarica Semiconduttore Policarbonato MagSafe CryoChip Alluminio Radiatore Montaggio su vetro Precisione Temperatura Viso Magneti Sistema di controllo 30 IT...
-
Page 17: Specifiche Del Prodotto
Compatibilità del dispositivo Specifiche del prodotto I prodotti Velox sono compatibili solo con Descrizione Specifiche iPhone e le custodie della serie MagSafe. Gli iPhone compatibili con MagSafe includono la DC 5V-3A Ingresso totale serie iPhone 12 e successive. DC 9V-2A Uscita di ricarica 7.5 W... -
Page 18: Installazione
02 Installazione 2. Staccare la pellicola protettiva sulla ventosa e premere Collegare il supporto saldamente il supporto sul Scegliere un metodo di installazione: cruscotto/ cruscotto. superficie piatta (A) o parabrezza (B). 3. Premere la leva di bloccaggio Opzione A verso il basso per attivare l’aspirazione. - Page 19 1. Rimuovi la pellicola protettivo della ventosa, e premere fermamente sul parabrezza. *La Montatura Cruscotto Velox non ha accensione/ 2. Abbassare la leva di spegnimento. Una volta che il cavo è collegato e il sicurezza per assicurare veicolo in moto, la montatura rimarrà fissata.
- Page 20 10 cm Utilizzo della tecnologia CryoFlow 18 cm 15 cm Una volta collegato il telefono al Velox Pro, la tecnologia di CryoFlow si accenderà automaticamente e inizierà a raffreddarsi. Siete ora pronti per la guida. 38 IT...
-
Page 21: Auf Einen Blick
Befolgen Sie für einen optimalen Einbau die Auf einen Blick detaillierten Anweisungen in diesem Handbuch, Magnetische montagefläche wenn Sie das Velox Pro verwenden. iOttie haftet CryoFlow-Kühlsystem nicht für mögliche Schäden, die auf Grund einer Drehbares Kugelgelenk unsachgemäßen Verwendung des Produkts Teleskoparm entstehen. - Page 22 CryoFlow-Kühlsystem MagSafe Halbleiter Polycarbonat Lademodul CryoChip Aluminium Kühlkörper Glasmontage Präzision Temperatur Gesicht Magnete Kontrollsystem 42 DE...
- Page 23 Kompatibilität der Geräte Produktspezifikationen Dieses Produkt ist ausschließlich mit iPhones Daten Spezifikation und Hüllen der MagSafe-Serie kompatibel. Zu den mit MagSafe kompatiblen iPhones DC 5V-3A Gesamteingang gehören die iPhone 12-Serie und höher. DC 9V-2A Ausgabe für 7.5 W kabelloses Aufladen Kabellänge 1.5 m Länge der Befestigung...
-
Page 24: Befestigung Der Halterung
02 Installation 2. Ziehen Sie den Schutzfilm vom Saugnapf ab und drücken Befestigung der Halterung Sie die Halterung fest auf das Wählen Sie eine Installationsmethode: Armaturenbrett-Pad. Armaturenbrett/glatte Oberfläche (A) oder 3. Drücken Sie den Windschutzscheibe (B). Verriegelungshebel nach unten, um die Absaugung Möglichkeit A zu aktivieren. -
Page 25: Anschließen Der Stromversorgung
Halterung eingeschaltet. Verriegelungshebel nach unten, um die Ansaugung Einstellung der Halterung zu aktivieren. Der Velox Pro kommt in der verriegelten Um den Saugnapf Position an. Um den Teleskoparm ausfahren, wiederzuverwenden, spülen ziehen Sie ihn einfach nach außen.Wenn Sie Sie ihn einfach unter warmem den Arm zum ersten Mal einstellen, müss... - Page 26 Sie sie neigen oder drehen. 10 cm Mit der CryoFlow-Technologie 18 cm 15 cm Sobald Ihr Telefon an Velox Pro angeschlossen ist, schaltet sich die CryoFlow-Kühltechnologie automatisch ein und beginnt mit der Kühlung. Schon können Sie losfahren. 50 DE...
-
Page 27: Información Del Producto
Para lograr un rendimiento óptimo, siga A simple vista atentamente las instrucciones que se incluyen Cara de montaje magnética en este manual al usar el Velox Pro. iOttie no es Sistema de refrigeración CryoFlow responsable por posibles daños debidos al uso Articulación de rótula incorrecto del producto. - Page 28 Sistema de refrigeración CryoFlow Módulo de carga Semiconductor policarbonato MagSafe CryoChip Admirador Aluminio Disipador de calor Montaje de vidrio Precisión Temperatura Rostro Imanes Sistema de control 54 ES...
-
Page 29: Especificaciones Del Producto
Compatibilidad de dispositivos Especificaciones del producto Los productos Velox solo son compatible Elemento Especificación con iPhones y fundas de la serie MagSafe. Los iPhones compatibles con MagSafe DC 5V-3A Entrada Total incluyen la serie iPhone 12 y posteriores. DC 9V-2A Salida del cargador sin 7.5 W... -
Page 30: Instalación
02 Instalación 2. Quite el papel protector de la ventosa y presione Instalando el soporte firmemente el soporte sobre Elija un locación de instalación: tablero/ la almohadilla del tablero. superficie plana (A) o parabrisas (B). 3. Presione hacia abajo la palanca de bloqueo para Opción A activar la succión. -
Page 31: Conexión A La Corriente
1. Retire la película protector de ventosa y presiónela f irmemente en el parabrisas. *El soporte para tableros de Velox no tiene un interruptor de encendido/apagado. Una vez que el 2. Presione la palanca de cable esté enchufado y el se encienda el vehículo, bloqueo para activar la la montura se mantendrá... - Page 32 10 cm 18 cm 15 cm Uso de la tecnología CryoFlow Una vez que su teléfono esté conectado al Velox Pro, la tecnología CryoFlow se encenderá automáticamente y comenzará a enfriarse. Ya esta listo para empezar a manejar. 62 ES...
- Page 33 Operation Warnings RF Exposure Warning Statements This equipment complies with FCC radiation exposure limits set This equipment has been tested and found to comply with forth for an uncontrolled environment. This equipment shall be the limits for a Class B digital device, pursuant to part 15 installed and operated with minimum distance 20cm between of the FCC Rules.
- Page 34 Designed in New York City. 470 7th Ave, New York, NY 10018. • Do not disassemble this magnetic wireless charging mount; Made in China. U.S. Patent Pending ©2023 iOttie. All rights take it to a qualified service person when service or repair reserved.
- Page 35 The Velox Pro Magnetic Wireless Charging Dashboard & Windshield Mount is backed by a 2 year warranty.
Need help?
Do you have a question about the Velox and is the answer not in the manual?
Questions and answers