Advertisement
Overview

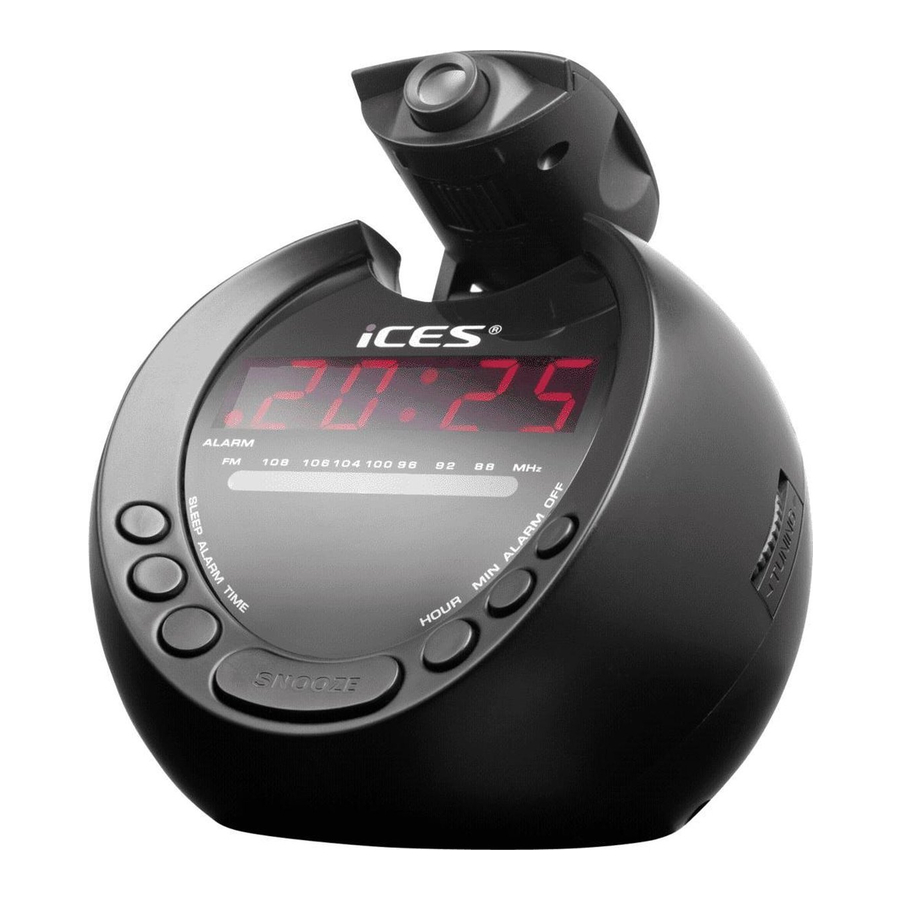
- 1 st Alarm Indicator Buzzer
- 1 st Alarm Indicator Music
- Time Set
- Alarm 2 Set/Volume Increase
- Alarm 1 Set/Volume Decrease
- Pre/M+
- Snooze button
- Projector
- 2 nd Alarm Indicator Buzzer
- 2 nd Alarm Indicator Radio
- Sleep Indicator
- Radio ON/OFF
- Minute Button/Tuning + Button
- Hour Button/Tuning - Button
- Snooze Button

- Minute Set For Projection
- Hour Set For Projection
- Projection ON/OFF
- Time Set For Projection
Radio
- Press the "ON/OFF" button to turn the clock radio on or off.
- Press the "TU+" or "TU-" button to tune to the desired station.
- Press the "VOL +" or "VOL -" button to adjust the volume.
- Press and hold the "PRE/M+" button until the preset memory display, for example "P01", is blinking. Then you can select the desired preset memory by "VOL+" or "VOL-" button and press "PRE/M+" button again to store the desired station.
- Now you can recall the preset station by pressing the "PRE/M+" button to select the preset memory.
Setting the Alarm
- You must switch off the radio before you set the alarm time.
- Press and hold the "ALARM 1" or "ALARM 2" button until the Hour display begins to flash.
- You can set the alarm time: Press the "HOUR" to adjust the hour and press "MIN" button to adjust the Minute.
- Press the "ALARM1" button now to store the alarm time.
- Now you can enable the alarm and select to wake up by radio or buzzer by pressing "ALARM1" in toggle.
The LED with music note logo and bell logo stands for waking up by radio or by buzzer respectively. Both LEDs with music note logo and bell logo are off representing to disable the alarm. - Use the same method to set Alarm 2.
Cancelling the Daily Alarm
Press the "RADIO ON/OFF" button to stop the alarm. The alarm will sound again at the same time on the next day.
Disabling the Alarm
At radio OFF mode, press the "ALARM 1" or "ALARM 2" button in toggle with both LEDs with music note symbol and bell symbol are off. The alarm is disable now.
Setting the Clock
- Before setting the clock time, radio must be switch off.
- Press and hold the "TIME SET" button until the display begins to flash. When the timer is up, radio will be off automatically
- Press the "HOUR" and "MIN" buttons to adjust the time.
- Press the "TIME SET" button again to finish setting the time.
Setting the Sleep Time
Press the Sleep button repeatedly to set the sleep time (90, 80, 70, 60, 50, 40, 30, 20, 10 min or OFF). When timer is up, radio will be off automatically.
Snooze
Press the SNOOZE button when the alarm is sounding, the alarm will be temporary stop and will resume sounding after 9 minutes.
TIME SETTING FOR PROJECTOR
- To preset the HOURS, press simultaneously the "HOUR" button and the "TIME" button, keep them depressed until the hour digits to be preset are displayed.
- To preset the MINUTES, press simultaneously the "MIN" button and the "TIME" button, keep them depressed until minute digits to be preset the displayed.
NOTE: PROJECTION TIME IMAGE ON THE CEILING OR WALL OF A DARKENED ROOM. MAXIMUM PROJECTION DISTANCE IS 2M. THE LED DIGITAL CLOCK AND THE PROJECTION CLOCK MUST BE SET SEPARATELY.
SPECIFICATIONS
Frequency Range: FM 87.5 –108 MHz
Power Source: AC 230V ~ 50 Hz, 5W DC 3V (For back-up)
Power Output: 400 mW
Safety instructions
- Before using this product, read and follow all warnings and instructions.
- The apparatus shall not be exposed to dripping or splashing and make sure that no objects filled with liquids, such as vases, shall be placed on or near the apparatus.
- To completely disconnect the power input, the mains plug of the apparatus shall be disconnected from the mains, as the disconnect device is the mains plug of apparatus.
- The mains plug of the apparatus should not be obstructed OR should be easily accessed during intended use.
- Battery shall not be exposed to excessive heat such as sunshine, fire or the like.
- A minimum distances of 10cm around the apparatus is needed for sufficient ventilations.
- The ventilation should not be impeded by covering the ventilation openings with items such as newspapers, table-cloths, curtains etc.
- No naked flame sources such as lighted candles should be placed on the apparatus.
- Attention should be drawn to the environmental aspects of battery disposal.
- The apparatus can only be used in moderate climates, extremely cold or warm environments should be avoided.
- The rating label has been marked on the bottom panel of the apparatus.
- This device is not intended for use by people (including children) with physical, sensory or mental disabilities, or a lack of experience and knowledge, unless they're under supervision or have received instructions about the correct use of the device by the person who is responsible for their safety.
- This product is intended for household use only and not for commercial or industrial use.
- Make sure the unit is adjusted to a stable position. Damage caused by using this product in an unstable position or by failure to follow any other warning or precaution contained within this user manual will not be covered by warranty.
- Never remove the casing of this apparatus.
- Never place this apparatus on other electrical equipment.
- Do not use or store this product in a place where it is subject to direct sunlight, heat, excessive dust or vibration.
- Do not clean this product with water or other liquids.
- Do not block or cover the slots and holes in the product.
- Do not push foreign objects into the slots or holes in the product.
- Do not allow children access to plastic bags.
- Please check that the voltage on the type plate of your appliance corresponds with your house electricity supply (type plate is located on the back of the unit).
- Protect the power cord from being walked on or pinched, particularly at plugs, convenience receptacles, and the point where they exit from the apparatus.
- Only use attachments/accessories specified by the manufacturer.
- Refer all servicing to qualified service personnel. Servicing is required when the apparatus has been damaged in any way, such as the power supply cord or the plug, when liquid has been spilled or objects have fallen into the apparatus, when the apparatus has been exposed to rain or moisture, does not operate normally, or has been dropped.
- Do not use a damaged power cord or plug or a loose outlet. Doing so may result in fire or electric shock.

- Never remove the casing of this device.
- Never place this device on other electrical equipment.
Notice
If at any time in the future you should need to dispose of this product please note that: All batteries and accumulators need to be removed from this product (Removal of Waste Batteries and Accumulators). Always bring your product to a professional to remove the built-in battery.

Documents / ResourcesDownload manual
Here you can download full pdf version of manual, it may contain additional safety instructions, warranty information, FCC rules, etc.
Advertisement


Need help?
Do you have a question about the ICRP-212 and is the answer not in the manual?
Questions and answers