Advertisement
Available languages
Available languages
Quick Links
Strictly follow the safety instructions provided with the product.
Product installation must ONLY be performed by highly qualified personnel.
1) Before making any operation, keep in mind that
this remote unit must be placed with marked area in
the area where mains cable exit from wall.
2) Place the wall mounting part in the area intended
for the installation of the device.
Mark the center of the fixing holes, making sure that
position is correct.
Drill in the wall and insert the expansion plugs for
screws (min. dimension 5mm).
3) Pull the mains cable through the circular area
previously marked. Pay attention to connect
properly the wires: a wrong connection could lead
to irreversible fault on the PCB. ATTENTION: high
voltage cables L and N must be kept separately
from the signal cables S1 and S2 and must be
positioned in different places.
Fix the device on the wall with two screws.
Cover the wires coming from mains using the
sheaths provided inside the box.
4) Connect wires to the terminal box, taking care of
the proper position and function; make sure that
fixing with terminal box is strong.
5) Fix the cable cover to the back part of the remote
panel, taking care that wires pass through the slot,
and tight the cover with the screw.
Klimair® - UNOKLIMA
USER INSTRUCTIONS REMOTE PANEL
TEMPERO ECO REMOTE
UK
Advertisement

Summary of Contents for Klimair UNOKLIMA
- Page 1 Klimair® - UNOKLIMA USER INSTRUCTIONS REMOTE PANEL TEMPERO ECO REMOTE Strictly follow the safety instructions provided with the product. Product installation must ONLY be performed by highly qualified personnel. 1) Before making any operation, keep in mind that this remote unit must be placed with marked area in the area where mains cable exit from wall.
-
Page 2: Command List
6) Lock the remote panel to the wall mounting, paying attention to dispose the excess wires in the duct inside the wall. The supply mains must be incorporated with a mean for disconnection having a contact separation in all poles that provide full disconnection under overvoltage category III conditions. The remote panel runs in automatic mode every time it is turned on. -
Page 3: Light Signals
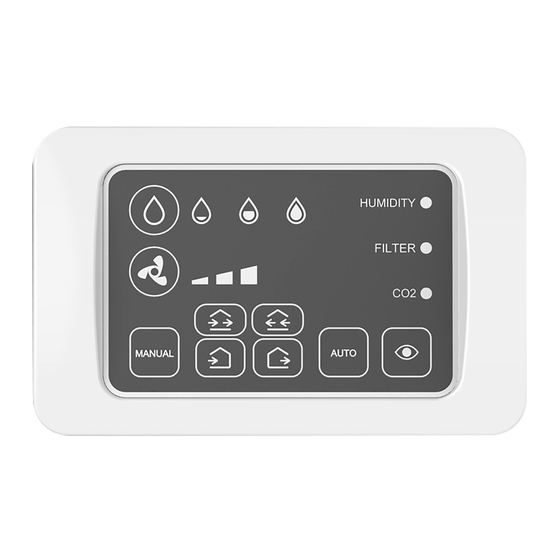
COMMANDS INSTRUCTION Attention: The remote control is equipped only to reset the products as shown in the specific paragraph. The remote control will be disabled once the configuration of the remote panel is done. Attention: The humidity and light sensor probes are placed inside the remote panel; the measurement of these parameters is effectuated by the accessory and not by the ventilation unit. - Page 4 It is possible to change the threshold level of the humidistat, pushing “H” button, to adapt the value to the type of the environment in which is installed. Once the humidity value set is overtaken, the product continuously extracts air at the maximum speed until the humidity level returns below the pre-set value. In case of more units, all the products will automatically run extraction until the restoration of the threshold value.
- Page 5 I – Air intake function By rapidly pressing the button "AIR INTAKE FUNCTION" two times consequently the products intakes air. In case of more units, all the products supply air simultaneously until new command by the user. Attention: Sensors are not activated in this function LIGHT SIGNALS Steady light V1 –...
- Page 6 5 times the (S) button within this time, this led remains steady until you disconnect the remote panel from the power supply. At this point the remote panel id reset and it is necessary to configure it again. Klimair® UNOKLIMA www.vvs-trading.dk -...
- Page 7 Klimair® - UNOKLIMA BRUGSANVISNING BETJENINGSPANEL TEMPERO ECO REMOTE Følg nøje sikkerhedsinstruktionerne, der følger med produktet. Produktinstallation må KUN udføres af autoriseret installatør. 1) Før du foretager nogen handling, skal du huske på, at denne fjernbetjeningsenhed skal placeres med det markerede område, hvor netledningen kommer ud af væggen.
- Page 8 6) Fastgør fjernpanelet til vægmonteringen, og vær opmærksom på at skjule de overskydende ledninger i kanalen inde i væggen. EL forsyningsnettet skal være forsynet med en kontakt til afbrydelse med en kontaktadskillelse i alle poler, der giver fuld frakobling under overspændingskategori III-forhold. Panelet kører i automatisk tilstand, hver gang det tændes.
- Page 9 Funktions instruktion OBS: Den medfølgende fjernbetjening er kun udstyret til at nulstille produkterne som vist i det specifikke afsnit. Fjernbetjeningen deaktiveres, når konfigurationen af fjernpanelet er udført. OBS: Fugtigheds- og lyssensor er placeres inde i panelet; målingen af disse parametre udføres af panelet og ikke af ventilationsenheden.
- Page 10 Det er muligt at ændre indstillingen af fugtighedsstyringen ved at trykke på "H" -knappen for at tilpasse værdien. Når den indstillede fugtighedsværdi overskrides, suger produktet luft ud ved maksimal hastighed, indtil fugtighedsniveauet er under den indstillede værdi. I tilfælde af flere enheder kører alle produkterne automatisk udsugning, indtil den indstillede værdi nås.
- Page 11 I –Indblæsnings funktion Ved at trykke på knappen "INDBLÆSNING" to gange hurtigt efter hinanden, blæser produkterne luft ind. I tilfælde af flere blæser alle enheder luft ind samtidigt, indtil brugeren giver en ny kommando. OBS: Sensorer aktiveres ikke i denne funktion LYS SIGNALER Lyser V1 –...
- Page 12 Hver start af panelet (undtagen første gang) forbliver lyset ’AC’ tændt i 10 sekunder, hvis du trykker 5 gange på ’S’ -knappen indenfor denne tid, forbliver lyset tændt, indtil du afbryder panelet fra strømforsyningen. På dette tidspunkt nulstilles fjernpanelets id, og det er nødvendigt at konfigurere det igen. Klimair® UNOKLIMA www.vvs-trading.dk - salg@vvs-trading.dk...
Need help?
Do you have a question about the UNOKLIMA and is the answer not in the manual?
Questions and answers