Table of Contents
Advertisement
Advertisement
Table of Contents

Related Manuals for VALTIR QuadGuard M10

Summary of Contents for VALTIR QuadGuard M10
- Page 2 The information contained in this manual supersede all previous versions. The instructions, illustrations, and specifications are based on the latest QuadGuard ® M10 information available to Valtir at publication. We reserve the right to make changes at any time. Please visit Valtir.com/Product/QuadGuard M10 to confirm the latest revision. QuadGuard ®...
-
Page 3: Table Of Contents
Determine Transition Type ............Error! Bookmark not defined. Recommended Tools ........................12 Site Preparation/Foundation ....................... 14 Foundation/Anchoring ......................15 Valtir Approved Adhesive Anchoring System ................16 Vertical Anchors ........................16 Anchor Assembly Cautions ....................17 Horizontal Anchors ........................ 18 System Assembly ........................21 ... -
Page 4: Customer Service Contacts
® M10, please contact the highway authority that has planned and specified this assembly and, if needed, contact Valtir. This product must be assembled in the location specified by the appropriate highway authority. If there are deviations, alterations, or departures from the assembly protocol specified in this manual, the device may not perform as tested. -
Page 5: Safety Symbols
QuadGuard ® M10. Additional copies of this manual are available from Valtir by calling (888) 323-6374 or by visiting Valtir.com/Product/QuadGuard M10. Please contact Valtir if you have any questions concerning the information in this manual or about the QuadGuard ®... -
Page 6: Limitations And Warnings
Features”, Valtir contracts with FHWA approved testing facilities to perform and evaluate crash tests to prepare a crash test results report. Valtir is then able to submit a Request for Federal Aid Reimbursement of Safety Hardware Devices to the FHWA for review. -
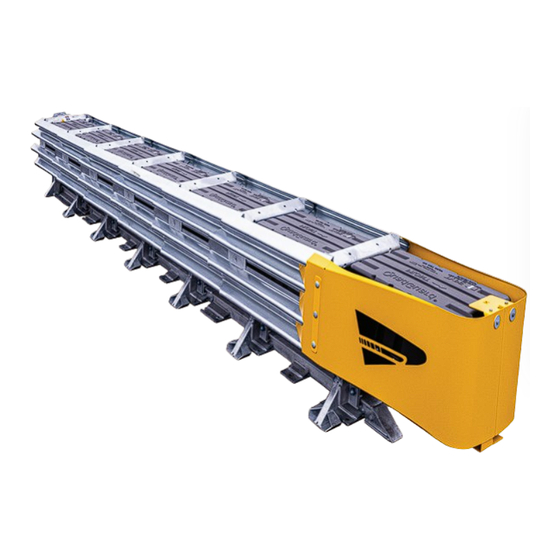
Page 7: System Overview
Quad-Beam Fender Panels. Important: Valtir makes no recommendation whether use or reuse of any part of the system is appropriate or acceptable following an impact. It is the sole responsibility of the project engineer and/or the local highway authority and its engineers to make that determination. It is critical that you inspect this product after assembly is complete to make certain that the instructions provided in this manual have been strictly followed. -
Page 8: System Components
Below is a list of system components that may be used in your particular QuadGuard ® configuration. Verify parts delivered and system details with the BOM (Bill of Materials) and system drawings shipped with your system. Please call Valtir if you have any system questions (p. 3). Note: Components are not shown to scale. - Page 9 611379 Shim, 12GAX3 5/8X8 Bracket, Angle, 2X1, W/Holes Bracket, Pull-Out 614062 626817 605535 Bracket, Cart, Hold Down Bracket, Cart Support, Nose Washer, Bar, 1/4 626815 626816 626818 Nose, L, W/Logo Nose, R, W/Logo 611669 611680 Valtir.com Revision F August 2022...
- Page 10 Anchor, 3/4X6 1/2, G5 Anchor, 3/4X7, G5 Anchor, 3/4X18, G5 117540 117542 116799 Nut, Hex, 1/4 Nut, Hex, 3/8 Rail Nut, Hex, 5/8 115946 115960 003340 Nut, Hex, 5/8 Nut, Heavy Hex, 3/4 003354 003704 Valtir.com Revision F August 2022...
- Page 11 Washer, Fender, 3/8X2 Washer, Flat, 3/4X2 003300 118038 118027 Mushroom Washer Flat Screw 5/8X5,G8 Die Spring, 5/8 X 1 1/2 617045 116878 117459 Cartridge Assy, Type I Cartridge Assy, Type II Approved Adhesive 606027 606029 118710 Valtir.com Revision F August 2022...
- Page 12 Contact the Customer Service Department prior to deployment if you have any questions (p. 3). Figure 1 Figure 2 No Transition Safety Shape 4” Offset (Unidirectional only) Figure 3 Figure 4 Single Slope 6” Offset End Shoe Figure 5 Figure 6 Extended End Shoe Quad to Thrie-Beam Valtir.com Revision F August 2022...
-
Page 13: Recommended Tools
Concrete drill bits – 7/8” [22 mm] (Double-Fluted) Grinder, Hacksaw or Torch (optional) Important: Valtir recommends using double-fluted drill bits to achieve optimum tensile strength when applying an approved adhesive anchoring system (p. 15). Valtir.com Revision F August 2022... - Page 14 Hex Key (Allen) wrench: 3/8” Important: Valtir makes no recommendation whether use or reuse of any part of the system is appropriate or acceptable following an impact. It is the sole responsibility of the project engineer and/or the local highway authority and its engineers to make that determination.
-
Page 15: Site Preparation/Foundation
Recommended dimension and reinforcement specifications for new concrete foundations are provided in Valtir concrete foundation drawings, supplied with the system. The system may be assembled on a non-reinforced concrete roadway (minimum 8” [200 mm] thick). Deployment cross-slope shall not exceed 8% and should not twist more than 2% over the length of the system;... -
Page 16: Foundation/Anchoring
Important: Only 18” [460 mm] threaded rods, utilizing Valtir approved adhesive, can be used with asphalt foundations (p. 15). Contact Valtir for a complete list of approved adhesives (p. 3). Concrete Installations For concrete installations, the QuadGuard ®... -
Page 17: Valtir Approved Adhesive Anchoring System
Valtir Approved Adhesive Anchoring System A Valtir approved adhesive anchoring system is required to securely anchor crash cushions. Each approved adhesive kit contains adhesive, studs, nuts and washers. Both vertical and horizontal assemblies are possible using an approved adhesive anchoring system. -
Page 18: Anchor Assembly Cautions
Note: Use of the Valtir approved vacuum drilling equipment is authorized to replace the blowing and brushing requirement of Step 3. 4) Apply Approved Adhesive Fill the borehole 100% full. -
Page 19: Horizontal Anchors
Do not disturb or load the stud until the approved adhesive material has hardened (reference approved adhesive kit instructions for hardening times). 4) Torque the nuts Once the adhesive has fully cured, torque nut(s) to the approved adhesive manufacturing specification. Valtir.com Revision F August 2022... - Page 20 Figure 11 Plan View 32 1/8 Figure 12 Elevation View 6 Bay TL-3 1) Backup Quad-Beam Fender Panel 3) Nose Cover 4) Cartridge 5) Diaphragm 6) Monorail TYPE II TYPE I Figure 13 3 Bay TL-2 Valtir.com Revision F August 2022...
- Page 21 The outside width of the system is approximately 6” [152 mm] wider than the nominal width. Note: The outside width of the system is not the same as the width of the Backup. Figure 15 Width of Parallel system Valtir.com Revision F August 2022...
-
Page 22: System Assembly
Transition Panel used. Please refer to the Drawing Package supplied with the system for details. CENTERLINE OF SYSTEM 6.5” [165 mm] CONSTRUCTION LINE Figure 16 (Top view of concrete foundation) Valtir.com Revision F August 2022... - Page 23 (p. 24, Detail 19a). It is important to align each segment of Monorail from the back to the front of the system (±1/4” [6 mm]). Anchor each Monorail section using the Valtir approved adhesive kits provided (p. 16).
- Page 24 5/8” RAIL NUT (2) Side Panel shown in some (Figure 25) cases will be a Transition Fender Panel 5/8”X 2” RAIL BOLT (2) *PANEL HOLES ARE CLOSEST TO FRONT OF SYSTEM Figure 18 Side Panel/Transition Panel Attachment Valtir.com Revision F August 2022...
- Page 25 ROADWAY Figure 20 Final Anchor Height (After Applied Torque) 4” [100 mm] TENSION STRUT BACKUP 3/4 X 7 ANCHOR MONORAIL CENTERLINE CONSTRUCTION LINE CONCRETE PAD Figure 21 Backup and Monorail Location for Tension Strut Backup Valtir.com Revision F August 2022...
- Page 26 3/4 LOCK WASHER 3/4 LOCK NUT Figure 22 Figure 23 Monorail Guide Attachment Diaphragm Orientation 36” [914 mm] DIAPHRAGM DIAPHRAGMS TYPICAL Bay 3 Bay 2 Bay 1 Nose FRONT FACE OF BACKUP MONORAIL Figure 24 Diaphragm Spacing Valtir.com Revision F August 2022...
- Page 27 Use a drift pin to align the center hole of the Fender Panel with the center hole of the Diaphragm. Note: Working from the Backup, assemble and tighten each Bay section one at a time toward the Nose of the system. Valtir.com Revision F August 2022...
- Page 28 5/8 FLAT WASHER SLOT SLOT 5/8 HEX NUT (SMALL) 5/8” FLATHEAD FENDER PANEL SOCKET SCREW MUSHROOM WASHER FENDER PANEL (ATTACHED) BACKUP OR DIAPHRAGM CORRECT INCORRECT Detail 26b Detail 26a Mushroom Washer Attachment Mushroom Washer Orientation Valtir.com Revision F August 2022...
- Page 29 Attach the End Cap to the front of the first Monorail segment, as shown below and the Monorail Assembly drawing. MONORAIL 5/8 LOCK WASHER 5/8 X 3 1/2 G5 HEX BOLT 5/8 HEX NUT END CAP Figure 28 Monorail End Cap Attachment Valtir.com Revision F August 2022...
- Page 30 Figure 29 Lower Cartridge Support Bracket Assembly TENSION STRUT BACKUP STEP 1 Mount Lower Cartridge Support Bracket Lower Cartridge STEP 2 Support Bracket Mount “Keeper” Figure 30 Lower Cartridge Support Bracket Assembly (Tension Strut Backup) Valtir.com Revision F August 2022...
- Page 31 LEFT NOSE PANEL HEX NUT 1/4 Detail 31b HEX BOLT Six (6) Locations: 1/4 X 3/4 CARTRIDGE Attach Nose SUPPORT Cartridge Support BRACKET Bracket using Bottom Two (2) Fasteners. RIGHT NOSE PANEL Detail 31a Detail 31b Valtir.com Revision F August 2022...
- Page 32 Steel Nose not shown for clarity Fastener Assembly 5/8 HEX NUT PULLOUT BRACKET 3/4 SCH 80X3 PIPE 5/8X5 RAIL BOLT 5/8X5 RAIL BOLT Detail 31e Detail 31f End View: Nose Cover Removed Inside View: Nose Cover Cut Away Valtir.com Revision F August 2022...
- Page 33 Note: Figure 33 shows proper placement of Cartridge Nose Support Bracket. Note height of Cartridge support Bracket. The Cartridge sits at the same level as the other CARTRIDGE HOLD Bays to the rear. DOWN BRACKET Figure 33 Valtir.com Revision F August 2022...
- Page 34 Placing the wrong Cartridge in the Nose or Bay(s) could result in unacceptable crash performance per MASH criteria and cause serious injury or death to occupants and/or bystanders in the event of a vehicle impact. Important: The QuadGuard ® M10 is a six (6) Bay configuration. Valtir.com Revision F August 2022...
-
Page 35: Quadguard ® M10 24" Final Inspection Checklist
Nose Cartridge is at the same height as Bay Cartridges (p. 30) Fender Panel gap is .78” [20 mm] for Narrow systems (p. 33) Bolts and nuts are properly tightened (p. 33) System is clear of debris Valtir.com Revision F August 2022... -
Page 36: Maintenance And Repair
To determine if a product should be replaced or is potentially reusable, a trained engineer experienced in highway products and directed by the DOT, or other appropriate local highway authority, must be consulted. Valtir.com Revision F August 2022... -
Page 37: Post-Impact Instructions
Post-Impact Instructions Important: Valtir makes no recommendation whether use or reuse of any part of the system is appropriate or acceptable following an impact. It is the sole responsibility of the local highway authority and its engineers to make that determination. It is critical that you inspect this product after assembly is complete to make certain that the instructions provided in this manual have been strictly followed. - Page 38 30 - 32 and 47 for Nose attachment instructions. 13) All bolts on the system are adequately tight. 14) Site is free from debris. 15) The QuadGuard M10 is now ready for use. ® Valtir.com Revision F August 2022...
-
Page 39: Parts Ordering Procedure & Drawings
Bracket, Cartridge Supt, Dia, Folded, QG 605447 Bracket, Cartridge, Supt, TS B/U, QG 605535 Bracket, Pull-Out, QG 625647 Diaphragm, QG, 24, QG 608136 Endcap, Monorail 611266 Locking Bar, Cartridge Supt, QG 611368 Monorail Guide, QG 611375 Monorail, 2 Bays Valtir.com Revision F August 2022... - Page 40 Washer, Lock, 3/4 118100 Washer, Lock, 5/8 617045 Washer, Mushroom Forged, QG Warning: Use only Valtir parts that are specified herein for assembling, maintaining, or repairing the QuadGuard M10. Do not utilize or otherwise ® comingle parts from other systems even if those systems are other Valtir systems.
-
Page 41: Quadguard ® M10 W/ Tension Strut Backup Qgmtscvr-U
Valtir.com Revision F August 2022... -
Page 42: Ts Concrete Pad 618686
Valtir.com Revision F August 2022... -
Page 43: Ts Concrete Pad 8" W/Rebar 618686
Valtir.com Revision F August 2022... -
Page 44: Ts Concrete Pad 8" Wo/Rebar 618686
Valtir.com Revision F August 2022... -
Page 45: Tension Strut Backup 627448
Valtir.com Revision F August 2022... -
Page 46: Monorail Assembly 625637
Valtir.com Revision F August 2022... -
Page 47: Diaphragm Assembly 625650
Valtir.com Revision F August 2022... -
Page 48: Shim Kit 627518
Valtir.com Revision F August 2022... -
Page 49: Fender Panel Assembly 608236
Valtir.com Revision F August 2022... -
Page 50: Nose Assembly 626814
Valtir.com Revision F August 2022... -
Page 51: 31" W-Beam Guardrail Transition Qgmtscvr-Twlr
Valtir.com Revision F August 2022... -
Page 52: Thrie-Beam Guardrail Transition Qgmtscvr-Ttlr
Valtir.com Revision F August 2022... -
Page 53: Safety Shape Barrier Transition
Valtir.com Revision F August 2022... -
Page 54: Single Slope Transition Qgmtscvr-T6
Valtir.com Revision F August 2022... -
Page 55: Vertical Barrier Transition Qgmtscvr-Es
Valtir.com Revision F August 2022... -
Page 56: Vertical Barrier Transition, Extended Qgmtscvr-Spe
Valtir.com Revision F August 2022... - Page 57 NOTES: Valtir.com Revision F August 2022...
- Page 58 NOTES: Valtir.com Revision F August 2022...
- Page 59 NOTES: Valtir.com Revision F August 2022...
Need help?
Do you have a question about the QuadGuard M10 and is the answer not in the manual?
Questions and answers