
Summary of Contents for Lab companion FHG-150
- Page 1 Operation Manual Laboratory Freezers Models: FHG-, FMG-,FCG-150/300/650 Manual No.: E2301L002 Version: 1.1...
-
Page 2: Table Of Contents
Table of Contents Safety Advice ................................1 1.1 Operation Manual ............................1 1.2 Danger/Caution/Notice Alerts ......................... 1 1.3 Danger Alerts ..............................1 1.4 Caution Alerts ..............................3 Description ................................. 4 2.1 Introduction ..............................4 2.2 Available Models ............................4 2.3 Key Features ..............................6 2.4 Construction .............................. - Page 3 5.1 Cleaning ................................ 26 5.2 Relocation ..............................27 5.3 Storage ................................27 6 Troubleshooting ..............................28 6.1 Power Troubles ............................28 6.2 Malfunctions during Operation......................29 7 Accessories ................................31 8 Appendix ................................... 32 8.1 Technical Specifications .......................... 32 8.2 Equipment Disposal ..........................33 8.3 Warranty and Disclaimer ........................
-
Page 4: Safety Advice
1 Safety Advice 1.1 Operation Manual This manual contains important safety and operation information. You must carefully read, understand, and follow all the instructions in this manual prior to operating this unit. Keep this manual in a safe place nearby for reference and make it easily available to all users. 1.2 Danger/Caution/Notice Alerts This manual highlights Danger/Caution/Notice alerts to prevent injuries or property damages and also to achieve optimum performance. - Page 5 Check the required electrical requirements on the ID plate of this equipment before ◆ use. Connect this equipment to a dedicated power outlet nearby. ◆ Make sure to connect this equipment only to properly grounded power outlets to ◆ protect you and your instrument. Do not ground to gas pipes or water pipes. Make sure to use the power cord supplied with this unit.
-
Page 6: Caution Alerts
1.4 Caution Alerts Ignoring the following cautions could cause injuries or property damages. Do not place heavy objects, including this equipment, on top of the power cord and ◆ do not strip, scratch, bend, twist, pull, or heat the power cord. A damaged power cord is a fire and electrical shock hazard. -
Page 7: Description
2 Description 2.1 Introduction Jeio Tech is introducing nine new models of laboratory freezers with exceptional features described in 2.3 to provide optimal freezing environments for your various scientific and clinical applications such as storage of reagents, pharmaceuticals, test samples, plasma, and other critical laboratory materials. - Page 8 And each Series offer three different chamber sizes to choose from: FHG/FMG/FCG-150 FHG/FMG/FCG-300 FHG/FMG/FCG-650 Chamber Size 156L (5.5 ft 319L (11.2 ft 636L (22.4 ft Dimension 763 x 871 x 975 mm 750 x 799 x 1610 mm 950 x 885 x 1980 mm (W x D x H) Therefore, depending on your specific requirements for the freezing temperature or the chamber size, you can select the most suitable laboratory freezer among the following nine...
-
Page 9: Key Features
2.3 Key Features Operational Features ⚫ Vivid and colorful 5.5” VFD (vacuum fluorescent display), four touch-sensitive buttons, and a jog dial for easy and intuitive operation ⚫ Superior temperature uniformity, temperature stability, and rapid thermal recovery ensured by the precise microprocessor PID control and the directed airflow system ⚫... - Page 10 ⚫ Magnetic door packing adopted for tight sealing and also for shock absorbing ⚫ Easy leveling adjustment thanks to high-quality level casters (except FHG/FMG/FCG-150) ⚫ Two units stackable for space saving (for FHG/FMG/FCG-150 only) ⚫ Three types of recorders available as options (See Accessories) Safety Features ⚫...
-
Page 11: Construction
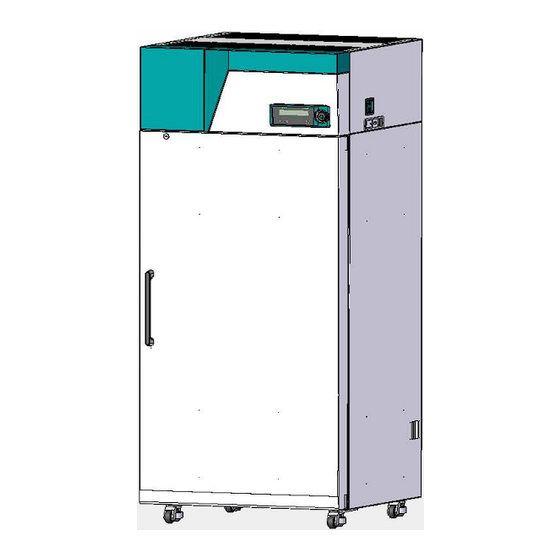
2.4 Construction Vent Holes Recorder (optional) Control Panel Power Cord Door Fuses & Power Switch Door Handle Level Casters Door key lock 8... - Page 12 Magnetic Door Safety Door Packing Switch Shelf Level Adjuster Door Lock Wire Shelves 9...
-
Page 13: Unpacking And Installtion
3 Unpacking and Installtion Checking Shipment Damage and Unpacking Upon receiving the equipment, check to ensure that no damage has occurred during shipment. It is important that any damage that occurred during shipment must be detected before unpacking. If you find such damage, notify the carrier immediately. 3.2 Checking the Contents of the Package After unpacking, check to ensure that all the following items are included in the package. -
Page 14: Preparations Before Installation
3.3 Preparations before Installation Before moving and installing the unit, note the size and the weight of the unit carefully. In addition, check the dimensions of the pathway and make sure that there is nothing obstructing the movement along the way. FHG/FMG/FCG-150 FHG/FMG/FCG-300 FHG/FMG/FCG-650... -
Page 15: Moving And Leveling
⚫ Never install or use this equipment in explosive atmospheres. ⚫ Never install or use this equipment near to hazardous or flammable substances. ⚫ Never expose this equipment to direct sunlight. ⚫ Never install this equipment near any device that generates high frequency noises. ⚫... -
Page 16: Power Connection
2) Turn all 4 height adjustment handles counter-clockwise until the rubber feet touch the ground. 3) Then, turn all 4 height adjustment handles about 90 degree more so that the caster is about 10 mm(0.39”) above the ground as shown below: 4) Check whether the equipment is level side-to-side as well as front-to-back by placing a bubble level on top of the equipment. -
Page 17: Operating Conditions
The power connection procedures are as follows: 1) Before connecting the power cord, make sure that the main power switch is turned off. 2) Plug the power cords into the power sockets at the back of this equipment. 3) Plug the other end into a properly grounded and dedicated power outlet nearby. 3.6 Operating Conditions This equipment is designed for indoor use in laboratory environments and to be operated only by properly trained staff knowledgeable in safe laboratory practices. - Page 18 ⚫ Check whether any flammable, explosive or hazardous substances are inside the equipment. ⚫ Check whether the power cord is firmly connected to a properly grounded power outlet. 15...
-
Page 19: Operation
4 Operation 4.1 Control Panel VFD (Vacuum Fluorescent Display) MENU Button LOCK Button START/STOP Button Jog Dial allows you to monitor overall operational status allows you to change various control settings. MENU Button allows you to prevent inadvertent or accidental LOCK Button operational change allows you to start or to stop the operation at... -
Page 20: Vfd (Vacuum Fluorescent Display)
⚫ To activate or to deactivate the locking function, press the LOCK Button for more than 3 second. Note that the LOCK Button illuminates if the locking function is enabled. 4.2 VFD (Vacuum Fluorescent Display) indicates overall operational status as well Operational Status Display as warnings. -
Page 21: Starting And Stopping The Operation
Operational Status Display illuminates when the operation is performed. illuminates when the actual temperature reaches the set St-by temperature. (i.e., Stand-by Mode) Stop illuminates stopped operation Hi. Temp. Illuminates when over-temperature occurs. Temp. Lo. Illuminates when under-temperature occurs. illuminates when the fan is activated. Door blinks when the door is opened. -
Page 22: Adjustment Of Control Functions
4.4 Adjustment of Control Functions You are allowed to adjust various control functions by pressing the MENU Button a certain number of times. ⚫ Adjustment of control functions is automatically cancelled if no action is taken for more than 30 seconds. 4.4.1 Temperature Setting The procedures to set the desired temperature value are as follows: 1) Turn the power switch on and check whether the VFD changes automatically from... -
Page 23: Alarm Setting
4.4.2 Alarm Setting For added safety, you can set the high and low temperature alarms to protect the samples against damage. The procedures to set the high and low temperature limits for the alarms are as follows: 1) Turn the power switch on and check whether the VFD changes automatically from Start-up Mode Display to Stand-by Mode Display as shown below: ↓... -
Page 24: Manual Defrost
factory is -5℃.) ⚫ If no action is taken for more than 5 seconds during alarm setting mode, it is automatically cancelled and returns back to the stand-by mode. 4.4.3 Manual Defrost Manual defrost procedure are as follows: 1) Press the MENU Button 4 times at Stand-by Mode and check whether the following display appears: 2) Turn the Jog Dial to select ‘ON’... -
Page 25: Changing High And Low Temperature Deviations
4.4.4 Changing High and Low Temperature Deviations This equipment is designed to activate or to deactivate the refrigeration compressor automatically if the actual temperature is above or below the set temperature by a certain temperature value. However, if necessary, you can change either high or low temperature deviation value for the compressor activation or deactivation. -
Page 26: Temperature Offsetting (Calibration)
2) Turn the Jog Dial to select the desired high temperature deviation value. 3) If selected, press the Jog Dial to store it. 4) To change the low temperature deviation value, press the MENU Button again and check whether three displays (Temp. Low, Refrig., and Set Temperatue shown below inside pink circles) blink along with beep sounds:. -
Page 27: Safety Alarms
3) Turn the Jog Dial to select the desired temperature offsetting value. 4) If selected, press the Jog Dial to save it. The temperature offsetting value is calculated by subtracting the displayed ⚫ temperature from the temperature of your own thermometer. Note that the offsetting value range is ±50℃... -
Page 28: Open Door Alarms
4.5.2 Open Door Alarms When the door is opened, the following blinking alarms are immediately set off: If the door remains open for more than 2 minutes, then audible alarms are activated. ⚫ The circulation fan is automatically stopped when the door is opened for added safety. -
Page 29: Maintenace
5 Maintenace 5.1 Cleaning ⚫ Do not reconnect this equipment to power outlets until all cleaned surfaces have dried. ⚫ Do not allow any liquid or wet material to get inside the unit when cleaning. ⚫ Do not use chlorine bleach, ammonia-based cleaners, abrasives, ammonia, or metal scouring pads when cleaning. -
Page 30: Relocation
5.2 Relocation If you need to move the equipment to another place, disconnect the power cord from the power outlet, Pay attention to avoid mechanical shock or vibration while moving the equipment. Damages caused by mechanical shock or vibration may result in injury or fire. 5.3 Storage If you know you will not use this equipment for an extended period of time, 1) disconnect the power cord from the power outlet and... -
Page 31: Troubleshooting
6 Troubleshooting 6.1 Power Troubles Problem Cause Corrective Action Meet the electrical requirements of this Unsuitable power supply equipment before use. Find out why blackout or cutoff happened Power cutoff by a circuit and restore power. If there is a short circuit breaker or power blackout or leakage, trace the source of the problem and fix it. -
Page 32: Malfunctions During Operation
Damaged VFD Contact Jeio Tech for service. Reconnect the power cord firmly to the VFD malfunction Loose power connection power outlet as well as to the power socket with power on at the back of the equipment. Internal circuit failure Contact Jeio Tech for service. - Page 33 decrease Too much load Reduce the load for efficient air circulation Too much dust accumulation Clean or replace the filter or the condensor on the filter or the condensor fin. Not enough space around the Secure recommended space around the unit unit .
-
Page 34: Accessories
7 Accessories Item Item Cat No. Dot matrix recorder (graph mode, 6 points) AAA8T500 Dot matrix recorder paper AAA8T509 Chart recorder (6", 24hr/7days) [for all FLG models] AAAE1501 Recorders Chart recorder paper (6", 100 sheets per pack) AAAE1502 Thermal line recorder (graph/digital mode, 1ch) AAAE1503 Thermal line recorder paper (3 sheets per pack) AAAE1504... -
Page 35: Appendix
Door key lock Shelves Plastic wire coating shelve Shelves (Standard/Max) 3/11 3/17 Load per shelf(kg) FHG-150,300,650 : R-134a / FMG/FCG-,150,300,650: R- Refrigerator Air circulation Forced air circulation Defrost control Automatic control Temperature alarm High Temp, Low Temp, Audible and visual alarm... -
Page 36: Equipment Disposal
8.2 Equipment Disposal Disposing of this equipment must be done in an environmentally responsible way if it has been potentially exposed to bio-agents or radioactive samples. Failure to follow stringent requirements for equipment disposal may lead to actions against you and your organization. (1) First, check with your laboratory or organization to ensure that you are following all the policies and procedures for disposal of laboratory equipments. - Page 37 CUSTOMER'S SOLE REMEDY FOR ANY DEFECTIVE PRODUCT WILL BE AS STATED ABOVE, AND IN NO EVENT WILL JEIO TECH BE LIABLE FOR INCIDENTAL, CONSEQUENTIAL, SPECIAL OR INDIRECT DAMAGES IN CONNECTION WITH THE PRODUCT. 34...
-
Page 38: After-Sales Service And Customer Assistance
8.4 After-sales Service and Customer Assistance Our after-sales service responds to your questions concerning maintenance and repair of this equipment as well as spare parts. In case of a warranty claim, repair or purchase of replacement parts or in case of queries or other problems, please contact your local dealer or Jeio Tech representative. - Page 39 36...
Need help?
Do you have a question about the FHG-150 and is the answer not in the manual?
Questions and answers