Advertisement
Available languages
Available languages
Quick Links
WARNING!
All units shown are to be installed by a
qualified, professional service technician
For proper installa on, be sure to use the correct cutout dimensions as specified on page 2 for your specific product.
Ÿ
We recommend that you use silicone caulk (not supplied) to seal the interface between the island and the trim work of your product.
Ÿ
Some models shown may include an addi onal product guide or supplement sheet.
Ÿ
CAUTION: Make sure your island is properly vented. See your grill's product guide/owner's manual for ven ng requirements. Consult your local
Ÿ
codes for addi onal direc on.
If you have purchased the Propane Tank Drawer, Model number K00AA2914, be sure to read the addi onal supplement page supplied with it.
Ÿ
Figure 1 - Cut out Guide
Drawers
Before installing your drawer, remove the drawer from its base by
carefully pulling it out of the frame. To release the drawer from the
drawer slides, press the white lever down on the right side and up on
the le side. Now pull the drawer completely out of the frame.
NOTE: it is recommended that you provide a secure surface for the
rear of the drawer frame to rest on. This will help support the
drawer's weight, along with the weight of its contents. The surface
should be 1/8" higher than the front opening cutout. This will ensure
that your drawer sits level. See Figure 2.
1. Slide in and fasten the unit securely into the island enclosure using
appropriate hardware (not included) for your applica on through
the screw slots in the top and bo om of the drawer frame. Some
models have screws slots in the right and le sides of the drawer
frame.
2. Rea ach the drawer by extending the drawer slides out
completely, the align the drawer onto the slides. Now push the
drawer closed. The slide will lock into posi on. Test that the slides
are locked by pulling the drawer out - it should stop before
reaching the end of the slides.
PROPANE (LP)TANK DRAWER - MODEL NUMBER K00AA2914:
Refer to the supplement sheet provided with your propane tank
drawer for addi onal instruc ons and for the required installa on
method of propane cylinders.
If you have questions or need assistance during
installation, please call
1-888-94-SABER
(1-888-947-2237)
For patents see www.sabergrills.com/patents
© 2014 Saber Grill, LLC., Columbus, GA 31902
INSTALLATION GUIDE
DRAWERS, DOORS, &
DROP-IN ACCESSORIES
OUTDOOR KITCHEN COMPONENTS
GENERAL INFORMATION
For proper
installa on, be
sure to use the
correct cutout
dimensions as
specified for your
model number.
Locate your model
on page 2, then
reference figure 1
for correct
orienta on.
Printed in China
Imprimé en Chine
Impreso en China
Read all instruc ons before star ng installa on
Save these instruc ons!
To installer: Leave this manual with the product for future reference.
To consumer: Keep this manual for future reference.
Doors
Slide in and fasten the unit securely into the island enclosure using
appropriate hardware (not included) for your applica on through the
screw slots in the top, bo om or sides of the door frame.
Drop-Ins
Slide the unit into the island enclosure cut out.
NOTE: The Ice Chest drop-in (K00AA3414) will require a drain line
(not included) to be plumbed outside the island enclosure.
Alternately, you can use the included plug and use the drop-in
without a drain line.
Care and Cleaning
Clean your product with Saber Stainless Steel Polish (part number
A00YY0312) to remove grease, dirt, or iron oxide deposits from the
surface of your product. Always wipe stainless steel products with the
grain.
If your product is installed in a loca on near the ocean or near a
swimming pool, it will be more suscep ble to corrosion and must be
maintained and cleaned more frequently. Do not store chemicals
such as chlorine or fer lizer near your product.
Due to the nature of stainless steel, surface iron oxide deposits may
appear on the surface of your product. These deposits are normal
and can be removed with a quality stainless steel polish. Once
deposits are found, they should be removed promptly to reduce the
chance of permanent surface pi ng.
Following these recommenda ons will ensure years of service and
®
beauty from your Saber stainless steel accessories.
Side view of Drawer
Figure 2 - Drawer support
For support and to register your
product, please visit us at:
www.sabergrills.com
Assembly instructions © 2014
Consignes d'assemblage © 2014
Learn more at sabergrills.com
®
Drawer
Support
11/19/13 • 80019706
Instrucciones de ensamblaje © 2014
Advertisement

Related Manuals for Saber Compact K00AA3314


Summary of Contents for Saber Compact K00AA3314
- Page 1 INSTALLATION GUIDE Learn more at sabergrills.com DRAWERS, DOORS, & DROP-IN ACCESSORIES OUTDOOR KITCHEN COMPONENTS GENERAL INFORMATION Read all instruc ons before star ng installa on WARNING! Save these instruc ons! All units shown are to be installed by a qualified, professional service technician To installer: Leave this manual with the product for future reference.
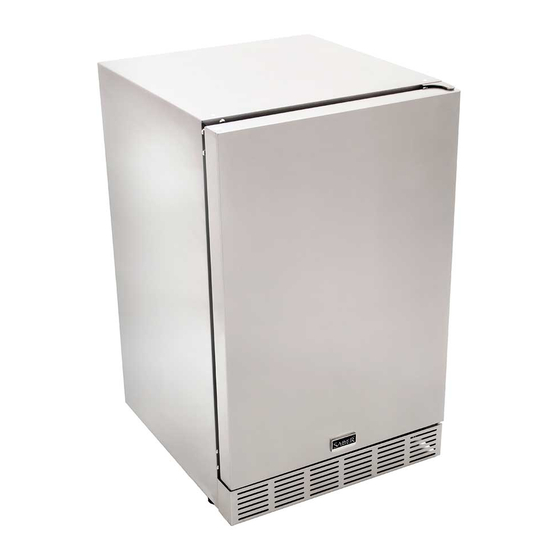
- Page 2 Learn more at sabergrills.com OUTDOOR KITCHEN COMPONENTS K00AA3314 K00AA2814 SABER ® 4.1 cu ft SABER ® Triple Outdoor UL Drawer Cabinet Rated Stainless 33.75" 21.25" 24.00" CUT OUT 24.06" 16.65" 17.17" CUT OUT Steel Refrigerator 33.07" 20.47" 22.64" PRODUCT 25.59"...
- Page 3 GUIDE D'INSTALLATION TIROIRS, Pour en savoir davantage, veuillez consulter PORTES ET ACCESSOIRES sabergrills.com DE GLACIÈRE ÉLÉMENTS DE CUISINE D'EXTÉRIEUR INFORMATION GÉNÉRALE AVERTISSEMENT! Lire a en vement toutes les consignes avant de commencer l'installa on. Conserver ces consignes! Tous les appareils illustrés doivent être installés par un technicien professionel qualifié.
- Page 4 Pour en savoir davantage, veuillez consulter sabergrills.com ÉLÉMENTS DE CUISINE D'EXTÉRIEUR K00AA3314 K00AA2814 K00AA2814 Ensemble de Petit meuble à Petit meuble à finition pour trois tiroirs trois tiroirs réfrigérateur de 85,73 85,73 53,98 53,98 60,96 60,96 ® ® DÉCOUPE DÉCOUPE...
-
Page 5: Información General
GUÍA DE INSTALACIÓN Obtenga más información yendo a: sabergrills.com CAJONES, PUERTAS Y ACCESORIOS EMPOTRADOS COMPONENTES DE LA COCINA AL AIRE LIBRE INFORMACIÓN GENERAL Lea todas las instrucciones antes de comenzar la instalación. ¡ADVERTENCIA! ¡Guarde estas instrucciones! Todas las unidades que se muestran deben ser instaladas por un técnico profesional capacitado. - Page 6 Obtenga más información yendo a: sabergrills.com COMPONENTES DE LA COCINA AL AIRE LIBRE K00AA3314 K00AA2814 Refrigerador para Gabinete con tres VATIOS el aire libre de VATIOS cajones de 4,1 pies cúbicos ® SABER 85,73 53,98 60,96 CORTE CORTE 61,11 42,29...