Table of Contents
Advertisement
Available languages
Available languages
Quick Links
Advertisement
Table of Contents

Related Manuals for Eminent EM6104R1

Summary of Contents for Eminent EM6104R1
- Page 1 EM6104R1 / EM6108R1 Surveillance Recorder...
-
Page 2: Table Of Contents
Table of contents 1.0 Introduction ......................3 2.0 Explanation of the connections ................4 2.1 EM6104R1 4 Port surveillance recorder ............4 2.2 EM6108R1 8 Port surveillance recorder ............5 3.0 (EN) Using the surveillance recorder ..............5 3.1 Connecting the surveillance recorder to your television or monitor ..... 6 3.2 Connecting the mouse to the surveillance recorder ........... -
Page 3: Introduction
Congratulations with the purchase of this high-quality Eminent product! This product has undergone extensive testing by Eminent’s technical experts. Should you experience any problems with this product, you are covered by a five-year Eminent warranty. Please keep this manual and the receipt in a safe place. -
Page 4: Explanation Of The Connections
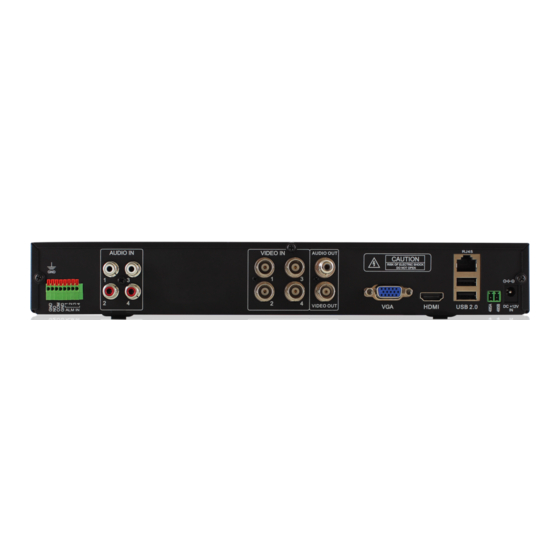
MULTILINGUAL 2.0 Explanation of the connections 2.1 EM6104R1 4 Port surveillance recorder 1. IO-Connections used to connect external sources to the Surveillance recorder. An example of an external source could be a door switch. You can connect this external source with 1 cable to the Common pin and 1 cable to the Input (1,2,3,4) pin. -
Page 5: Em6108R1 8 Port Surveillance Recorder
11. Power connector. 3.0 (EN) Using the surveillance recorder During the following chapters we will explain how to setup the Eminent surveillance recorder and how to install the cameras. It is recommended to setup the surveillance recorder and install the cameras at your desk before installing and mounting the surveillance recorder kit at the desired location. -
Page 6: Connecting The Surveillance Recorder To Your Television Or Monitor
MULTILINGUAL 3.1 Connecting the surveillance recorder to your television or monitor 1. Take the surveillance recorder out of the packaging. 2. Connect the surveillance recorder to a monitor/TV which has a VGA or HDMI connection. Also, you can connect the surveillance recorder to a special security monitor which has a BNC connection. -
Page 7: Using The Setup Wizard
MULTILINGUAL 6. Follow the steps shown on screen to install the software. 4.0 (EN) Using the setup wizard Once the surveillance recorder has been started, a setup wizard will be shown. Using this wizard, you can setup the basic settings of the surveillance recorder. Note: The surveillance recorder will always start in the English language until you have chosen a language! Hint: If you do not want the setup wizard to be shown again, you need to mark ‘don’t... - Page 8 MULTILINGUAL can use the mouse to select and change the data). Also, fill out a correct ‘Preferred’ and ‘Alternate DNS Server’. Click ‘Next’. Step 5: A new screen appears. The network connection will be tested first. Then an overview appears. This overview shows the IP-Address data, DNS server addresses and your (Internet) WAN IP-Address.
-
Page 9: De Beveiligingsrecorder Gebruiken
MULTILINGUAL Step 9: Click ‘OK’ to finish the setup wizard. 3.0 De beveiligingsrecorder gebruiken Gedurende de volgende stappen leggen we uit hoe je de beveiligingsrecorder kunt instellen en hoe je de camera’s dient aan te sluiten. We raden aan om de beveiligingsrecorder in te stellen terwijl het apparaat op je bureau staat. -
Page 10: De Software Van De Beveiligingsrecorder Installeren (Optioneel)
10 | MULTILINGUAL 3.5 De software van de beveiligingsrecorder installeren (optioneel) 1. Schakel je computer in. 2. Plaats de CD-ROM in de CD-ROM of DVD speler van je computer. 3. De wizard start automatisch op. 4. Kies je taal. 5. Kies ‘Mini Player software installeren’. 6. - Page 11 11 | MULTILINGUAL Stap 4: In het volgende scherm dien je aan te geven of je een automatisch IP-Adres wenst te ontvangen, of dat je deze handmatig wilt instellen. Normaliter volstaat het om een IP- Adres automatisch toe te laten wijzen. Klik in geval van een automatisch IP-Adres op ‘Next’.
-
Page 12: Utilisation De L'enregistreur De Surveillance
Dans les chapitres suivants, nous allons vous expliquer comment configurer votre enregistreur de surveillance Eminent et comment installer les caméras. Il est recommandé de configurer l'enregistreur de surveillance et d'installer les caméras depuis votre bureau avant de procéder à l'installation et au montage des éléments sur les sites à... -
Page 13: Branchement De La Souris Sur L'enregistreur De Surveillance
13 | MULTILINGUAL connecteur VGA ou sur un connecteur BNC de votre moniteur. 3.2 Branchement de la souris sur l’enregistreur de surveillance 1. Sortez la souris de la boîte. 2. Branchez la souris USB sur le port USB de l’enregistreur de surveillance équipé de la «... - Page 14 14 | MULTILINGUAL Étape 1 : L’assistant démarre et affiche le message « Bienvenue dans l’Assistant d’installation ». Cliquez sur « Suivant ». Étape 2 : Sur l’écran suivant, vous pouvez configurer le mot de passe du compte « admin ». Saisissez un mot de passe dans le champ «...
-
Page 15: Uso Del Registratore Di Sorveglianza
3.0 Uso del registratore di sorveglianza Nei capitoli che seguono spiegheremo come configurare il registratore di sorveglianza Eminent e installare le telecamere. Si consiglia di configurare il registratore di sorveglianza e installare le telecamere sulla scrivania prima di installare e montare il kit del registratore di sorveglianza nella posizione desiderata. -
Page 16: Collegamento Del Registratore Di Sorveglianza Al Televisore O Monitor
16 | MULTILINGUAL 3.1 Collegamento del registratore di sorveglianza al televisore o monitor 1. Estrarre il registratore di sorveglianza dalla confezione. 2. Collegare il registratore di sorveglianza ad un monitor o ad un televisore dotato di connettore VGA o HDMI. Inoltre, è possibile collegare il registratore di sorveglianza ad un monitor di sicurezza speciale dotato di connettore BNC. -
Page 17: Uso Dell'installazione Guidata
17 | MULTILINGUAL 5. Scegliere “Installa mini lettore”. 6. Attenersi alle istruzioni su schermo per installare il software. 4.0 Uso dell'installazione guidata Una volta avviato il registratore di sorveglianza, viene visualizzata l'installazione guidata. Utilizzando la procedura guidata, è possibile configurare le impostazioni di base del registratore di sorveglianza. - Page 18 18 | MULTILINGUAL mask” e “Gateway predefinito” (è possibile utilizzare il mouse per selezionare e modificare i dati). Inoltre, inserire “Server DNS preferito” e “Server DNS alternativo”. Fare clic su “Avanti”. Passo 5: Viene visualizzata una nuova schermata. Viene prima eseguita una prova della connessione di rete.
-
Page 19: Verwendung Des Überwachungsrekorders
Fare clic su “OK” per terminare l’installazione guidata. 3.0 Verwendung des Überwachungsrekorders In den folgenden Kapiteln wird erläutert, wie Sie den Eminent Überwachungsrekorder konfigurieren und Kameras installieren. Es wird empfohlen, das Einrichten des Überwachungsrekorders und das Installieren der Kameras auf einem Schreibtisch vorzunehmen, bevor Sie den Überwachungsrekorder am gewünschten Standort... -
Page 20: Anschließen Des Überwachungsrekorders An Ihr Netzwerk
20 | MULTILINGUAL 3.3 Anschließen des Überwachungsrekorders an Ihr Netzwerk 1. Schließen Sie ein Netzwerkkabel an den „RJ45“-Port des Überwachungsrekorders 2. Schließen Sie das andere Ende des Netzwerkkabels an Ihr Modem, Ihren Router oder Ihren Switch an. 3.4 Anschließen des Überwachungsrekorders an die Stromversorgung Verbinden Sie den kleinen Netzteilstecker mit dem Anschluss „DC +12V IN“... - Page 21 21 | MULTILINGUAL Im folgenden Bildschirm können Sie ein Kennwort für das Konto „admin“ einrichten. Geben Sie in das Feld „Kennwort“ ein Kennwort ein. Bestätigen Sie das gewählte Kennwort im Feld „Kennwort erneut eingeben“. Klicken Sie auf „Weiter“. Schritt 3: Wählen Sie Ihr „Videoformat“...
- Page 22 22 | MULTILINGUAL Klicken Sie auf „Port“. Auf diesem Bildschirm werden der „Medienport“ und der „Webport“ angezeigt. Der „Medienport“ wird von Geräten wie Smartphones verwendet, die extern auf den Überwachungsrekorder zugreifen. Der „Webport“ wird von Computern verwendet, die extern auf den Überwachungsrekorder zugreifen. Bei Bedarf können der „Medienport“...
-
Page 23: Utilizar La Grabadora De Vigilancia
3.0 Utilizar la grabadora de vigilancia En los siguientes capítulos se explican los pasos necesarios para configurar la grabadora de vigilancia Eminent y para instalar las cámaras. Se recomienda conectar la grabadora de vigilancia y las cámaras en su escritorio antes de instalar el conjunto completo en el lugar final deseado. -
Page 24: Instalar El Software De La Grabadora De Vigilancia (Opcional)
24 | MULTILINGUAL 3.5 Instalar el software de la grabadora de vigilancia (opcional) 1. Encienda su ordenador. 2. Inserte el CD-ROM en el reproductor de CD-ROM o DVD de su ordenador. 3. El software se iniciará automáticamente. 4. Elija su idioma. 5. - Page 25 25 | MULTILINGUAL término del horario de verano (DST) en los campos "Desde" y "Hasta". Haga clic en "Siguiente". Paso 4: En la siguiente pantalla, necesitará decidir si desea obtener una dirección IP por DHCP o si prefiere introducirla manualmente. La dirección IP obtenida automáticamente suele ser suficiente.
-
Page 26: A Megfigyelő Rögzítő Használata
Haga clic en "ACEPTAR" para finalizar el asistente de instalación. 3.0 A megfigyelő rögzítő használata A következő fejezetekben elmagyarázzuk, hogyan állíthatja be az Eminent megfigyelő rögzítőt és telepítheti a kamerákat. Javasoltmindezt az asztalon elvégezni, mielőtt a kamerákat felszerelné végleges helyükre. Ezáltal könnyen ellenőrizheti, hogy megfelelően működnek-e. -
Page 27: Egér Csatlakoztatása A Megfigyelőrögzítőhöz
27 | MULTILINGUAL 3.2 Egér csatlakoztatása a megfigyelőrögzítőhöz 1. Vegye ki az egyeret a csomagolásból. 2. Csatlakoztassa az egeret a megfigyelő rögzítő csatlakozásához,mely mellett a'Mouse' felirat látható. 3.3 A megfigyelő rögzítő csatlakoztatása a hálózathoz 1. Csatlakoztassa a hálózati kábelt a megfigyelő rögzítő 'RJ45' portjához. 2. - Page 28 28 | MULTILINGUAL 3. lépés: Válassza ki a "Videó formátum"-ot. Válassza a "PAL"-t. Válassza ki a nyelvte is. Ebben az esetben az "angol". Kattintson a "Time"-ra, ha szeretné, a helyes dátum és idő beállítst. Az"Idő formátum- ot" és a "Time zone" zónát is beállíthatja. A "Time szervernél választhatja az online idő szervert, amely szinkronizálja a dátumot és az időt.
- Page 29 29 | MULTILINGUAL 7.lépés: A következő képernyőn, kiválaszthatja, hogy melyik csatornát (CH) kívánja rögzíteni. Minden egyes csatorna a csatlakoztatott kamerákat jelenti. Ha a jelzés kerül a "Enable"-re a megfelelő csatornán, az azt jelenti, a csatorna felvétel be van kapcsolva. Beállíthatja, hogy audio paramétereket az "Audio"-n. A "Mode"-n választhatja ki, hogy a felvételek állandóan, vagy tervezetten müködjenek.
- Page 30 Consejo | Aplicação das Diretivas do Conselho | Applicazione delle Direttive del Consiglio | Anwendung der EU- Richtlinien | Tanácsi irányelvek alkalmazása Naam fabrikant | Manufacturer’s Name | Nom du fabricant | Nombre Eminent del fabricante | Nome do fabricante| Nome produttore| Name des Herstellers Gyártó neve: Type apparatuur | Type of Equipment | Type d'équipement | Tipo de...
- Page 31 31 | MULTILINGUAL...
- Page 32 32 | MULTILINGUAL EM6104R1 – EM6108R1 | 06-2014...
Need help?
Do you have a question about the EM6104R1 and is the answer not in the manual?
Questions and answers