Advertisement
Table of Contents
Advertisement
Table of Contents

Related Manuals for Topdon Topscan


Summary of Contents for Topdon Topscan
- Page 1 Bluetooth Vehicle Diagnostic Dongle User Manual...
-
Page 3: Table Of Contents
Safety Is Always the First Priority! ........Section 1 What's in the Box? ........Section 2 Product Overview ........Section 3 Getting Started ........Section 4 Using the TopScan via the App ........Section 5 Specifications ........Section 6 FAQ ........Section 7 Warranty ........ -
Page 4: Safety Is Always The First Priority
Safety Is Always the First Priority! For your safety, the safety of others, and to avoid any damage to the product and your vehicle, CAREFULLY READ AND MAKE SURE YOU FULLY UNDERSTAND ALL THE SAFETY INSTRUCTIONS AND MESSAGES ON THIS MANUAL BEFORE OPERATING. You must also read the vehicle's service manual, and observe the stated precautions or instructions before and during any test or service procedure. -
Page 5: Section 1 What's In The Box
Section 1 What's in the Box? Quick User Guide TopScan Quick User Guide... -
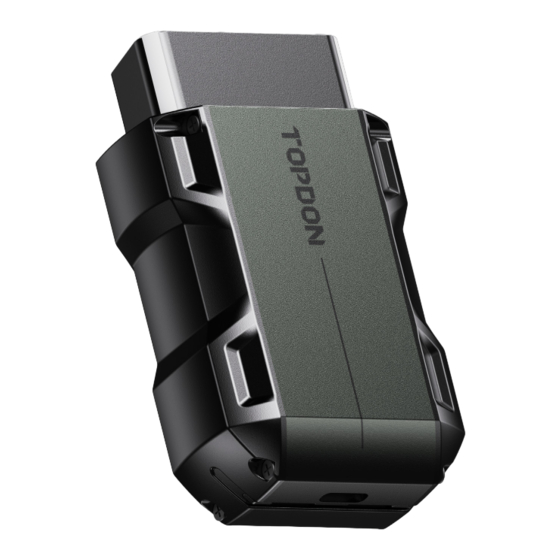
Page 6: Section 2 Product Overview
Section 2 Product Overview... - Page 7 Solid Blue: Bluetooth Indicator connected Power Indicator Solid Red: power on Communication Flashing Green: Indicator communicating with the vehicle 2. OBD-II 16 Pin Connector Connects the TopScan to vehicle's DLC. 3. USB Type-C Port Connects the TopScan to a computer for updates.
-
Page 8: Section 3 Getting Started
Section 3 Getting Started 3.1 Download the TopScan App Search for the TopScan app in App Store or Google Play, download and install it to your phone. Note: This app is compatible with iOS 10.0 or later / Android 7.0 or later. - Page 9 3.2 Register & Log In Open the app and log in to your TOPDON account. (If you do not have an account, please register with your email.) Figure 3-2...
- Page 10 Bluetooth connection between the TopScan and your phone is established, the serial number and activation code will be automatically obtained.) Note: The TopScan should be properly plugged into the vehicle's DLC before Bluetooth can be connected. ③ Then, tap Activate. Figure 3-3...
- Page 11 3.4 Download the Diagnostic Software You will need to download the vehicle-specific software the first time you use the diagnostic function. Tap Diagnostics from the home screen and download the software you need. Figure 3-4...
- Page 12 3.5 Plug the TopScan into the Vehicle's DLC Note: Make sure the ignition is OFF before plugging in the unit. Figure 3-5 To locate the vehicle's DLC, tap DLC Location from the home screen, select vehicle make, model and year, and tap Next. A picture of DLC location for the selected vehicle will display.
- Page 13 Tap the icon at the top right of any screen with this icon to establish Bluetooth connection with the TopScan unit. After the connection is successfully established, the icon changes to Once Bluetooth is successfully paired, the connection will be automatically established when you open the app.
-
Page 14: Section 4 Using The Topscan Via The App
Section 4 Using the TopScan via the App 4.1 Home Screen Figure 4-1... - Page 15 1. Currently Selected Vehicle 2. Image of the Selected Vehicle 3. Vehicle Selection Selecting the icon opens the vehicle selection screen. 4. Function Icons Configures the TopScan to operate as a scan tool. Diagnostics Allows you to perform acceleration tests on your vehicle.
- Page 16 4.2 Diagnostics The Diagnostics module allows you to scan all supported vehicle systems at one time (Auto Scan) for Diagnostic Trouble Codes (DTCs) or select an individual system to perform Read Trouble Code, Clear Trouble Code, Read Data Stream, Read Version Information and Active Test.
- Page 17 2. Select the software by your vehicle make (If you have not downloaded the software, please download and install the software first). Note: A demonstration mode (DEMO option) is provided to help you become familiar with Diagnostics functions. 3. Select Automatic / Manual to identify the vehicle. Figure 4-3...
- Page 18 Automatic Manually enter Vehicle Identification Number (VIN) or tap Read to acquire VIN, then tap Confirm. TopScan will automatically decode the VIN to identify the vehicle. Manual Manually select the vehicle information to identify the vehicle. Alternatively, you can tap the...
- Page 19 AutoVIN - The TopScan automatically reads and decodes the VIN. Enter VIN - manually enter the VIN or tap to scan the VIN characters. Scan VIN - tap to scan the VIN characters. 4. A systems menu will display after the vehicle is identified.
- Page 20 To perform an Auto Scan, tap the Auto Scan button. The TopScan will start scanning all the systems supported by the vehicle, and DTC retrieval will be automatically proceeded. Results are displayed progressively as the systems are scanned.
- Page 21 Button Description Report - tap to save the current scan results in report format. (To view the saved reports, go to Me > Diagnostic Report.) Clear DTCs - tap to clear all the DTCs retrieved. Show All / Show Actual - tap to toggle between showing all vehicle systems and showing only the supported systems.
- Page 22 (ECU) for the currently selected system. Read Trouble Code To retrieve DTC for the currently selected system: Tap Read Trouble Code in the function menu. TopScan will communicate with the ECU and retrieve and display DTCs for the currently selected system.
- Page 23 Icon Description Indicates that the DTC is causing a warning light to illuminate. Tap to open a window that allows you to search on Google for more information about the DTC. Tap to view the detailed description of the DTC. Tap to view the freeze frame captured at the time when the DTC occurs.
- Page 24 Read Data Stream To view data stream for the currently selected system: 1. Tap Live Data in the function menu. A data stream list displays. Figure 4-9 Button Description Edit - allows you to customize your data stream list. Select the check box of the data stream you are interested in viewing and tap Confirm.
- Page 25 Report - tap to save the current data stream values in report format. To view the saved reports, go to Me > Diagnostic Report. Each entry of the list shows the name and the current value of the data stream. You can tap the dots at the side of each entry to enter the setting screen.
- Page 26 2. For ease of comparison and observation, the Combine function is provided which allows up to 4 data streams to be viewed in one graph. To access the Combine function: ① Tap the icon to change the display form, and go back to the data stream screen.
- Page 27 ② Tap the full screen icon at the right side. The following screen will appear. Figure 4-12 ③ Tap Combine, and select up to four data streams.
- Page 28 Figure 4-13 ④ Tap Confirm. A combined graph will display. Note: IF THE VEHICLE MUST BE DRIVEN TO VIEW THE LIVE DATA STREAM, ALWAYS HAVE A SECOND PERSON HELPING YOU. DO NOT WATCH THE DATA STREAM WHILE DRIVING.
- Page 29 Active Test - allows you to manually control certain component operations directly from the app to verify the operations of components. Note: Available tests vary by vehicle make, year and model. 4.2.2 EOBD The EOBD function allows you to perform emission-related diagnostics for your vehicle.
- Page 30 Auto Scan - The TopScan will automatically communicate with the vehicle and identify which protocol the vehicle is using. Protocol - allows you to manually select the communication protocol. After the communication protocol is confirmed, a vehicle status screen displays showing the protocol and other status info of your vehicle.
- Page 31 3. Tap OK to enter the function menu. Figure 4-16 4. Select a function to continue. Note: Depending on the vehicle make, some functions may not be available. Typical function options may include: DTC & Freeze Frame Data I/M Readiness Live Data O2 Sensor Monitoring On-Board Monitoring...
- Page 32 DTC & FFD (Freeze Frame Data) This function helps retrieve and clear DTCs stored in the vehicle's ECU and displays FFD of the emission-related systems. 1. Read DTCs This function displays the DTCs retrieved from the emission-related systems. 2. Clear DTCs This function allows you to clear the DTCs retrieved from the emission-related systems.
- Page 33 • Calibration ID (CID) • Calibration Verification Number (CVN) 4.2.3 Diagnostic Feedback The TopScan allows you to instantly send diagnostic feedback (with logs of diagnostic data automatically attached) while you are encountering a software problem with the diagnostics operations. To send diagnostic feedback: 1.
- Page 34 4.3 Vehicle Performance Test Vehicle Performance Test allows you to make accurate measurements of vehicle acceleration, providing results at intervals defined by set speed and fixed distance measurements. 4.3.1 Performing a Vehicle Performance Test 1. Tap Vehicle Performance Test from the home screen. 2.
- Page 35 3. The default values for the start and end speeds are 0 MPH and 60 MPH respectively. If you want to change the values, tap the 0-60 MPH button, and tap Edit to set the start and end speeds. 4. Accelerate your vehicle to start the test. Note: If you do not reach the end-of-measurement speed, the results will be automatically reset as soon as the speed of the car is equal to...
- Page 36 Figure 4-19 ① Vehicle Speed ② Engine Speed ③ Horsepower ④ Torque Button Description Start - tap to reset for the next run Test Report - tap to view the test results 0-60 MPH / (1/4 mi) - tap to toggle between 0-60 MPH result screen...
- Page 37 and 1/4 mi result screen. Edit - tap to set the start and end speeds. 4.3.2 Viewing Test Results 1. From the test screen, tap Test Report. The result screen will appear. Figure 4-20...
- Page 38 2. Tap the desired record to view its full content. Figure 4-21...
- Page 39 1/4 mi Test Results - record the elapsed time for a vehicle to travel a certain distance (60 ft, 330 ft, 1/8 mi, 1000 ft, 1/4 mi), and the instantaneous speed at each point (see Figure 4-18 and Figure 4-21). 0-60 MPH Test Results - record the elapsed time for a vehicle to accelerate from 0 to 60 miles per hour (see Figure 4-19).
- Page 40 BMS Reset After the car battery is replaced, the car battery control unit needs to be reset. This will clear fault information (such as low battery level) so that the control unit can match the relevant information of the newly replaced battery.
- Page 41 4.4.2 Performing a Service Reset 1. Tap Maintenance from the home screen. A function menu will display. Figure 4-22 2. Select a function that you want to perform. 3. Vehicle identification is required before you can access the function (for more on identification operations, refer to Identifying the Vehicle on page 16).
- Page 42 4.5 Repair Information 4.5.1 DTC Repair Guide The DTC Repair Guide is an experience-based database of generic OBD-II DTCs, which provides code-specific information, including popular fixes and repair steps for identifying faults. To use the DTC Repair Guide: Tap Repair Information > DTC Repair Guide. Enter a DTC in the search bar to search.
- Page 43 Tap Me > Firmware Update to update the firmware if a new version is available. 4.7.3 TopScan App Update Tap Me > Settings > About > Check for Updates. If there are updates, tap to update the app to the latest version.
- Page 44 Figure 4-23...
-
Page 45: Section 5 Specifications
Section 5 Specifications Bluetooth Version: Bluetooth 4.2 Range: 33 feet (10 m) Operating System Supported iOS 10.0 or later Android 7.0 or later -4 ℉ to 158 ℉ (-20 ℃ to 70 ℃ ) Storage Temperature 14 ℉ to 122 ℉ (-10 ℃ to 50 ℃ ) Working Temperature Dimensions 84.1 ×... -
Page 46: Section 6 Faq
Follow the steps below to identify the problem: 1) Check if the ignition is ON. 2) Check if the TopScan is securely plugged into the vehicle’s OBD- II port. 3) Turn the ignition off. Then, turn it on after 10 seconds and continue the operation. -
Page 47: Section 7 Warranty
TOPDON shall not be liable for any incidental or consequential damages arising from the device's use, misuse, or mounting. If there is any conflict between the TOPDON warranty policy and local laws, the local laws shall prevail. This limited warranty is void under the following conditions: •... -
Page 48: Section 8 Fcc
Section 8 This device complies with Part 15 of the FCC Rules. Its operation is subject to the following two conditions: (1) this device may not cause harmful interference, and (2) this device must accept any interference received, including interference that may cause undesired operation. Note: This equipment has been tested and found to comply with the limits for a Class B digital device, pursuant to Part 15 of the FCC Rules. - Page 49 Scan the QR code for more support!
Need help?
Do you have a question about the Topscan and is the answer not in the manual?
Questions and answers
Can this scanner read actual miles on vehicle ?
Yes, the Topdon Topscan scanner can read the actual miles on a vehicle.
This answer is automatically generated
I bought a second hand Bluetooth scanner but it has an account how can I remove it