Advertisement
- 1 Important safety instructions
- 2 DESCRIPTION OF THE APPLIANCE
- 3 DESCRIPTION OF THE CONTROL PANEL
- 4 INSTALLING THE POWER CORD HOLDER
- 5 INSTALLATION LOCATION OF THE APPLIANCE
-
6
OPERATING THE APPLIANCE
- 6.1 TURNING ON AND OFF
- 6.2 SETTING THE COMFORT OPERATING MODE
- 6.3 SETTING THE CONTINUOUS DEHUMIDIFICATION MODE
- 6.4 SETTING THE HUMIDITY
- 6.5 SETTING THE FAN SPEED
- 6.6 SETTING THE AUTOMATIC START AND SHUT OFF TIMER
- 6.7 SETTING THE IONISATION FUNCTION
- 6.8 FILTER NEEDS CLEANING INDICATION
- 6.9 AUTO-DEFROST FUNCTION
- 7 DRAINING CONDENSATE
- 8 TROUBLESHOOTING TABLE
- 9 CLEANING AND MAINTENANCE
- 10 STORAGE
- 11 TECHNICAL SPECIFICATIONS
- 12 Documents / Resources
Important safety instructions
READ CAREFULLY AND STORE FOR FUTURE USE.
- This appliance may be used by children 8 years of age and older and by persons with physical or mental impairments or by inexperienced persons, if they are properly supervised or have been informed about how to use the product in a safe manner and understand the potential dangers. Children must not play with the appliance. Cleaning and maintenance performed by the user must not be performed by unsupervised children.
- The appliance is designed for use at home, in the office and similar types of areas. It is not intended for commercial purposes.
- Do not use the appliance in rooms where flammable chemicals or explosives are stored, in industrial environments or outdoors.
- Do not place the appliance in the vicinity of an open flame or appliances that are sources of heat.
- Always install the appliance on an even, dry and stable surface so that it does not fall over.
- Do not store any item on top of the appliance.
- Before connecting the appliance to a power socket, check that the nominal voltage on its rating label matches the voltage in the power socket.
- Connect the appliance only to a properly grounded power socket. Do not use an extension cord or a multi-socket adapter. If necessary, an extension cord with a power rating appropriate for this appliance may be used.
- The power socket to which the appliance is connected must be freely accessible so that it is possible to quickly disconnect the power cord from the power source if necessary.
- If the appliance is equipped with travel wheels, pay increased attention when handling it so that it does not fall down stairs or travel down from sloped areas. To prevent the appliance from falling over, do not attempt to travel over carpet with the travel wheels.
- Do not touch the appliance with wet hands when it is connected to a power socket.
- Do not use the appliance in the vicinity of a shower, pool, etc., do not spray it with water or any other liquid or submerge it in water or any another liquid.
- Do not cover or insert anything into the air inlet or outlet openings. Otherwise, this could damage the appliance.
- During operation there needs to be sufficient space for air circulation as specified in more detail in chapter Installation location of the appliance.
- To turn the appliance on or off, always use the appropriate buttons on the control panel. Do not turn off the appliance by disconnecting the power cord from the power socket.
- Do not use the appliance without a properly installed air filter and condensate tank.
- Do not remove the condensate tank while the appliance is running.
- Always turn off the appliance and disconnect it from the power socket before assembling or disassembling it, when not using it and before moving or cleaning it.
- To avoid damaging the compressor, move, store and transport the appliance in an upright position.
- Do not attempt to remove the outer case of the appliance.
- Disconnect the appliance from the power socket by pulling on the plug, never pulling on the power cord. Otherwise, this could damage the power cord or the socket.
- If the power cord is damaged, it must be replaced by an authorised service centre or by another similarly qualified person, this will prevent the creation of a dangerous situation. It is forbidden to use the appliance if it has a damaged power cord.
- Do not use the appliance if it is not working correctly, if it has been damaged or has been submerged in water. To avoid the danger of injury by electrical shock, do not repair the appliance yourself or make any adjustments to it. Have all repairs of the appliance performed at an authorised service centre. By tampering with the appliance, you risk voiding your legal rights arising from unsatisfactory performance or quality warranty.
- Prior to using this appliance, please read the user's manual thoroughly, even in cases, when one has already familiarised themselves with previous use of similar types of appliances. Only use the appliance in the manner described in this user's manual. Keep this user's manual in a safe place where it can be easily retrieved for future use.
- We recommend saving the original cardboard box, packaging material, purchase receipt and responsibility statement of the vendor or warranty card for at least the duration of the legal liability for unsatisfactory performance or quality. In the event of transportation, we recommend that you pack the appliance in the original box from the manufacturer.
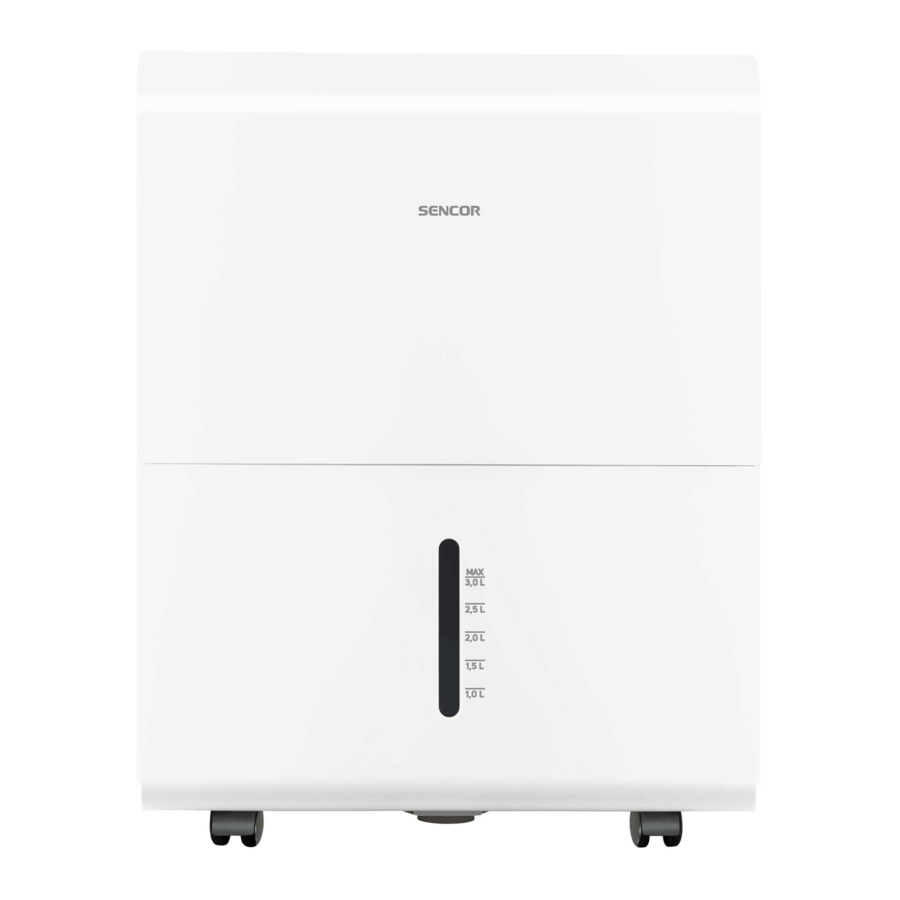
DESCRIPTION OF THE APPLIANCE

A1 Control panel with an LED display
A2 3-litre removable condensate tank
A3 Water tank level indicator
A4 Integrated handle
it is located on both sides of the appliance.
A5 Air outlet grill
A6 Air inlet
A7 Washable air filter
A8 Drain hose connection outlet
is fitted with plug.
A9 Condensate drain hose
A10 Power cord storage holder
A11 Travel wheels
A12 Power cord
DESCRIPTION OF THE CONTROL PANEL

B1 Ionisation function setting indicator
B2 COMFORT operating mode setting indicator (intelligent humidity control in the room)
B3 Filter cleaning needed indicator
B4 Automatic defrosting process indicator
B5 Continuous dehumidification operating mode indicator
B6 High fan speed setting indicator
B7 Full condensate tank indicator
it is lit when the tank needs to be emptied, when it is not installed in its place or when it is installed incorrectly.
B8 Automatic shut-off timer setting indicator
B9 Automatic start timer setting indicator
B10 LED display
shows the humidity setting in %, automatic start and shut-off times, current humidity in the room in % (±5%), error messages AS, ES, EC, E3 or message P2
B11 ION button
turn the Ionisation function on and off
B12 COMFORT button
used to set the COMFORT operating mode (intelligent humidity control in the room)
B13 FILTER button
serves to reset the fan operating time counter
After 250 hours of operation, the Filter cleaning needed indicator is activated.
B14 CONT. button
it is used to set the continuous dehumidification mode.
B15 TURBO button
it is used to set normal or high fan speed.
B16 TIMER button
it is used to set the automatic shut-off and start timer. It is used in combination with buttons B17.
B17 ◄ ► button
it is used to set humidity in the range 35 to 85% RH (relative humidity).
In combination with button B16 it is used to set the time of the automatic shut-off and start in the range from 0 to 24 hours.
B18 POWER button with LED indicator
it is used to turn the appliance on and off.
INSTALLING THE POWER CORD HOLDER
- After unpacking the appliance, you will find the power cord holder A10 inside the condensate tank A2. Take the power cord holder A10 out of it and attach it to the rear part of the appliance, see figure below.


INSTALLATION LOCATION OF THE APPLIANCE
- Locate the appliance on an even, dry and stable surface within reach of a properly grounded power socket.
- To ensure sufficient air circulation, leave a clearance of at least 30 cm on all the sides of the appliance and 50 cm in the direction of the air outlet vent A5.
- Do not use the appliance in the vicinity of a heater or another source of heat.
- This appliance is designed for dehumidifying rooms with an area of 58 to 73 m2.
OPERATING THE APPLIANCE
- The dehumidifier is used for drying out, for example, flooded basements, rooms with an increased level of moisture, etc. Do not use it in areas where substances or items are stored requiring precise temperature and humidity control.
- Use the the appliance at an ambient temperature of 5 to 35°C (41 to 95°F). Do not use it at a temperature lower than 5°C (41°F). Otherwise, a frost layer may form on the vaporizer. This could affect the operation of the appliance.
- To achieve optimal effectiveness, close all the windows and doors in the room where the appliance is used. If necessary, allow the room to ventilate for a short time.
- Make sure that the appliance is installed in a suitable place and that it is correctly assembled. Then connect it to a power socket.
TURNING ON AND OFF
- To turn the appliance on and off, use button B18. When turned on for the first time, allow the dehumidifier to run for at least 24 hours.
- The appliance will turn off automatically when the required room humidity is reached, when the water tank A2 is full or removed, or when the tank A2 is incorrectly installed.
- If you turn the appliance off and then on again within a short time period, the appliance will start again within approximately 3 minutes. This function protects the compressor against damage.
- The appliance is equipped with an AUTO-RESTART function for the event of a power outage. This means that the settings are stored in the memory of the appliance and once power is restored, the appliance will automatically start again in the mode in which it was previously set.
- Always turn off the appliance and disconnect it from the power socket when you have finished using it.
SETTING THE COMFORT OPERATING MODE
- The COMFORT button B12 is used to turn the COMFORT operating mode (intelligent humidity control in the room) on and off. The activation of this operating mode is shown by indicator B2.
- In this mode, room humidity is controlled automatically depending on the current room temperature. A specific humidity cannot be set.
SETTING THE CONTINUOUS DEHUMIDIFICATION MODE
- The CONT. button B14 is used to turn the continuous dehumidification mode on and off. The activation of this mode is shown by indicator B5.
- In this mode, the appliance runs continuously until the condensate tank A2 is completely full. A specific humidity cannot be set.
SETTING THE HUMIDITY
- Buttons B17 can be used to set the required humidity in the range 35 to 85% RH (relative humidity). Each time the button is pressed, the setting will change by 5%. The set humidity will be shown on the display B10.
SETTING THE FAN SPEED
- The TURBO button B15 it is used to set normal or high fan speed. The high fan speed setting is shown by indicator B6 being lit.
- For maximum dehumidification speed, set the fan to the high speed. When quieter operation is preferred or when the humidity declines, set the normal fan speed.
SETTING THE AUTOMATIC START AND SHUT OFF TIMER
- When the appliance is turned on, press the TIMER button B16 once to activate the automatic shut-off timer function. Indicator B8 will be lit. Press button B16 again to activate the automatic start function. Indicator B9 will be lit.
- When the appliance is turned off, press the TIMER button B16 once to activate the automatic start function. Indicator B9 will be lit. Press button B16 again to activate the automatic shut-off timer function. Indicator B8 will be lit.
![]() Note:
Note:
The automatic start and shut-off timer functions can be combined. - Use buttons B17 to set the automatic shut-off or start time, i.e. times when the appliance will automatically shut off or start. The set time will change in 0.5-hour intervals. After reaching 10 hours, the set time will change in one-hour intervals. Holding down the buttons will speed up the setting process.
- The set time is saved to memory within 5 seconds and the display B10 returns to the humidity display mode.
- Turning the appliance on or off, or setting the time to zero will cancel the automatic timer function. The timer is also cancelled when the text P2 appears on the display B10.
 Note:
Note:SETTING THE IONISATION FUNCTION
- The ION button B11 is used to turn the ionisation function on and off; it adds negatively charged ions to air and creates the fresh after-rain air effect. The ionisation function setting is indicated by the LED indicator B1.
FILTER NEEDS CLEANING INDICATION
- After 250 hours of fan operation, the Filter cleaning needed indicator B3 will start flashing, indicating that the filter A7 needs to be cleaned.
- After cleaning the filter A7 according to the instructions in chapter Cleaning and maintenance, press button B13 to reset the fan operating time counter. The indicator B3 will turn off.
AUTO-DEFROST FUNCTION
- The appliance is equipped with an AUTO-DEFROST function. This means that when a frost layer forms on the vaporizer, the compressor will stop to prevent its damage. The fan will continue to run until the frost layer melts away.
- The auto-defrost process is indicated by LED indicator B4 being lit. The end of the process is indicated by the LED indicator B4 turning off.
DRAINING CONDENSATE
- For draining condensate, either the tank A2 or the drain hose A9 may be used.
DRAINING CONDENSATE INTO THE TANK
- Before turning on the appliance, check that the outlet A8 is closed using the plug.
- During operation, condensate will accumulate in the tank A2. As soon as it fills up, the appliance will turn off automatically. Indicator B7 will start turn on and the text P2 will appear on the display B10. Carefully slide out the tank A2 and empty it out. The bottom of the tank A2 is not level, therefore do not stand it on the floor when it is filled with condensate. Otherwise, this could result in the tank A2 tipping over. After emptying the tank A2, put it back in its place. The appliance will automatically resume operation.
- When the tank A2 is filled with water and the appliance is turned off in the stand-by mode, the LED indicator B7 will be lit.
![]() Note:
Note:
When removing the tank A2, proceed carefully so as not to drop it and not to damage the internal parts of the dehumidifier.
Use a wiping cloth to carefully dry any water that appears in the tank A2 storage area.
CONTINUOUS CONDENSATE DRAINING VIA THE DRAIN HOSE
- For continuous condensate draining, screw the plug out of the outlet A8 in the anticlockwise direction. Carefully store the plug for future use.
- Properly screw the threaded end of the drain hose A9 into the outlet A8. Check that the hose end is firmly connected to the outlet A8 so that condensate does not leak out in the joint.
- Locate the free end of the hose A9 so that the condensate can flow out freely. The container or place where the condensate is drained must be lower than the outlet A8. Do not bend or twist the hose A9.
- When you have finished using it, remove the hose A9. Dry out any water that may appear around the outlet A8 and screw the plug into the outlet A8 in the clockwise direction.
TROUBLESHOOTING TABLE
| PROBLEM / ERROR MESSAGE | POSSIBLE CAUSE | SOLUTION |
| The dehumidifier will not start. | It is not connected to a power socket. | Connect the power cord to a power socket. |
| The set humidity level has been reached. | The dehumidifier always turns off automatically when the set heating level is reached. | |
| The tank A2 is full or is not installed correctly or inserted in its place. | Empty the tank A2 and properly install it back in its place. | |
| The performance of the dehumidifier appears to be insufficient. | The dehumidifier has not been running long enough. | Leave the dehumidifier running for a longer time. |
| The vents are blocked by curtains, drapes or other items. | Remove obstacles preventing air circulation. | |
| A lower humidity level must be set. | Set a lower humidity level. | |
| There are open windows or doors in the room. | Close the doors and windows in the room. | |
| The temperature in the room is too low (lower than 5°C). | Place the dehumidifier in a room with an air temperature in the range from 5 to 35°C (41 to 95°F). | |
| There is a source in the room that is creating humidity. | Remove the source of humidity. | |
| Water appeared on the floor. | Water is leaking in the location of the drain hose A9. | Properly tighten the end of the drain hose A9. |
| The plug is not screwed into the outlet A8. | When the condensate is drained into the tank A2, the plug must be screwed into the outlet A8. | |
| A noise can be heard while the dehumidifier is running. | The air filter A7 is clogged. | Clean it out according to the instructions in chapter Cleaning and maintenance. |
| The dehumidifier is tilted or not installed on an even surface. | Locate it in vertical position on an even surface. | |
| A layer of frost has appeared on the vaporizer. | The temperature in the room is too low (lower than 5°C). | Place the dehumidifier in a room with an air temperature in the range from 5 to 35°C (41 to 95°F). The dehumidifier is equipped with an automatic defrost function that removes the layer of frost from the vaporizer. |
| The display B10 shows error message AS, ES, E3 or EC. | Humidity sensor error (AS) or temperature sensor error (ES), operation error (E3) or coolant leakage (EC). | Disconnect the dehumidifier from the power socket and then reconnect it. Try starting it again. If the error continues to be shown, please contact an authorised service centre |
CLEANING AND MAINTENANCE
- Before cleaning the appliance, always turn it off and disconnect it from the power socket.
CLEANING THE CONDENSATE TANK
- Empty out the condensate tank A2 whenever you finish using the appliance, and dry it out using a wiping cloth.
- To prevent undesirable bacteria, micro-organism or moulds from multiplying inside the tank A2, clean it out at least once per month using a cloth dampened in lukewarm water with the addition of neutral detergent. Then rinse it out thoroughly using clean water, dry it out using a clean cloth and insert it back into the appliance.
- Do not wash the tank A2 in a dishwasher.
CLEANING THE AIR FILTER
- The need to clean the filter A7 is indicated by the LED indicator B3 flashing.
- Release the latch located at the bottom of the filter A7 and take the filter A7 out of the appliance. Wash the filter A7 in warm water with neutral kitchen detergent. Then thoroughly rinse it under clean running water, allow it to dry naturally and install it back in its place. Make sure that the filter A7 is completely dry before installation.
- Do not use the appliance without the filter A7 being properly installed. Do not wash the filter A7 in a dishwasher.
CLEANING THE OUTER CASE AND THE AIR OUTLET GRILL
- To clean the air outlet grill A5 and the outer case, use a textile lightly dampened in lukewarm water with an addition of neutral detergent. Make sure that water does not enter into the vents. In the event that the grill A5 is only dusty, a vacuum cleaner may be used to clean it.
- Do not submerge the appliance or its power cord A12 in water or any other liquids.
- Do not use solvents, cleaning products with an abrasive effect, etc. to clean the appliance. Otherwise the surface coat of the appliance may be damaged.
STORAGE
- When not using the dehumidifier for an extended period of time, clean it according to the instructions in chapter Cleaning and maintenance. Thoroughly clean out the tank A2 no sooner than 24 hours after its last use. During this time, a small amount of condensate could continue to accumulate inside the tank A2.
- The holder A10 in the rear of the appliance may be used for storing the power cord A12.
- Store the dehumidifier in a clean, dry place, out of the reach of children.
TECHNICAL SPECIFICATIONS
Power supply - 220–240 V~, 50 Hz
Dehumidification capacity - 30l / 24 h
Rated power input - 465 W
Rated current - 2.5 A
EEV energy factor - 2.673l/kWh
Starting current - 11 A
Fuse type and current value - T/3.15 A
Condensate tank capacity - 3l
Coolant type and weight - R134A/220 g
GWP (Global Warming Potential) - 1 430
CO2 Equivalent - 0.46 tonnes
Air flow volume (high/normal fan speed) - 210/180 m3/h
Noise level (high/normal fan speed) - 54/52 dB(A)
Dimensions of the dehumidifier (w × d × h) - 386 × 260 × 500 mm
Dimensions of the packaging (w × d × h) - 420 × 297 × 537 mm
Weight net/gross - 15.3/16.4 kg
Operating temperature - 5–35°C
Recommended room area - 58–73 m2
The declared noise emission level of the appliance is 54 dB(A), which represents a level A of acoustic power with respect to a reference acoustic power of 1 pW.
We reserve the right to change text and technical specifications.

Documents / ResourcesDownload manual
Here you can download full pdf version of manual, it may contain additional safety instructions, warranty information, FCC rules, etc.
Advertisement


Need help?
Do you have a question about the SDH 3010WH and is the answer not in the manual?
Questions and answers