Advertisement
Specification
| *** 32 bit processor | *** Low resistance FET |
| *** Continuous current | *** Auto Fan control |
| System: | Brushless |
| Forward/Brake/Reverse: | Yes (Factory preset at Forward/Brake) |
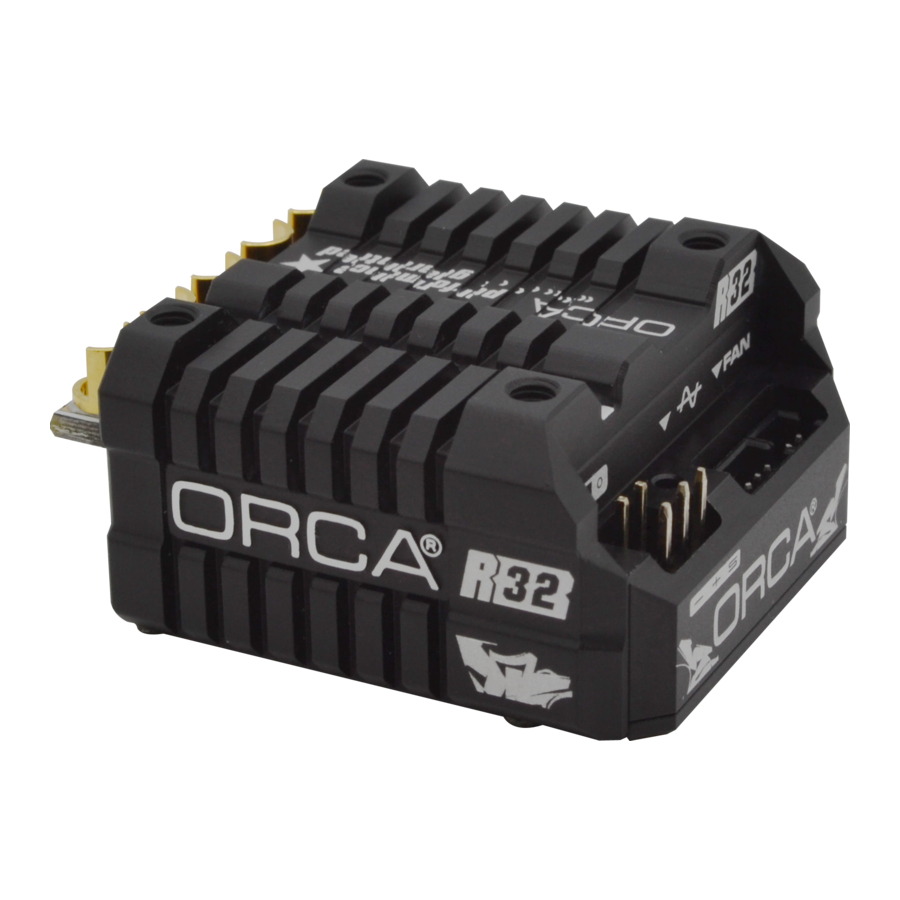
| Dimensions: | 41(L) x 36(W) x 20(H)mm |
| Weight: | 46g (excluding wires) |
| Voltage Input: | (4.8 – 9.9V DC) 6 Cells NiCD/NiMH 2-Cell LiPO / 2-3 Cell LiFe |
| Peak Current: | 760A |
| Motor Limit: | Over 4.5 Turns |
| Motor Type: | Sensored 540 sized brushless motors |
| B.E.C.: | 6V / 7A / 3.0A |
| Multi Protection System: | Yes |
Installation & Connectors

- Position the ESC where it is protected in the event of a crash. Use the supplied double sided tape to secure the ESC to the chassis.
- Install/Solder the relevant battery connector (Battery Specific) to the battery wires. RED to +ve and BLACK to –ve.
![]()
Reversing the battery polarity will destroy your ESC and void the warranty. - Connect supplied BEC wire(180mm) to 3pin port match the "- + s" between the receiver connector and ESC.
- Connect supplied Switch wire to 2pin port (- o).
- Connect the 3 motor wires to the motor; you can either solder the wires directly to the motor or use your favorite connectors. Match the label of the ESC Output (A, B, C) to the Tab labels on the motor when soldering. Avoid soldering each joint for longer than 5 seconds. Prior to operation make sure you have not created a short by either creating a wire bridge or solder bridge on the solder tabs on the motor.
![]()
Improper wiring may damage the ESC and void the warranty. - Connect the sensor cable between the ESC sensor plug and the Motor sensor plug.
- Connect the receiver plug to the CH2/throttle pin of the receiver.
- Secure the on/off switch in a place where it will not be accidentally knocked to the "off" position during a crash.
- The Fan port voltage is drawn directly from the battery.
- The Motor configuration A-B-C can be changed to C-B-A in the Initial Setup section of the Program Card. Ensure that your physical wiring configuration of A-B-C match the Initial Setup options of the Program Card.
![]()
Improper configuration may damage the ESC.

Radio & ESC set-up
Transmitter Settings
| Throttle Travel | Maximum / 100% |
| Brake Travel | Maximum / 100% |
| Throttle Exponential | Start with 0% |
| Throttle Neutral Trim | Center / 0 |
| Throttle Servo Reverse | Reverse (Futaba, KO, Sanwa) |
Initial set-up of the throttle end-points of the ESC
- Connect the power wires of the ESC to a fully charged battery set; making sure the polarity is correct.
- Bind your receiver and transmitter first if your radio requires you to do so.
- Turn on the transmitter and hold the throttle at full brake position.
- Turn on ESC and listen for 2 beeps.
- After you hear the 2 beeps, apply full throttle and listen for another 2 beeps.
- Once you hear the 2 beeps, release the throttle to neutral position.
- A beep will then sound, signifying that the ESC endpoints have been successfully set.
Note!
If you do not hear the beeping sound as described above, try reversing the throttle reverse setting in the transmitter.
Customizing the ESC
Due to the different requirements of each style and class of racing, it is important to customize your ESC for each use case. Customization of the ESC is done using the Program Card (Sold Separately):

To begin, connect the battery wires to a charged battery, then connect supplied 4pin wire (200mm) to the ESC setting port (4pin port) and Program Card. Turn on the ESC and the Program Card will activate automatically. Note that the screen will show "Loading..." during initialization – indicating that the ESC is copying the current setup in the ESC to the Program Card. Once loading is completed, the screen will show "ORCA R32 Pro" and "Program". You can now begin programming your ESC.
Press "Enter" to access Program Mode or Data Reading.
There are 4 Modes available: Blinky, Modified, Open Stock Brushless and Offroad profiles are pre-loaded within the firm-ware.
TIPS!
Whenever in doubt, double check your ESC setting by initializing the Program Card again and checking each menu setting.
Navigation around the Program Menu is done using the 4 buttons on the right hand side of the Program Card. The function of each button varies depending on which screen the display is showing:
| "Select" button | go to next select |
| Press and Hold "Select" button two second | go to back page |
"  " button " button |
|
"  " button " button |
|
| "Enter" button |
|
NOTE!
The Program Card is not included and is sold separately. The Program Card will compare the Parameters within the card and ESC before sending. If changes are detected, you will hear a series of beeps and the Program Card will display:

TIPS!
Do not worry about making mistakes. You will not damage the ESC during setting. If in doubt, you can always reload the default set up and start over again.
Operation
Getting started
Turn on the on/off switch, the screen will display:

Use "  " button and "
  " button to find [Program], [Update] or [Data Record].
Press "  " button to choose. Each mode presented are independent from each other and will require setup.
Press "SELECT" button for 2 seconds to go back to the previous screen.

Program

Use "SELECT" button to find [BLINKY MODE], [MODIFY MODE], [OPEN STOCK MODE] or [OFF ROAD MODE].
Use " " button and " " button to find [1:Quick Setup], [2:Advance Setup], [3:Initial Setup] or [4:Load & Save].
Press " " button to choose mode.
Update
Updating of ESC Firmware
Scroll to the "Update" menu and press "Enter". This will show the current ESC FW Version. Press "Enter" again to access the SD cards Firmware folder. Select the FW Version that you would like to use to update the ESC. Press "Enter" again and the update will commence (It will take around 1 minute to complete the update).
Updating of Program Card Firmware

Depress and hold the Program card's "Enter" button while turning on the ESC. It will display the current Program card FW Version. Press "Enter" again to access the SD cards Firmware folder. Select the FW Version that you would like to use to update the Program Card. Press "Enter" again and the update will commence (It will take around 1 minute to complete the update).
Preparing the SD card for use
Format a microSD card using FAT32 file structure using a personal computer. If you are using a Micro SD Card larger than 32GB, you will need to use a 3rd party SW Package to do this. Create a new folder called "Firmware". Download the latest firmware from www.orcarc.com/firmware/ and copy the file to the "Firmware" folder on the Micro SD card. Once completed, install the MicroSD card into the microSD card slot of the Program Card. Both the Program Card and ESC FW Files need to be copied in to the "Firmware" Folder. A maximum of 10 of each ESC/ Program card firmware can be present in the folder at any one time.
Operating Tips
Multi Protection System – In addition to the Low Voltage and Overheat Protection that were described above, the ESC is protected in 2 more ways.
Motor Lock Protection
- The ESC is protected against damage when the motor is stuck and does not turn at all. Power will not be applied in this situation.
![]()
Since the ESC relies on the feed back of the 3 motor wires to deploy this protection, it ONLY works if the motor does not turn AT ALL. If the rotor has any rotation, the ESC will consider the motor to be operational and the power to the motor will not be cut off.
Fail Signal Protection
- In case the radio signal to the ESC is interrupted for over 1 second during a run, the ESC will cut off until the signal resumes.
ROAR Stock Spec Racing
ROAR has announced the new class of Stock Spec Racing using a zero degree timing ESC with Spec Motors known commonly as 'Blinky' classes. The R32 ESC satisfies the ROAR requirement showing a blinking LED when set at 0 timing and 0 turbo timing.
Blinky Mode

Modified Mode

Open Stock Mode

Off Road Mode

Misc. Tips:
- Connect the ESC to the battery pack only when you are ready to run. This will avoid draining the battery pack. Always disconnect the battery after your run.
- A small spark may occur when the battery is initially connected to the ESC. This is normal and is due to the charging of the capacitors.
Detailed Explanation of each ESC Menu items
Quick Setup
- Punch – Allows you to change the punch of the ESC (Level 1 to Level 15):
- Level 1 has the least punch and Level 15 has the highest punch. •
- djust punch level to maximize acceleration speed with minimum wheel spin.
- Pulse Width Modulation (PWM) (This function can be found in the "Advance setup" except Blinky mode) – Allows you to change the forward drive frequency of the ESC (2K to 32K step by 500HZ)
- The 2K setup will give you good punch at the low end.
- The 32K setup will result in strong mid to top end.
- Experiment to find out what suits your driving style best.
(Lower PWM will lower ESC temperatures while higher PWM settings may increase ESC temperatures and Higher PWM will course ESC more heat.) Ensure that your physical wiring configuration of A-B-C match Initial Setup options of the Program Card.
- Drag Brake – Also known as trail braking - allows you to set the automatic brake force applied when the throttle returns to neutral position (30 steps from 0% to 30%):
- Drag Brake affects how a car handles off-throttle (entering a corner). With drag brake on, there will be more weight shift to the front tires thus increasing the front end grip when you let go the throttle.
- Experiment with different settings to find the setting that fits your driving style.
- Compress (found in "Advance Setup" menu, Except for Blinky mode where it can be found in "Quick Setup") - This is for throttle curve, the higher the number, the more responsive the throttle feels at bottom end. 0% is linear throttle response. That's mean throttle compress, than will course you more sensitive in the throttle bottom.
- Timing (Except "Blinky Mode") – Allows you to adjust the timing of the motor (0º-100º Mode 1º increments):
- Generally speaking, in brushless systems, an increase in timing will result in an increase in the RPM of the motor. However, increase in timing can also decrease the efficiency of the system, thus generating heat on the ESC and motor.
- Lower timing has the most torque and the lowest RPM; Higher timing has the least torque and the highest RPM.
- Turbo Timing (Except "Blinky Mode") – Turbo Timing is unique to brushless systems because the ESC can simulate motor timing advance. While mechanical timing advance in a brushed motor system is limited by the physical phasing of the motor, brushless ESC timing advance can push beyond that physical limit. As a result, motors can run at a super-high RPM in the Turbo Timing mode, resulting in a sensation of having a 2nd gear/Turbo for top speed. This menu allows you to adjust the amount of Turbo Timing in your ESC in 1º increments. (The "Turbo Timing" should never be greater in value than Timing)
- Turbo down rank (Except "Blinky Mode") – This is an opposite side Turbo timing for braking, preset -15, if you set the value to -30, this will smooth the throttle response as you slow from top speed, if you value set to -1, this will have more drag brake effect when you release throttle from top speed.
Advance Setup
- Punch fine tune – Allows you fine tune your Punch setting more detail, if you set (+1) your punch will up to 7.1 when the punch setup is 7, if you set (-1) your punch will down to 6.9 when you setup is 7.
- Timing start – Allows you to adjust early or later to add timing in bottom power, this will make it easy to get a smooth power band in bottom power.
- Timing range – Allows you to adjust a smooth power band in middle power.
- Turbo delay – Delay how long to start your turbo timing when you touch the throttle turbo point.
- Turbo timing – Turbo Timing is unique to brushless systems because the ESC can simulate motor timing advance. While mechanical timing advance in brushed motor system is limited by the physical phasing of the motor, brushless ESC timing advance can push beyond that physical limit. As a result, motors can run at a super-high RPM with the assitance of Turbo Timing, resulting in the sensation of having a 2nd gear/Turbo for top speed. This menu allows you to adjust the amount of Turbo Timing in your ESC in 1º increments. (The Turbo Timing value shall never be bigger than the Timing value.)
- Turbo Timing is applied at 95%(preset) throttle.
- Higher Turbo Timing settings will increase top speed, motor and ESC temperatures as well.

Always monitor motor and ESC temperatures closely when applying timing to the ESC or motor. Heat may build up very fast in both ESC and motor and may cause permanent damage to equipment.

Documents / Resources
References
Download manual
Here you can download full pdf version of manual, it may contain additional safety instructions, warranty information, FCC rules, etc.
Advertisement


Need help?
Do you have a question about the R32 and is the answer not in the manual?
Questions and answers